Objective
To route incoming messages to different destinations based on the content of messages.
Prerequisites
- Start Fiorano Enterprise Server (FES) and Fiorano Peer Server (FPS).
- Log on to the eStudio application.
- Understand the basic menus and perspectives (panels) in the eStudio application.
Scenario
Send data using the Feeder and filter the books where the publisher is 'Methi' by using CBR. When the publisher value matches 'Methi', the data is sent to display1, or else it is sent to display2.
Components Used
- One CBR component.
- One Feeder component to send the books data.
- Two Display components - one for showing the filtered data and the other for showing the raw data sent.
How CBR works
The CBR component creates a port for the XPath expression specified and the messages satisfying the particular XPath are sent to their respective ports. In addition to these ports, an output port 'OUT_FALSE' is created and messages whose content does not satisfy any of the XPath expressions are sent to this port. If more than one XPath condition is true, the message is sent on all the ports for which the XPath condition evaluates to true.
Setting up the Example Application
Configuring the CBR component
To configure CBR, perform the following actions in eStudio:
- Add a new Event Process with the name 'CBR_Example'.
- Drag the CBR component present under the Flow category in the Micro Service Palette to the Fiorano Orchestration Editor.
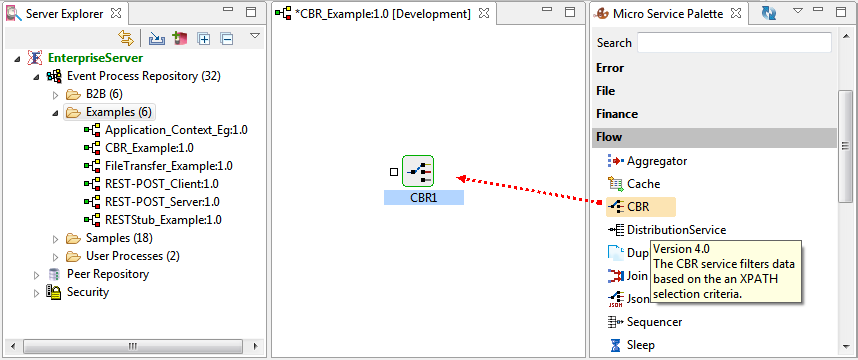
Figure 1: Adding CBR component to Fiorano Orchestrator
Double-click the CBR component to open the Configuration Property Sheet (CPS) and use a valid Schema in the Schema editor.
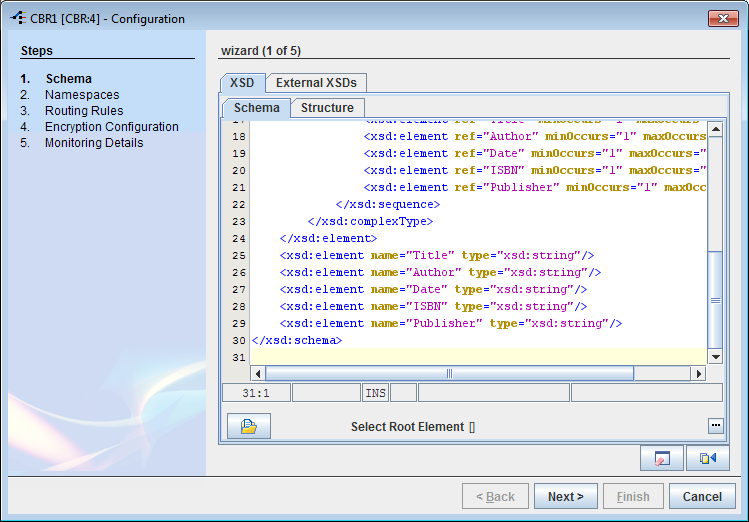
Figure 2: Adding Schema to CBR component
- Click the Ellipsis
 button present in the bottom-right part. In the Root Element dialog box, select 'BookStore' and click OK. The root element will appear within Select Root Element brackets present next to the Ellipsis button.
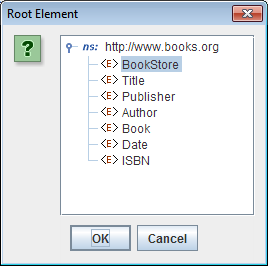
Figure 3: Selecting Root element
- Click Next twice (as Schema section lists all the namespace prefixes used by XML schema, do not make any changes to the Namespaces section).
- In the Routing Rules section, click the cell under XPath and click the Ellipsis
 button next to it.
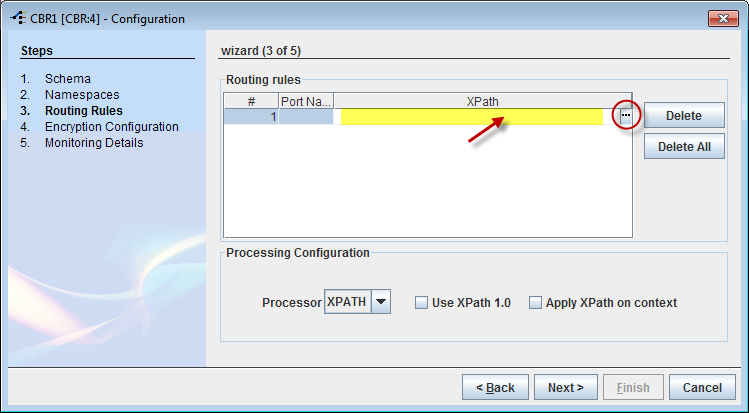
Figure 4: Configuring XPath
- In the Set XPath window, perform the following actions to specify Xpath for the purpose of filtering data of books where the publisher is 'Methi':
- Drag the Publisher element present under the Document tab in the left pane to the editor on the right side.
- Right-click inside the editor, point to AddConstant and click the StringValue option
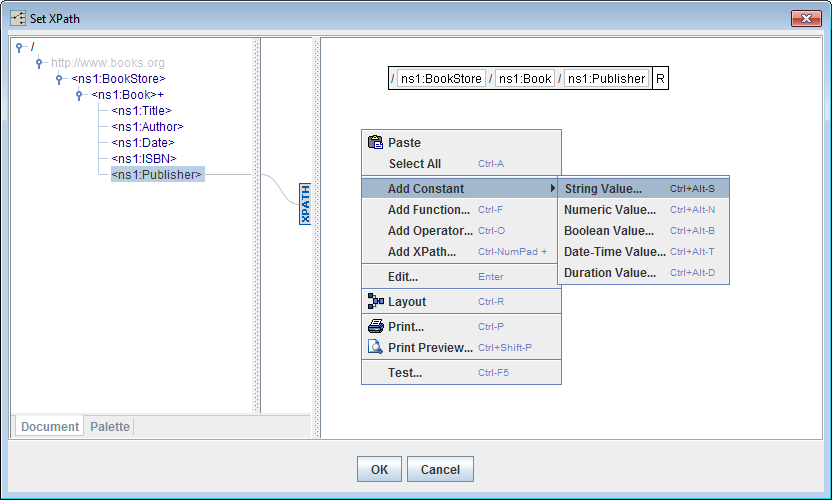
Figure 5: Adding the String Value
- In the Customize String Literal dialog box, type the text 'Methi' and click OK.
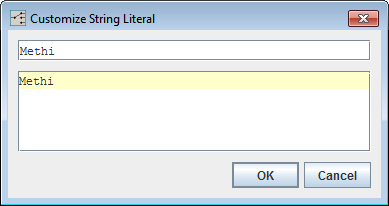
Figure 6: Providing the name of the publisher
- Click the Palette tab in the left pane, double-click the StringFunctions and drag the compare function to the editor.
Connect the Publisher element (drag from R output node) to the first element in Compare function and similarly connect the Methi element to the second element in Compare function.
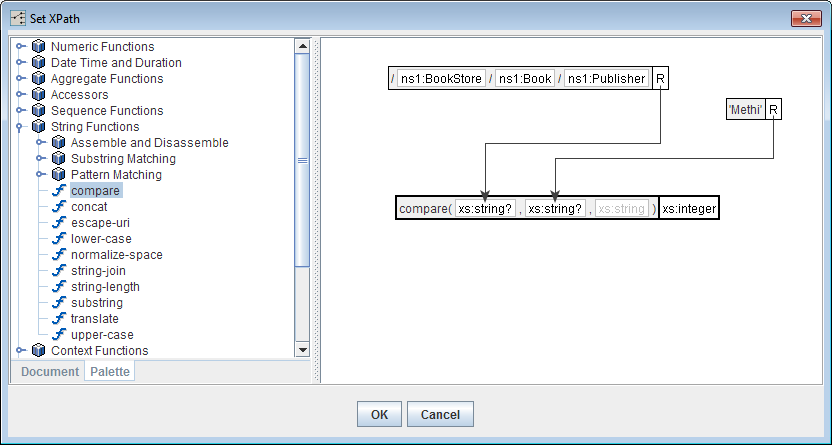
Figure 7: Providing input values to the String Compare function
- Drag the equals(=) function from the Operators category.
- Right-click inside the editor, go to Add Constant and click the Numeric Value. In Customize Numeric Value, type '0' (zero) to add the '0' element. Click OK.
- Connect compare function's output to the first argument of the Equals (=) operator and constant '0' to the second argument of the Equals operator, and click OK.
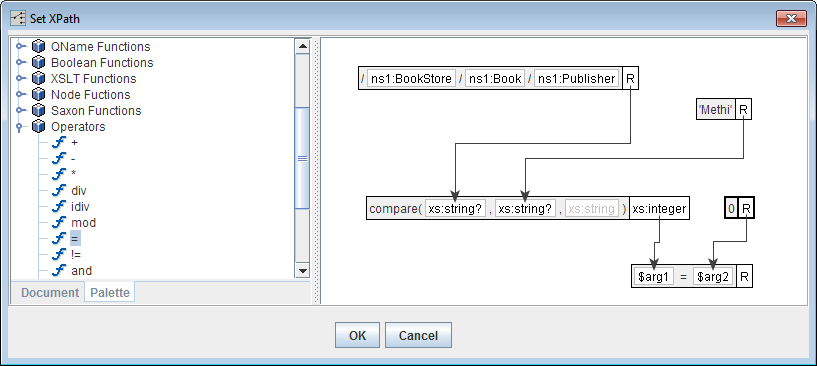
Figure 8: Checking the publisher name to match with 'Methi'
- The first row of the Routing rules will be populated with the configured data. Click Next twice and then click Finish. Two output ports appear in the CBR component present in the Fiorano Orchestrator:
- OUT_XPATH: To send messages that satisfy the specified XPath.
- OUT_FALSE: To send messages whose content does not satisfy the XPath expressions specified.
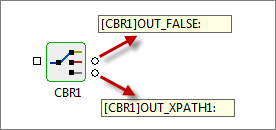
Figure 9: Output ports generated after CBR configuration
Composing the Event Process
To work with the 'CBR_Example', compose the event process by performing the following actions.
- Drag one Feeder component present under the Util category in the Service Palette to the Fiorano Orchestrator and connect the output port of Feeder1 to the CBR input port.
- Configure Feeder component by performing the following actions:
- Click Connected Port Schemas, select IN_PORT in the Connected ports dialog box and click OK, and then click Next.
- In the Message Details Configuration dialog box, click Generate Sample, change the max value under No. of Repeatable elements to be generated to '1' and click OK.
- Click Validate, click OK on the Validation Successful dialog box and click Finish.
- Drag two Display components present under the Util category and connect the ports as mentioned below:
- Output port 'OUT_FALSE' of the CBR component to input port of Display1
- Output port 'OUT_XPATH' of the CBR component to input port of Display2. Rename (press F2) this Display to "FilteredDisplay" to identify filtered messages.
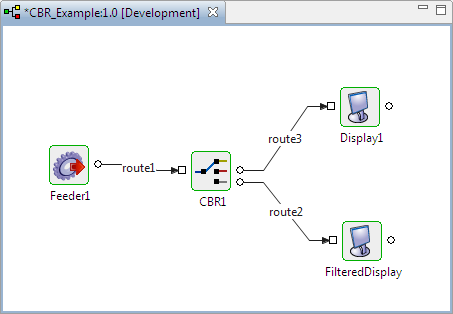
Figure 10: CBR component with the Display components and the Feeder connected
Running the Event Process
To run the 'CBR_Example' event process, perform the following actions:
- Click the Check Resource and Connectivity
 icon (or press ALT+SHIFT+C) to check the resource and its connectivity.
 - Click the Run Event Process
 icon (ALT+SHIFT+R) to run the event process. Two Display windows and one Feeder window are displayed.
 - Open the Feeder window and click Send without making any changes.
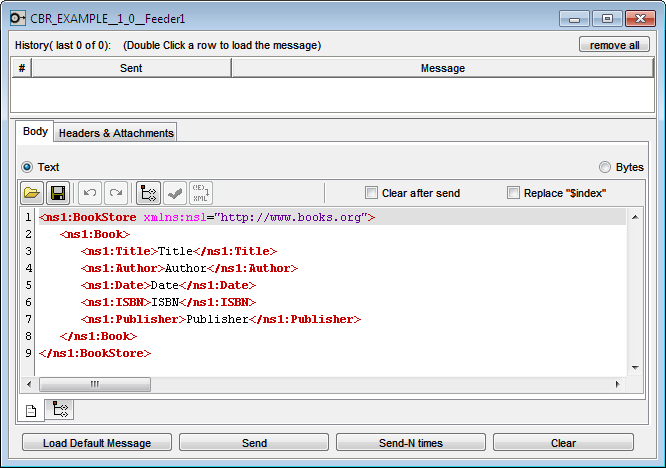
Figure 11: Sending the message without changing the data
- The message unfiltered message gets displayed in Display1 window.
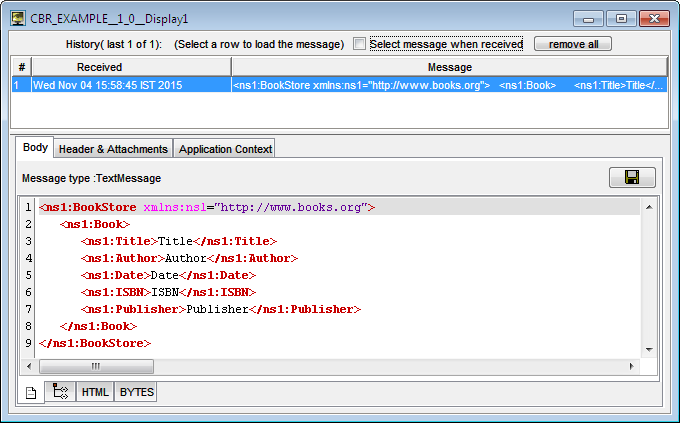
Figure 12: Message displayed in Display1 when data does not match the filter condition
- Open the Feeder window, replace the text "Publisher" with an existing publisher name—"Methi" and click Send.

Figure 13: Sending a Message with the keyword (publisher name) to filter
- The filtered message gets displayed in the FilteredDisplay window.
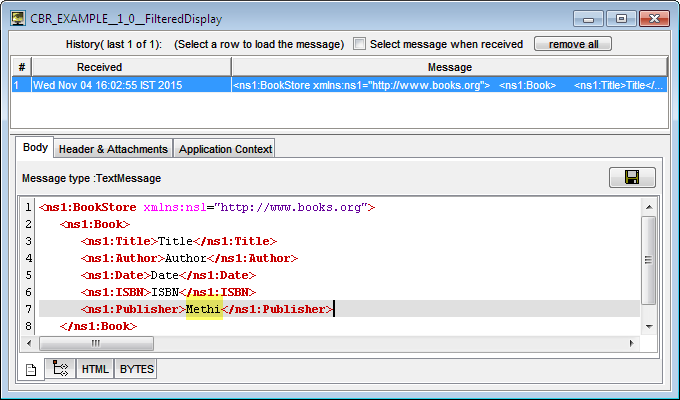
Figure 14: Message displayed in the FilteredDisplay window when data matches the filter condition
Reference
- Download CBR_Example event process and import it to the Event Process Repository in the Server Explorer in eStudio to understand the configuration used in this example and to execute the working sample.
- Please note that the options used in this example are minimum, which assists in getting familiar with the application. To explore other options present in the CBR, Feeder and Display, refer sections: CBR, Feeder and Display respectively.