Objective
To demonstrate the ability of a Fiorano REST application to interact with an end user by exposing a secured REST service which accepts HTTP POST requests at a URL and responds with a count of new records inserted into a database successfully.
Prerequisites
- Start the Fiorano Enterprise Server (FES) and the Fiorano Peer Server (FPS)
- Login to the eStudio application
- Get familiar with the basic menus and perspectives (panels) in eStudio application
- Add DB jars (ojdbc.jar) to the System Library by following the steps mentioned in Adding Resources to a Microservice. This is for the DB component to work seamlessly.
Scenario
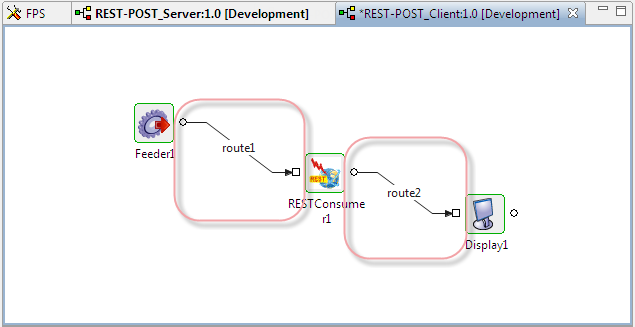
- Configure the RESTStub component to receive HTTP POST requests from RESTConsumer and process it as query configured in a DB component. Bind the DB schema to the RESTStub and transform the routes between the RESTStub and the DB.
- Configure the RESTConsumer component to send HTTP POST requests triggered using a Feeder component which adapts to the RESTConsumer schema.
- Use security settings (Basic HTTP Authentication / SSL security) for Peer Server Jetty profile, RESTStub and RESTConsumer in sequence.
How it Works
The REST service gets deployed in the jetty server running inside the peer server and when a rest client sends a request to the service, the request is available on the output port. The response can be routed back by connecting a route to the input port.
Components used
Setting up the Example
Configuring Peer Server Profile for Security
Stub component runs in the FPS server. As SSL support and HTTP Authentication are provided for the Jetty, configure corresponding parameters (SSL configuration or Basic Authentication as per requirement) for the Jetty in the FPS server profile.
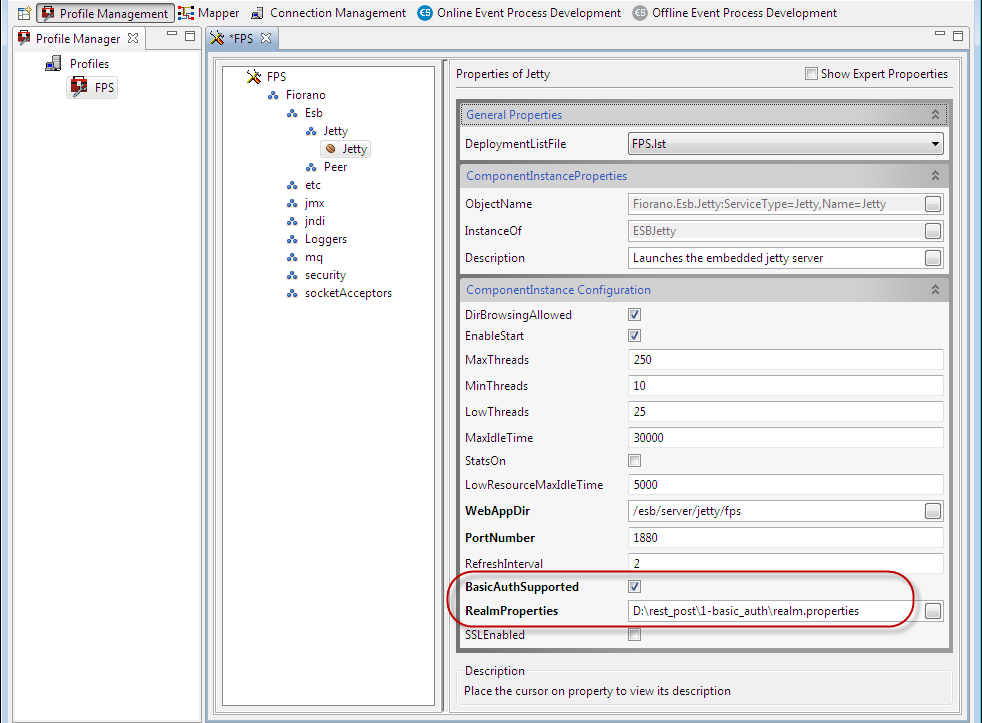
For Basic Authentication settings as well as SSL security settings, changes are done in Properties of Jetty in the FPS Profile. To navigate to this panel,
Open Profile Manager in eStudio and load the respective FPS profile
Navigate to Fiorano > Esb > Jetty > Jetty
In the Properties of Jetty section on the right side, under the ComponentInstanceConfiguration section, enable the BasicAuthSupported property or the SSLEnabled option. Sections below explain both of these configurations.
Basic Authentication
To configure the Jetty properties for Basic Authentication in the FPS server, enable the BasicAuthSupported property and provide the location where RealmProperties file is saved.
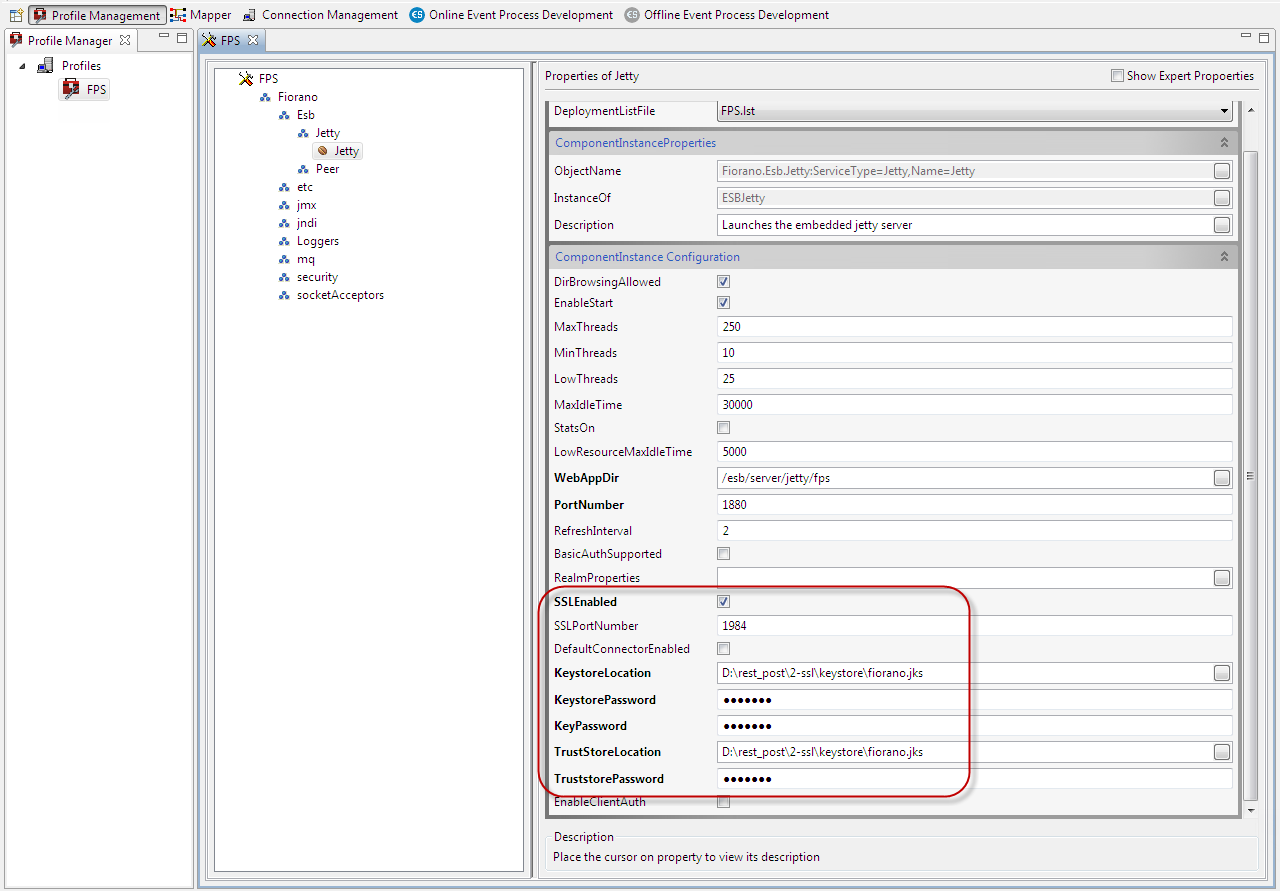
SSL Configuration
To configure the Jetty properties for the SSL Security in the FPS server, refer the Managing Jetty Security section to enable the SSLEnabled property and provide Keystore and Trustore values.
Configuring Server Event Process
Create an Event Process with the name 'REST-POST_Server' to configure a server application with a DB component to raise a query.
Configuring DB component
Use the DB component to store data and return the result for the Insert Query statement.
To configure the DB component, perform the actions below in the REST-POST_Server event process:
- Under the DB category in the Microservice Palette, drag the DB component to the Fiorano Orchestrator.

Double-click the component to open the Configuration Property Sheet (CPS).
In the Managed Connection Factory panel, click Database Configuration ellipsis button to configure the DB Connection. Provide the credentials for the DB from which the table needs to be accessed.
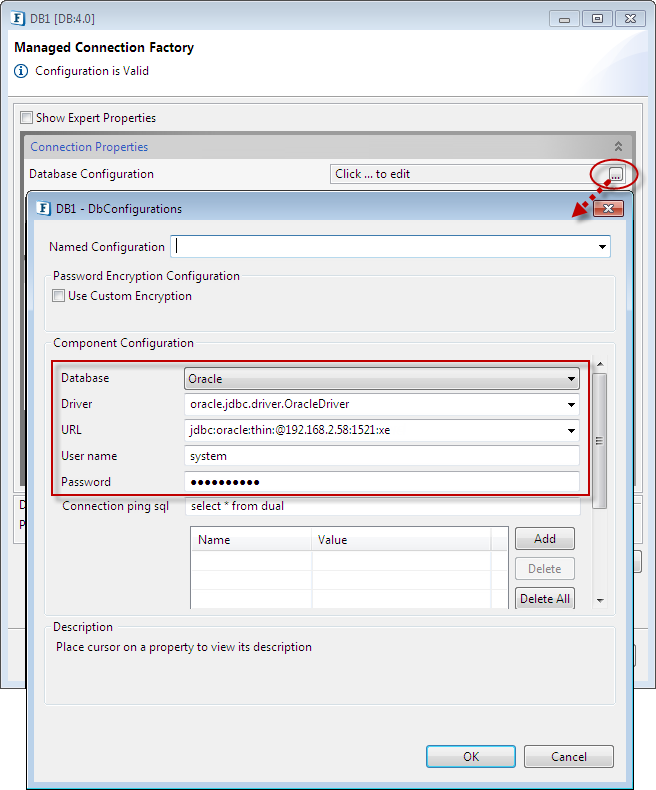
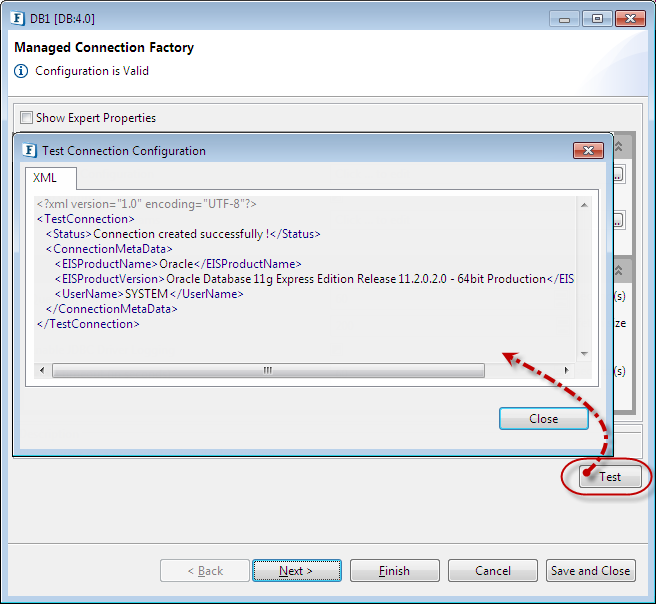
Click OK and click the Test button present in the Managed Connection Factory panel to confirm a successful connection with the message "Connection created successfully". Click Next to move to the Interaction Configurations panel.
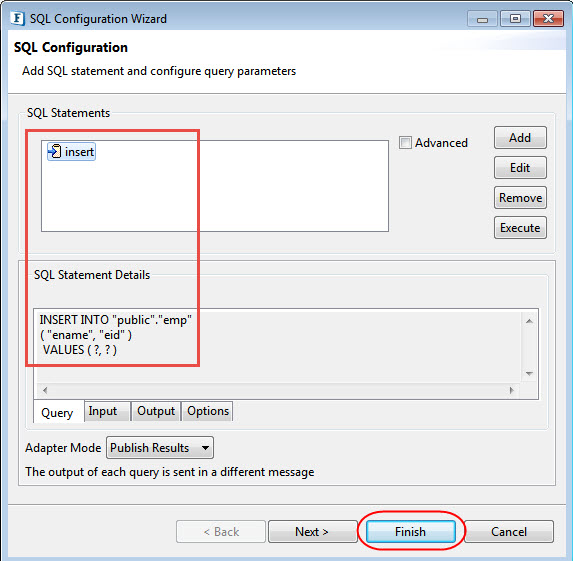
In the Interaction Configurations panel, click SQL Configuration ellipsis button to configure Insert SQL statement with the Query Name: insert.
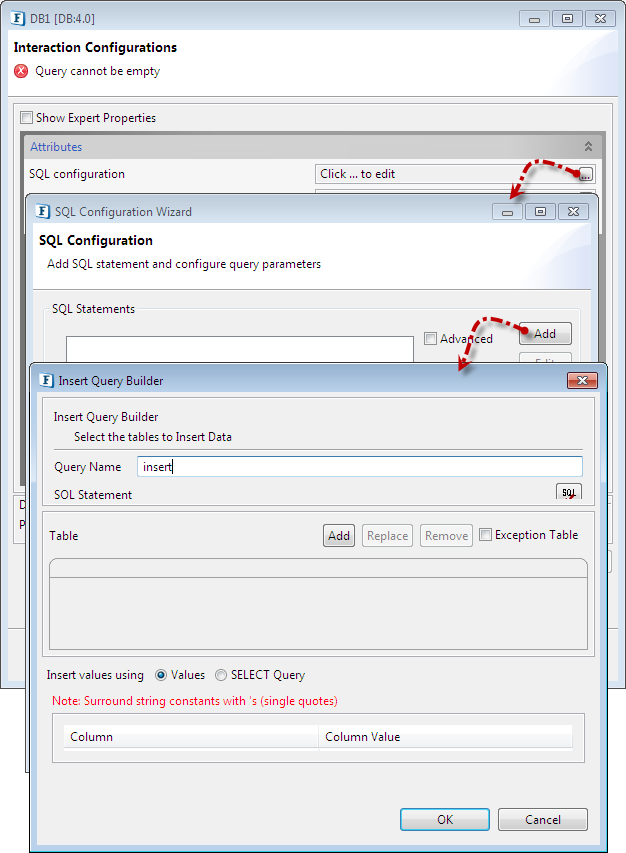
Click Finish to complete SQL Configuration.
- Click Finish in the Interaction Configurations panel to complete the DB Configuration.
Configuring RESTStub component
The RESTStub component exposes Restful services in the Fiorano environment. To configure the RESTstub component, perform the actions below in the eStudio application:
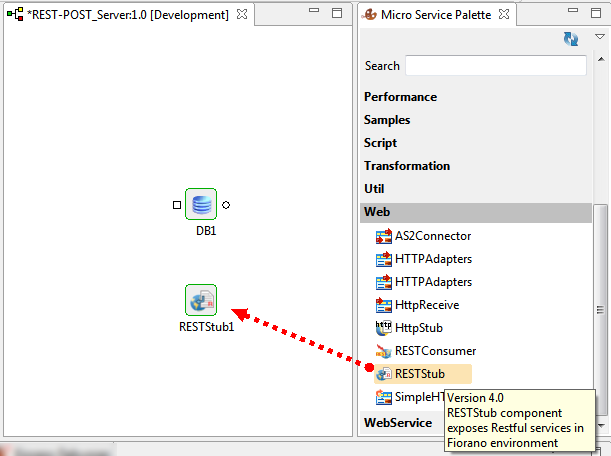
- In the REST-POST_Server event process, drag the RESTStub component from the Web category in the Microservice palette to the Fiorano Orchestrator.
Double-click the component to open the Configuration Property Sheet (CPS).
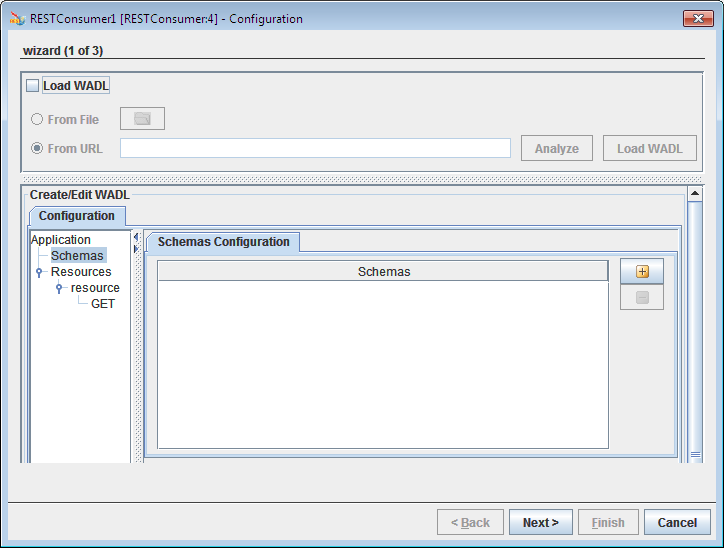
- The first screen in the CPS, wizard (1 of 3), is used to define the service using a user interface for WADL. WADL can be created manually by defining different aspects of the service or can load an existing WADL and edit the configurations.
Provide Service Name as 'Sample' with which the event process functionality is exposed as RESTful service. - Under the Create/Edit WADL section, perform the actions below:
Bind the DB input port and output port schemas to the RESTStub
Click Schemas under the Configuration tab.
In the Schemas Configuration section, click the Add
 button and click Load from Port Schemas option
In the Select Port dialog box that is displayed, select 'IN_PORT'.
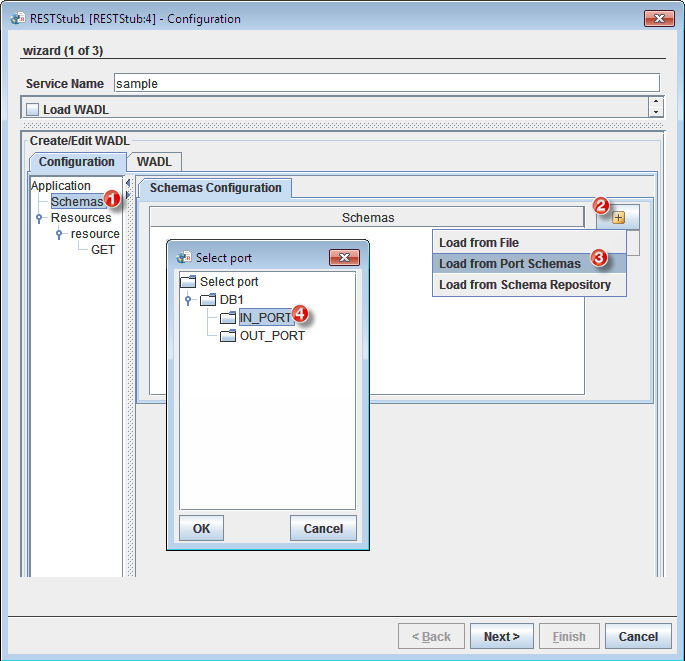
Similarly, select the OUT_PORT too and click OK. Both schemas get added under the Schemas section.
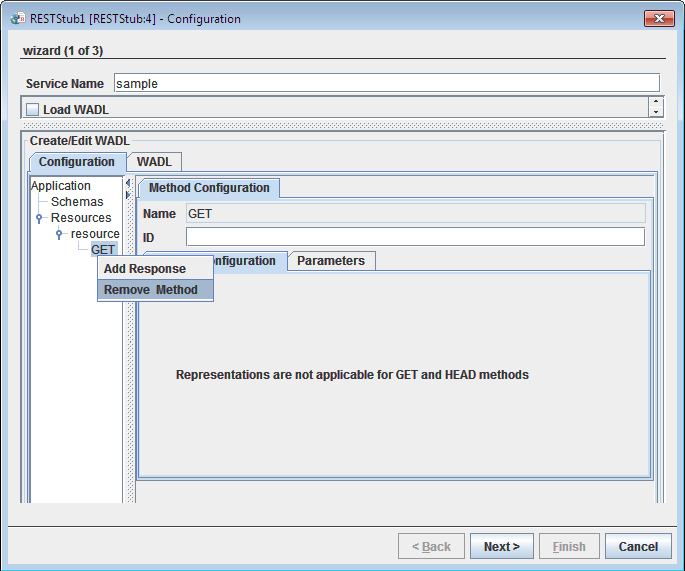
Add POST method
Right-click the GET node and select the Remove Method option to remove the default method.
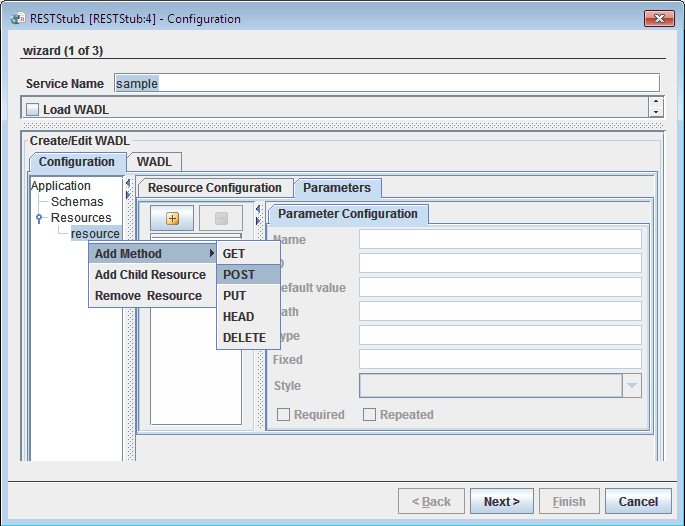
- Right-click resource under the Resources node, go to Add Method and select POST option to add the Post method.
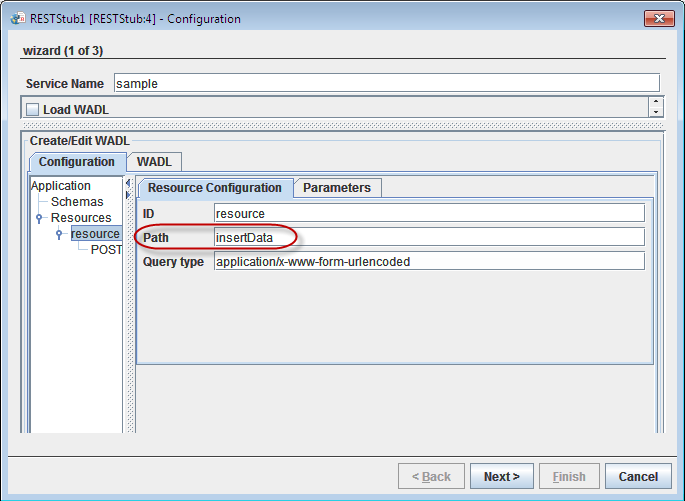
Rename resource path to give a logical meaning to the scenario
Click the resource node.
Under the Resource Configuration tab, replace the default value of Path 'resourcePath' with 'insertData'.
Add the request SQL element to the Post node
Click the POST node.
Click the Add
 button under the Request Configuration tab.
Click the ellipsis
 button under the Representation tab.
In the Select Element window displayed, select "SQL_CFG_1" under Request element and click OK.

Add the response SQL element to Post node
Right-click the POST node and click the Add Response option. The Response node is displayed.
- Click the Response node
Click the Add
button under the Response Configuration tab.Click the ellipsis
button under the Representation tab.In the Select Element window, select "SQL_CFG_1" under the Response element and click OK.

Security Configuration in RESTStub
Click Next to navigate to the second screen: wizard(2 of 3). SSL Configuration, HTTP Authentication Configuration and Additional Configuration can be performed in this screen.
In this example, SSL Configuration and Basic Authentication under HTTP Authentication is performed sequencially.
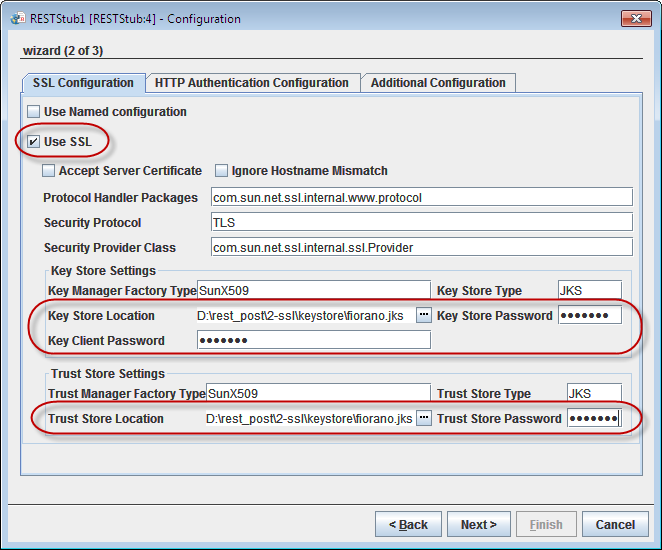
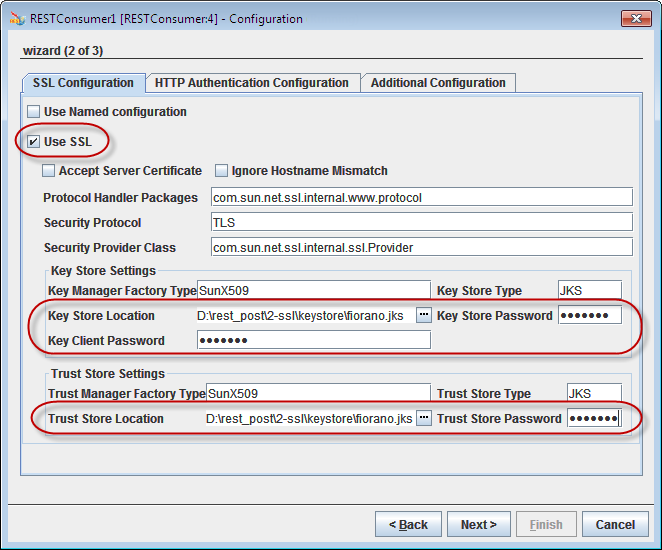
SSL Configuration
In SSL Configuration section, enable SSL by selecting the Use SSL option and provide the details in the sections below.
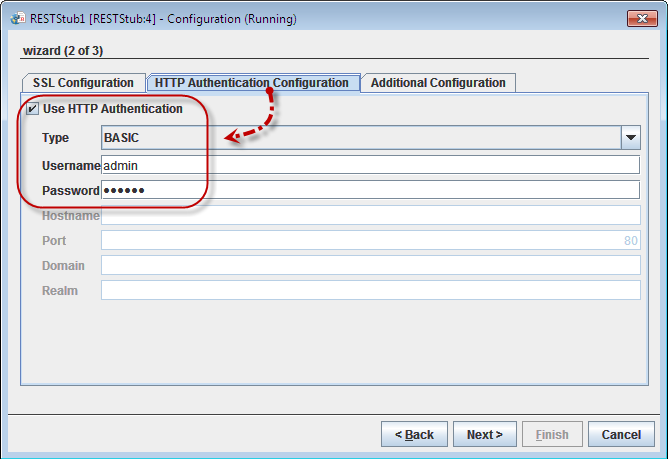
Basic Authentication Configuration
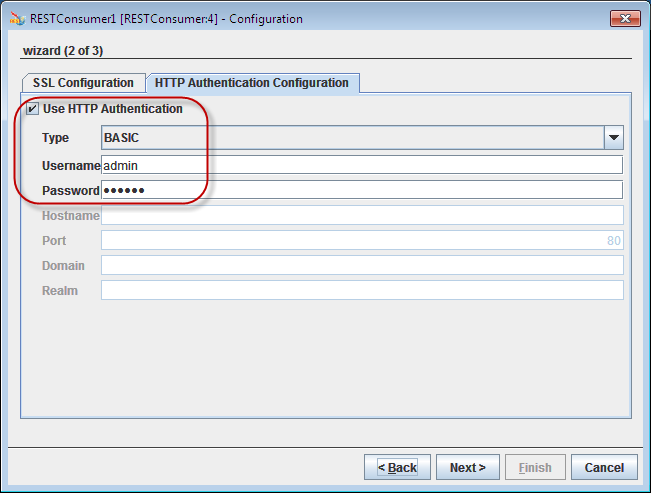
In HTTP Authentication Configuration, enable HTTP authentication by selecting the Use HTTP Authentication option. Provide the credentials below:
- Type: Basic
- Username and Password: as provided in FPS Jetty profile.
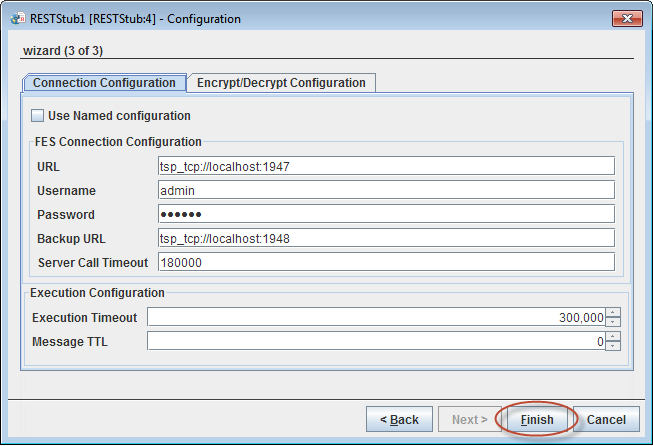
Click Next and then Finish in the third screen, wizard (3 of 3) , to close the CPS and to save the configuration. The input and output ports gets generated.
Configuring Transformation
Connecting Ports Creating Routes
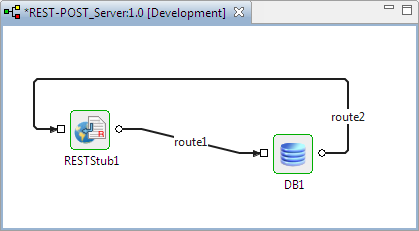
Connect the ports of the RESTStub and DB components in the following manner:
- Output Port of RESTStub component to the Input Port of DB component.
- Output Port of DB component to the Input Port of RESTStub component.
Route Transformation
To configure transformation between input and output ports of the RESTStub and the DB, perform the actions below in the Fiorano Orchestrator:
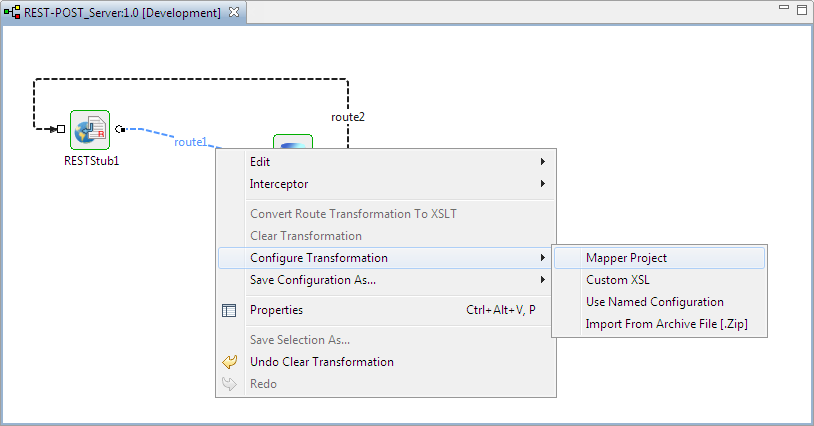
- Right-click route1, point to Configure Transformation and select the Mapper Project option to open the Fiorano Mapper editor.
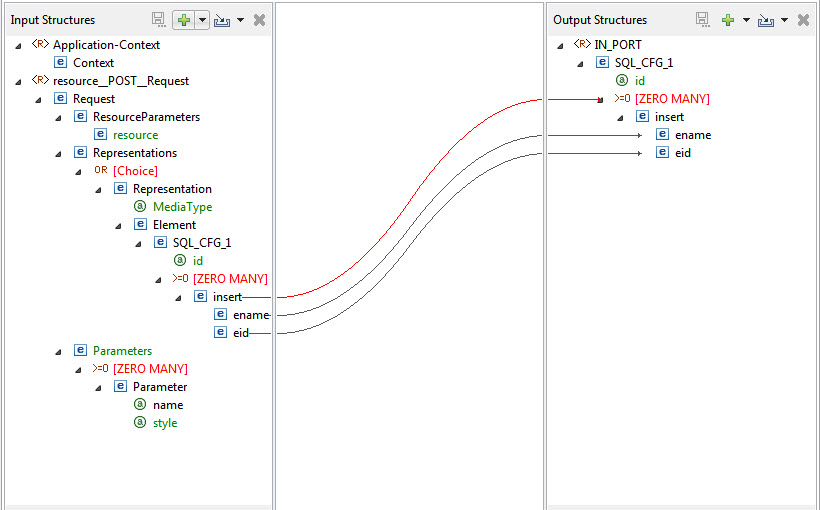
- In the Mapper Project, connect values with the same names present in both panels: Input Structures and Output Structures:
- Name
- ID
- Click the Save
 icon (or File > Save) to save the transformation configuration and close the Mapper Project editor.
 - Similarly, for route2, go to the Mapper Project window and connect the values:
- UpdateCount
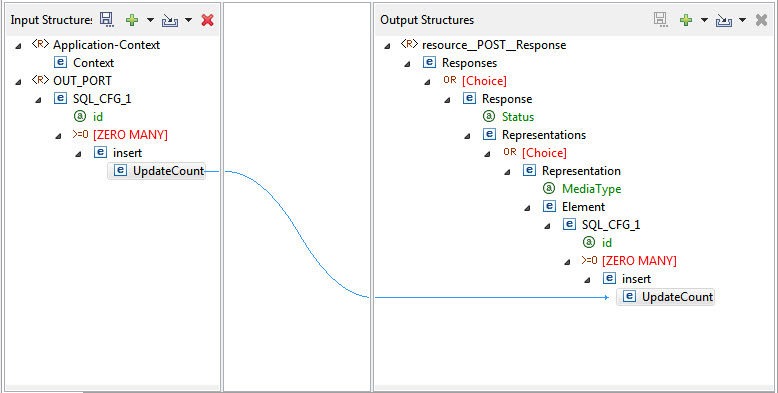
- UpdateCount
Save the mapping configuration as explained above.
Launching the Server Event Process
WADL URL has to be copied from the RESTStub component to use in the RESTConsumer component added in later steps. Perform the actions below in the Fiorano Orchestrator:
Click the Check Resource and Connectivity (CRC)
 icon (or press ALT+SHIFT+C) to check resources and connectivity.
- Click the Run Event Process
 icon (ALT+SHIFT+R) to run the event process.
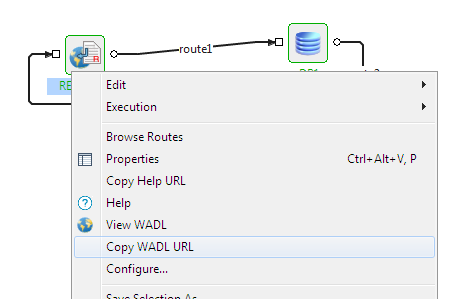
 Right-click the RESTStub component and click the Copy WADL URL option to copy the WADL URL.
Configuring Client Event Process
Create another Event Process with the name REST-POST_Client to configure a client event application with a Feeder and Display.
Configuring RESTConsumer
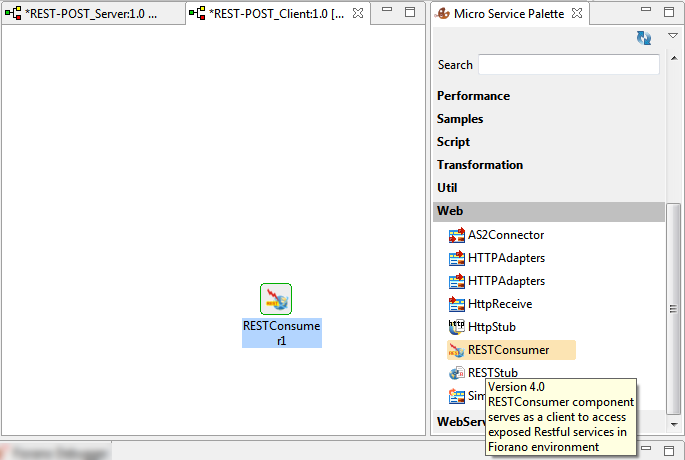
The RESTConsumer component serves as a client to access exposed services within the Fiorano Environment. To configure the RESTConsumer component and communicate with the RESTStub which has an exposed RESTservice, perform the actions below in the REST-POST_Client application:
- Add the RESTConsumer component from Web category in Microservice Palatte to the Fiorano Orchestrator.
- Double-click the component to open the Configuration Property Sheet (CPS).
- Perform the actions below in the wizard (1 of 3) panel:
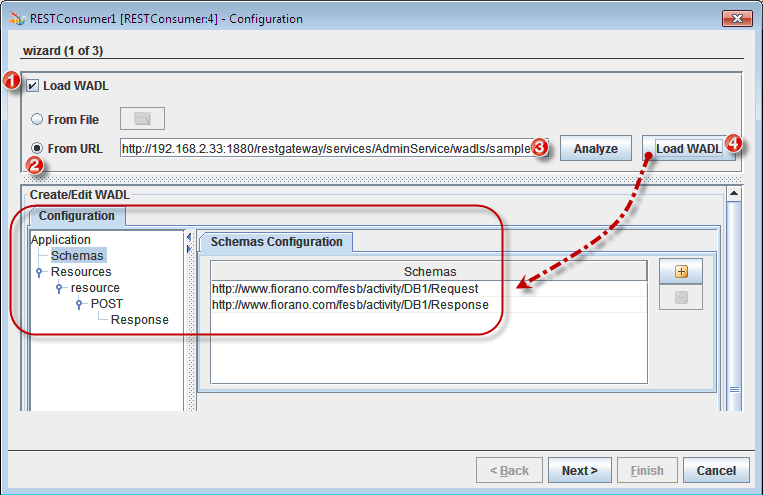
- Enable the Load WADL option. The From URL option gets active/editable.
- Select the From URL option and paste the WADL URL copied from RESTStub onto it.
Click the Load WADL button to apply the RESTStub schemas. The schemas get populated as shown below.
Security Configuration in RESTConsumer
Click Next to navigate to the second screen: wizard(2 of 3). Here, SSL Configuration, HTTP Authentication Configuration, and Additional Configuration can be performed.
In this example, SSL Configuration and Basic Authentication under HTTP Authentication is performed sequentially.
SSL Configuration
In SSL Configuration section, enable SSL by selecting the Use SSL option and provide the values as used in the RESTStub SSL Configuration.
Basic Authentication Configuration
In the HTTP Authentication Configuration, enable HTTP authentication by selecting the Use HTTP Authentication option.
Provide the credentials provided in the RESTStub.
Click Next and then Finish in the next screen, wizard (3 of 3) , to close the CPS and to save the configuration. The input and output ports get generated.
Configuring Feeder
- Add Feeder and Display components from the Util category in the Microservice Palette into the REST-POST_Client orchestrator.
- Connect the ports of the RESTConsumer to the Feeder and Display components in the following manner:
- Output Port of the Feeder component to the Input Port of the RESTConsumer component.
- Output Port of the RESTConsumer component to the Input Port of the Display component.
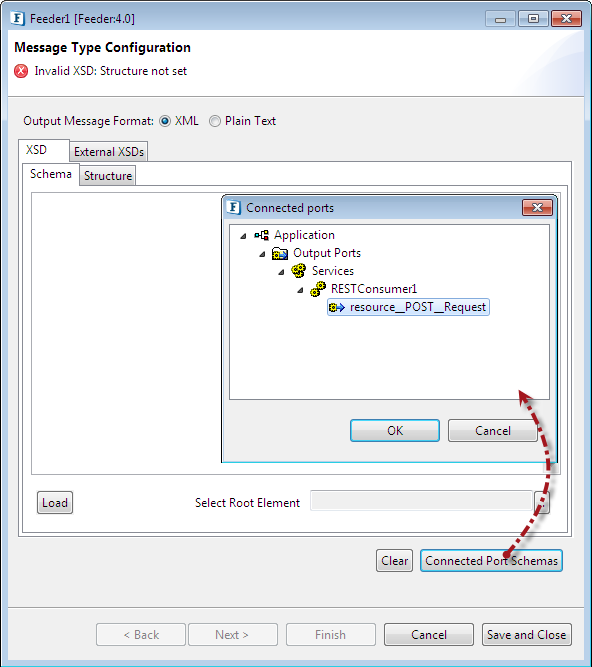
- Double-click the Feeder component and click the Connected Port Schemas button in the Message Type Configuration panel. Select the last child node ('resource_POST_Request' in this example) in the Connected ports window to import the RESTConsumer schema into the feeder and click OK.
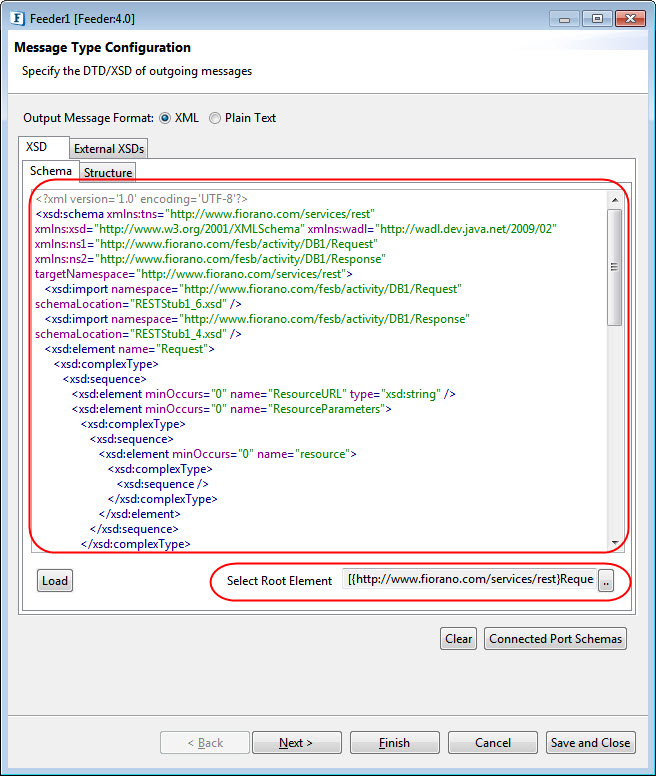
- The Select Root Element text box and the schema editor get populated with the RESTConsumer schema. Click Next.
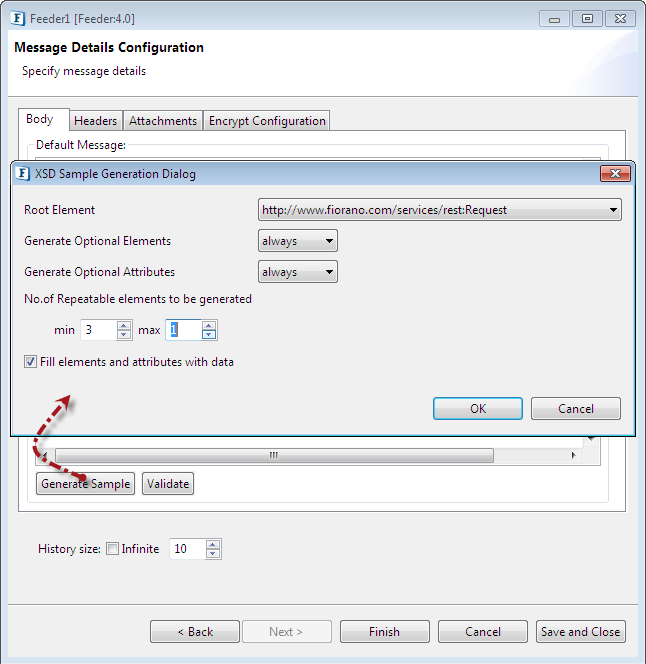
- In the Message Details Configuration panel, click Generate Sample to open the XSD Sample Generation Dialog box. Enter '1' in the max text field under No. of Repeatable elements to be generated to reduce the number of samples generated to just one, and click OK.
- Click the Finish or Save and Close button to complete the Feeder configuration.
Running the Example
To see the REST-POST_Client Event Process running in conjunction with REST-POST_Server Event Process, perform the actions beow in the REST-POST_Client Event Process:
- Click the Check Resource and Connectivity
 icon (or press ALT+SHIFT+C) to check the resource and connectivity.
 - Click the Run Event Process
 icon (ALT+SHIFT+R) to run the event process. The Feeder and Display windows get opened.
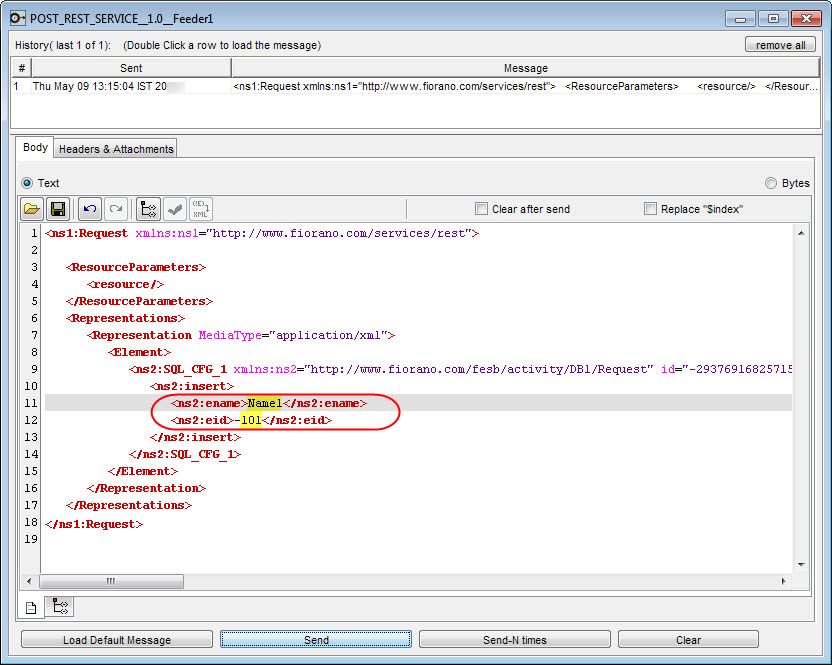
 Provide the required column values (in this example, ename: Name1 and eid: 101) ) in the Feeder window and click Send.
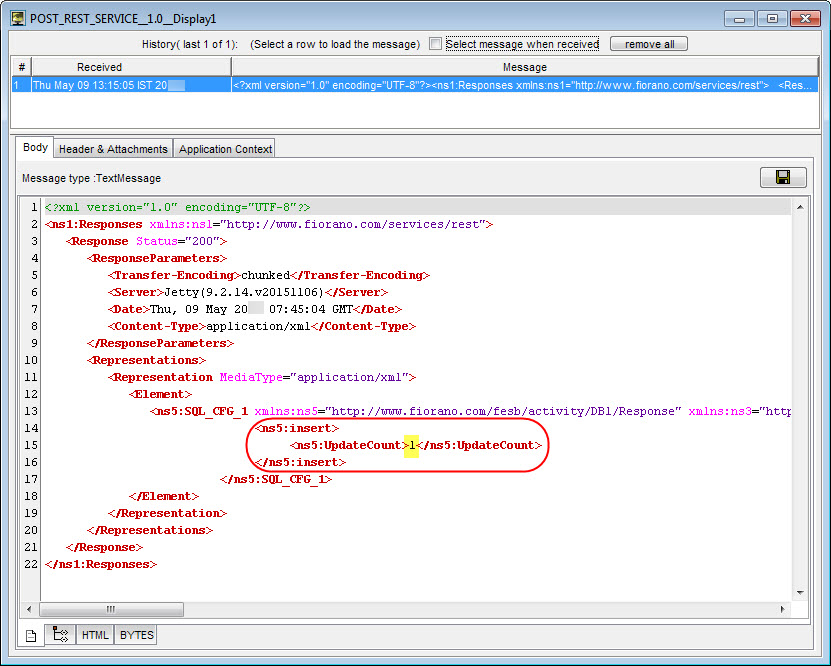
- If the Insert query is successful, 'UpdateCount' is displayed as '1' in the Display window.

Reference
- Download REST POST Client and Server Example event processes and import it to the Event Process Repository in the Server Explorer within eStudio to understand the configuration used in this example and to execute the working sample.
- Please note that the component options used in this example are basic to have an overview of the application. To explore other options present in the RESTStub and the RESTConsumer components, refer to the sections: RESTStub and RESTConsumer.