Event Processes are composite applications created as event-driven assemblies of microservice components. They represent the orchestration of data flow across customized microservice components distributed across the ESB network.
Event Processes in Fiorano are designed to connect disparate applications in a heterogeneously distributed environment. Event Processes allow the logical process design to be mapped directly to physical microservice components distributed across the ESB network.
eStudio
Fiorano eStudio enables intuitive visual configuration of all the elements of an event process including the components of the process, the data flow or routes between components, deployment, profile information, and layout. The event process metadata contains all the required information in XML format, which is stored in the repository.
The Fiorano eStudio enables you to create applications, configure profiles of servers and manage connections.
Creating an Event Process Project
A new Event Process can be developed to meet your customized requirements, which has to be built on an Event Process Project.
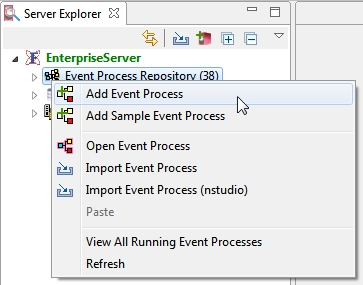
To create a new Event Process Project, log on to eStudio and open Server Explorer panel (Window > Show View > Other > Fiorano > Server Explorer) in the Online Event Process Development view, and perform the following actions:
- Right-click the Event Process Repository, and then click Add Event Process.
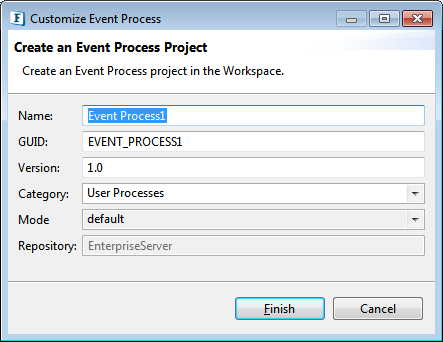
In the Customize Event Process dialog box, provide an appropriate name, choose the category (under which the Event Process falls) from the Category drop-down and click Finish.
Creating a Chat Event Process
A Chat component initiates a chat session on two or more nodes of a Fiorano Network. This event process also demonstrates how messages flow from one microservice to the other in a Fiorano Network.
To create an Chat Event Process application,
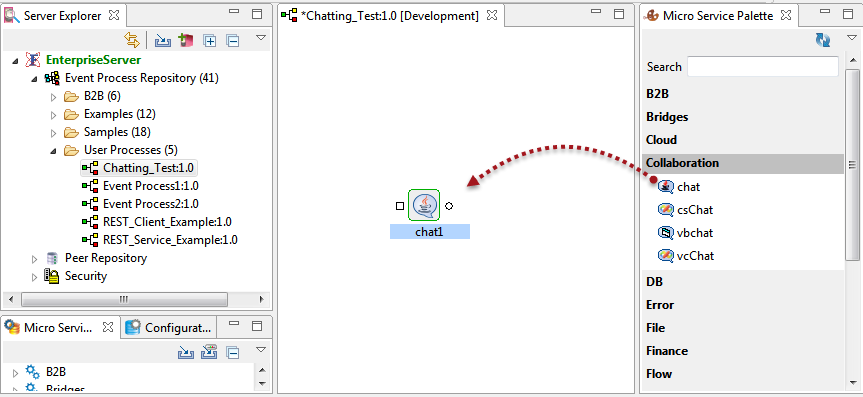
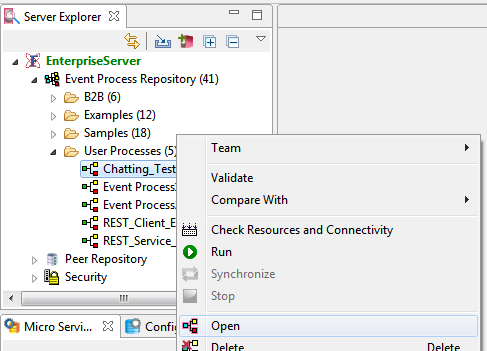
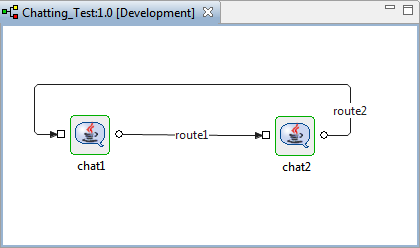
Create an Event Process with a unique name (saved as 'Chatting_Test' in this example) that represents the process.
- Bring the component to the Fiorano Orchestrator following any one of the options below:
Click the category on the Micro Service Palette to display the microservices under the particular category and drag the component to the Fiorano Orchestrator.
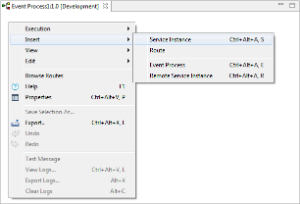
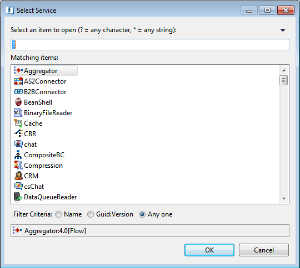
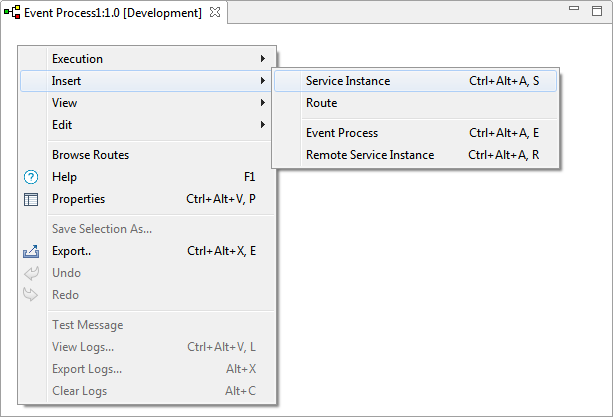
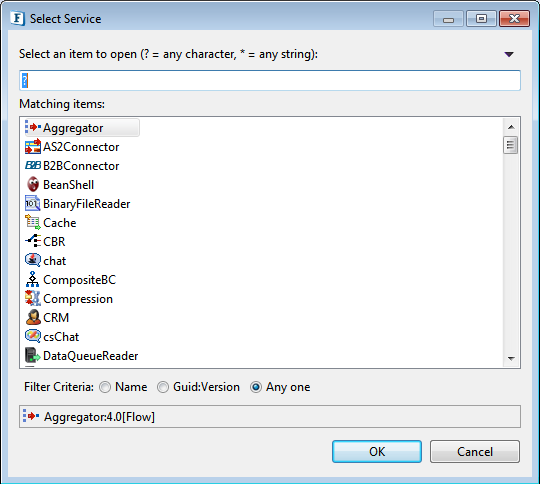
- Right-click on the Fiorano Orchestrator, go to Insert and click Service Instance. Type the name of the service, select the microservice that's displayed and click OK.
- Type the service name in the Micro Service Palette Search option, drag the microservice that is displayed.
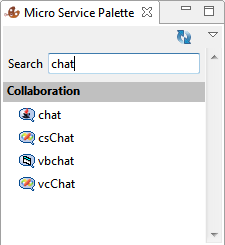
Repeat the above action to bring another chat component.
Connecting Ports to create a Route
After adding the components, they need to be linked by an Event Route so that data flows between the two microservice instances.
To create a route between the two components, perform the following actions:
- Click the output port (OUT_PORT) of chat1 and drag to the input port (IN_PORT) of chat2. This creates a connection between chat1 and chat2 which appears as route1.

- Similarly, create a connection between OUT_PORT of chat2 and IN_PORT of chat1, which creates route2.
Using a Sample Event Process to create a new Event Process
Sample Event Processes are predefined examples that come with the eStudio where components will be configured and connected making it ready to work/execute. A new Event Process can be created or build-upon these predefined ones by saving it into a different category and customizing it as required.
To create an Event Process from a Sample Event Process:
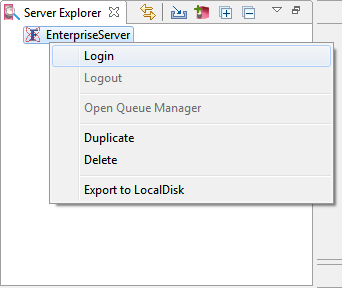
In the Server Explorer palette of eStudio, double-click (or right-click and select Login) EnterpriseServer to login to Enterprise Server.
- Double-click (or click on the Expand
 button) EnterpriseServer, right-click Event Process Repository, and then click Add Sample Event Process.
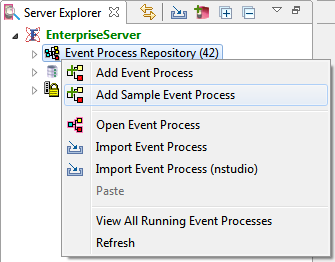
- In the Add Sample Event Process dialog box, choose the required examples by selecting the check boxes adjacent to the Event Process names or choose all of them by clicking Select All button and then click Finish. The Samples are available under Event Process Repository.

- In the Event Process Already Exists pop-up, click the below buttons as required:
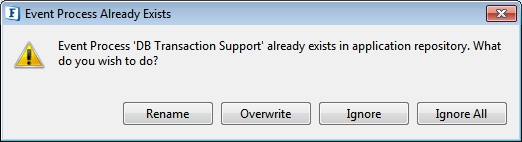
- Rename: An Event Process Customization page dialog box appears where either of the below can be done:
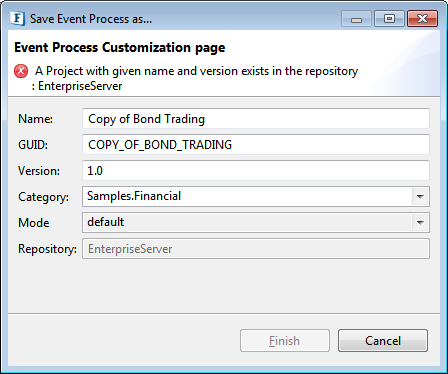
- Change the name and click Finish to save the Sample Event Process with a new name in the Sample Event Process list.
- Change the Category by choosing from the Category drop-down or typing a new name which creates a new Category.
- Overwrite: Overwrites the Event Process to the predefined ones that come along with the system. This is used when any changes are made to the predefined sample, which needs to be reverted to the original one.
- Ignore: Closes the dialog boxes without any changes made.
- Ignore All: Does the same as Ignore, but used for more than one item selected (where all of them need to be ignored and dialog boxes closed)
- Rename: An Event Process Customization page dialog box appears where either of the below can be done:
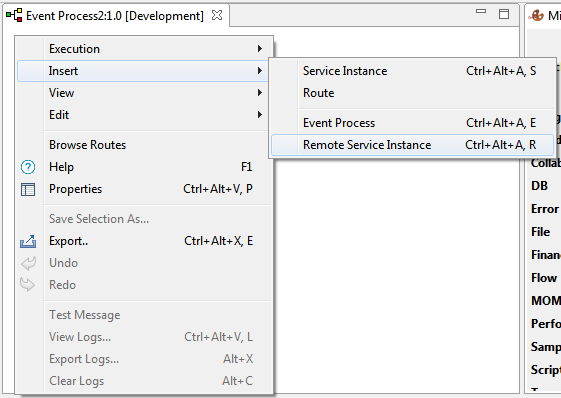
Using a Remote Microservice Instance in an Event Process
To add a microservice with a specific configuration from an existing Event Process, right-click the Orchestrator, go to Insert and click Remote Service Instance. Then select the required service instance and click OK.
|

|
Configuring Components
Though all the components available in eStudio carry a basic configuration to run an Event Process by just connecting the IN_PORT and OUT_PORT, the configuration requires change based on scenarios.
There are two sections where all the settings related to a component are present where the run-time behavior of the component can be changed.
Configuration Property Sheet (CPS)
To view/customize the configuration attached to a component, use any one of the two options below in the Orchestrator:
- Double-click the component.
- Right-click the component and click Configure.
CPS appears as a dialog box or wizard where the options are more or less self-explanatory. The configuration can be tested at any point of time (on most of the components that require the option) while configuring properties by clicking Test button. It can also be saved till a particular instant, choosing to revisit, by clicking Save and Close.
Properties
To view/edit properties, use any one of the two options below in the Orchestrator:
- Right-click the component and click Properties.
- Open from Window > Show View
Properties section generally appears below the three windows involved in the previous sections above: Server Explorer, Orchestrator and Micro Service Palette.
Properties section has subsections where values can be edited based on the requirement, such as General, Deployment, Execution, Log Manager, Log Module Instances and Runtime Arguments.