Command Line Interface (CLI) tool provides functions for manipulating application and services in Fiorano Enterprise Server (FES). It is a command line interface to FES. Most of the functions that CLI offers can be done with eStudio tool but there can be situations where using a command line interface is convenient or there could be no support for a Graphical User Interface like eStudio.
Functionalities provided by CLI are:
- Multiple Application Launch/Stop: It is possible to launch/stop a set of applications with CLI with a single command similar to services.
Replacement utility: CLI also provides the replacement utility. Provided a properties file (key -value pairs), all the occurrences of keys in a given event process are replaced with corresponding values. This can be used to replace strings in configurations which are not supported by EPLCM.
Location
The tool is available as a batch/script file (cli.bat/cli.sh) in CLI_HOME ( FIORANO_HOME/esb/tools/cli.)
Property Files
Since the interface is command line, options for every target are included in the properties file.
| Property | Description |
|---|---|
connection.properties | Enterprise server connection configuration. Internally CLI uses either RMI or RTL connection; mention appropriate URL in this file |
nStudio.properties | Options while operating with nStudio applications. Used when CLI uses RTL connection |
eStudio.properties | Options while operating with eStudio applications. Used when CLI uses RMI connection |
svn.properties | SVN credentials and SVN path. Used in functions involving SVN |
Functions Supported
Launch Application
launchEStudioApps target has to be used to launch Event Processes whose description is as below.

Sample configuration to launch EAI Demo sample is shown below. The user needs to take care of populating required variables mentioned in the readme file. Batch scripts can also be used to provide these values which is discussed at the end of the section.
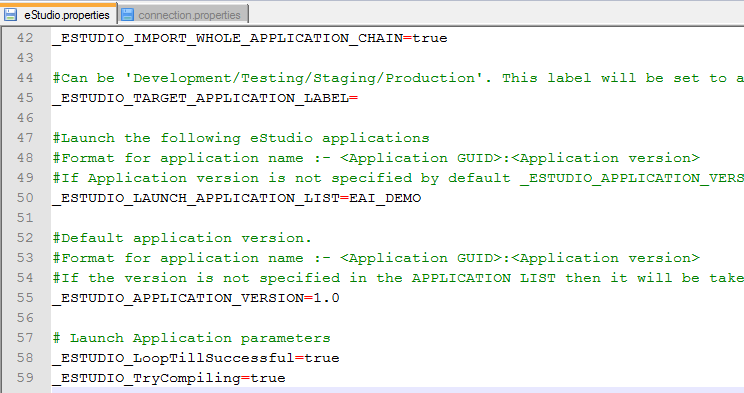
When the command is executed, the task prompts for the username and password and launches the Event Process(es). The password can also be provided in connection.properties to avoid the prompt or it can also be provided directly in batch files.
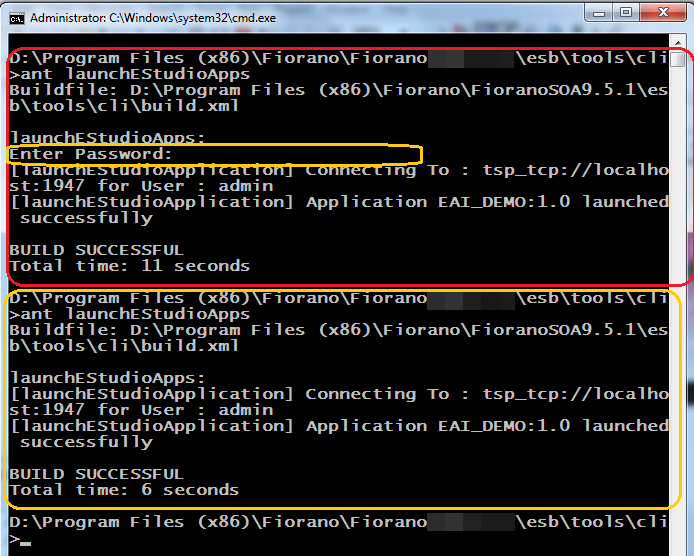
Sample screenshot is shown below for launchEStudioApps. During the first run it has prompted for the password and in the second run the password is picked up from connection.properties file (CONNECTION_STRING=tsp_tcp://localhost:1947;admin;passwd).
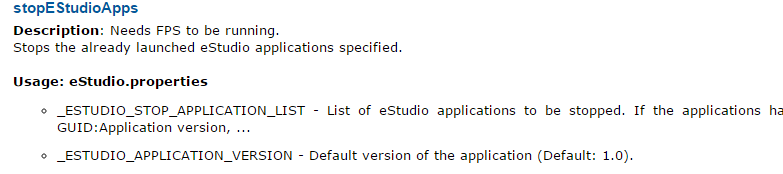
Stop Application
Same as startEStudioApps, but the following properties have to be provided in eStudio.properties file.
Sample scripts are provided below.
Start and stop a component in an Application
From Fiorano 10 (recommended)
Before Fiorano 10
Export Application
Exports the application in the FES repository to the local disk as a Zip file. To export, perform the following actions:
- Run FES server necessary for export application process.
Set properties directory to which application zip files are to be exported and the list of applications to be exported in eStudio.properties file:
_ESTUDIO_APPLICATION_EXPORT_DIR=/temp/import_ESTUDIO_EXPORT_APPLICATION_LIST=SIMPLECHAT:1.0,EVENT_PROCESS1:3.0Run command "ant exportEStudioApps" in CLI_HOME. Refer Figure below for sample output.
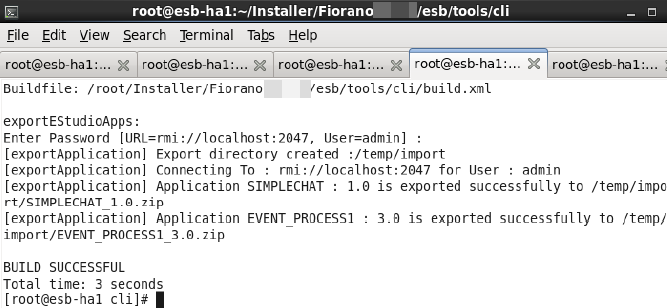
Sample output for export Applications
Following is the script to export the given application.
Import Application
Imports FIorano Application from exported application Zip File.
To import, perform the following actions:
- Run FES server necessary for import application process and have the application zip file to be imported in the local disk.
Set properties, directory from which application zips should be taken and the zip file names in eStudio.properties file:
_ESTUDIO_APPLICATION_IMPORT_DIR=/root/import/_ESTUDIO_IMPORT_APPLICATION_LIST=SIMPLECHAT_1.0.zip,WORKLIST_MANAGER_1.0.zip- Run command "ant importEStudioApps" in CLI_HOME. Refer Figure below for sample output.
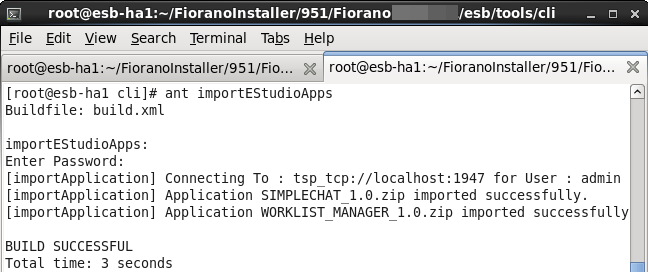
Sample output for import Applications
Following is the script to import the given application
Export Application with Libraries
While exporting an application, if the libraries for the application also need to be exported, then use this function.
- Set properties export directory, applications to be exported in eStudio.properties file.
_ESTUDIO_EXPORT_APPLICATION_LIB_LIST=SIMPLECHAT:1.0,EVENT_PROCESS1:3.0_ESTUDIO_APPLICATION_EXPORT_DIR_LIB=/temp/import - Run command "ant exportEStudioAppsWithLibs" in CLI_HOME. Refer the below figure for sample output.

Sample output for exporting Applications with Libraries
Import Application with Libraries
In this function only those Zip files which are exported from the above function can be imported.
- Set properties import directory and the files to be imported in the directory:
_ESTUDIO_APPLICATION_IMPORT_DIR_LIB=/temp/import_ESTUDIO_IMPORT_APPLICATION_LIB_LIST=SIMPLECHAT_1.0.zip,EVENT_PROCESS1_3.0.zip - Run command "ant importEStudioAppsWithLibs" in CLI_HOME. Refer Figure below for sample output.

Sample output for importing Applications with Libraries
Import Application from SVN
If the application folder is in SVN repository then this function can be used to import the application directly into the repository.
- Set properties for single application folder name, svn revision (HEAD indicates latest version), a temporary directory to which application is checked-out in eStudio.properties (also set SVN details in svn.properties):
svn.username=usersvn.password=passsvn.repository=/trunk/application_ESTUDIO_SVN_IMPORT_APPLICATION=event_process10-1.0_ESTUDIO_SVN_IMPORT_APPLICATION_REVISION=HEAD_ESTUDIO_APPLICATION_IMPORT_DIR=/temp - Run command "ant importApplicationFromSVN" in CLI_HOME. Refer the figure below for sample output.
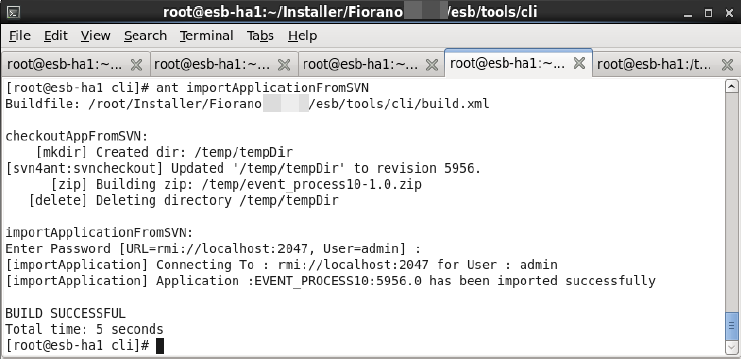
Sample output for importing Applications from SVN
Change Environment of an Application
Once the event process is set up for both environments with respective peer servers (Refer Configure Peer Server to Environment), by changing the Environment of the Event Process, the peer in which all the components are deployed can also be changed. Below script helps to change the Environment from CLI tool.
Environment Migration
Prerequisite
This operation primarily requires configuring peer server for components, attaching them to the specific environments, as explained below using eStudio tool.
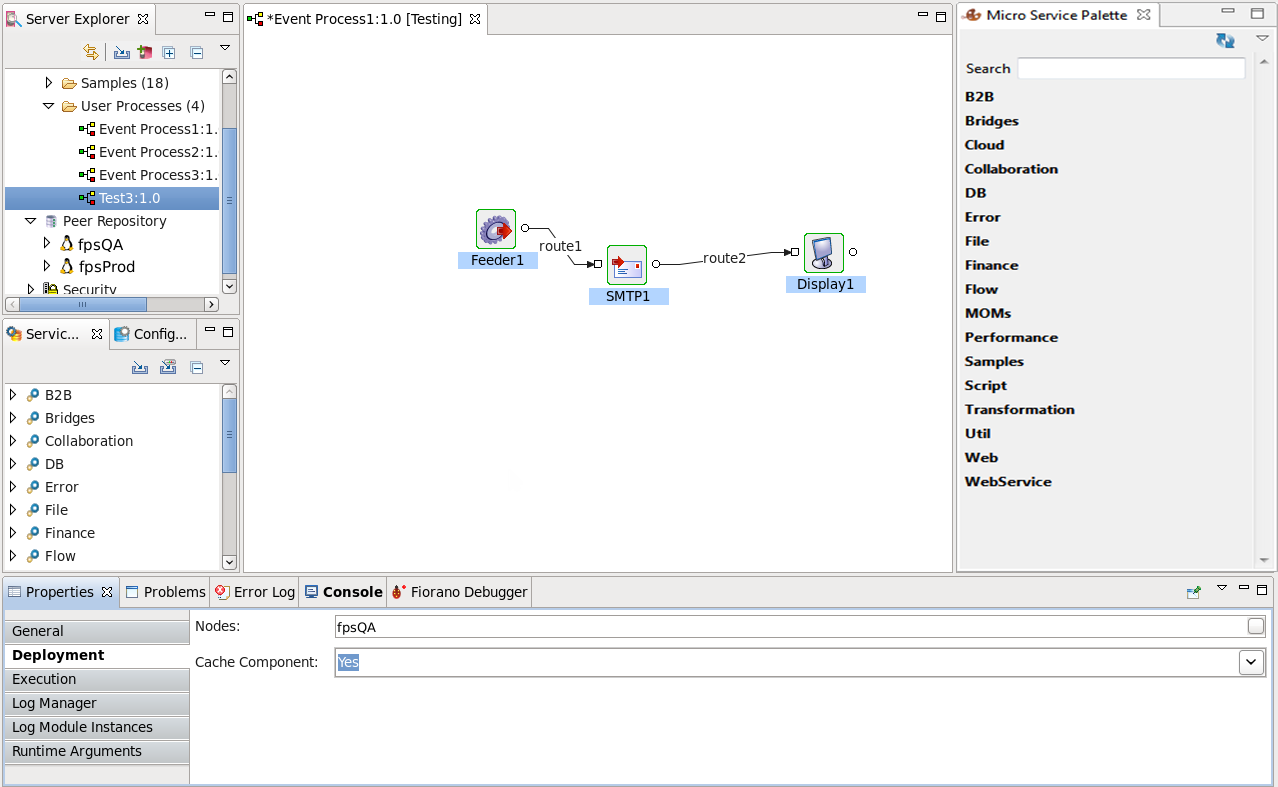
Configuring fpsQA peer to Testing Environment
Change the Event Process to required Environment
- Open the required application.
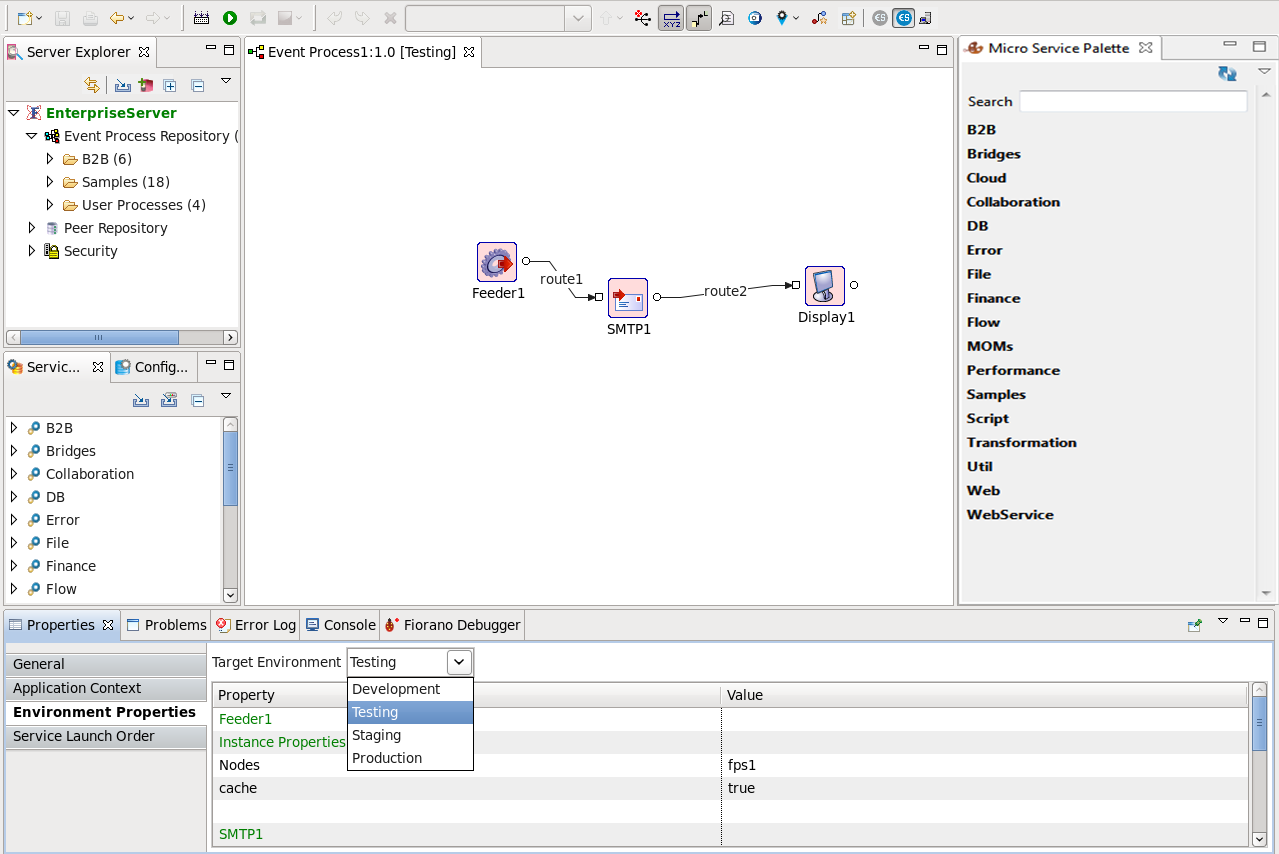
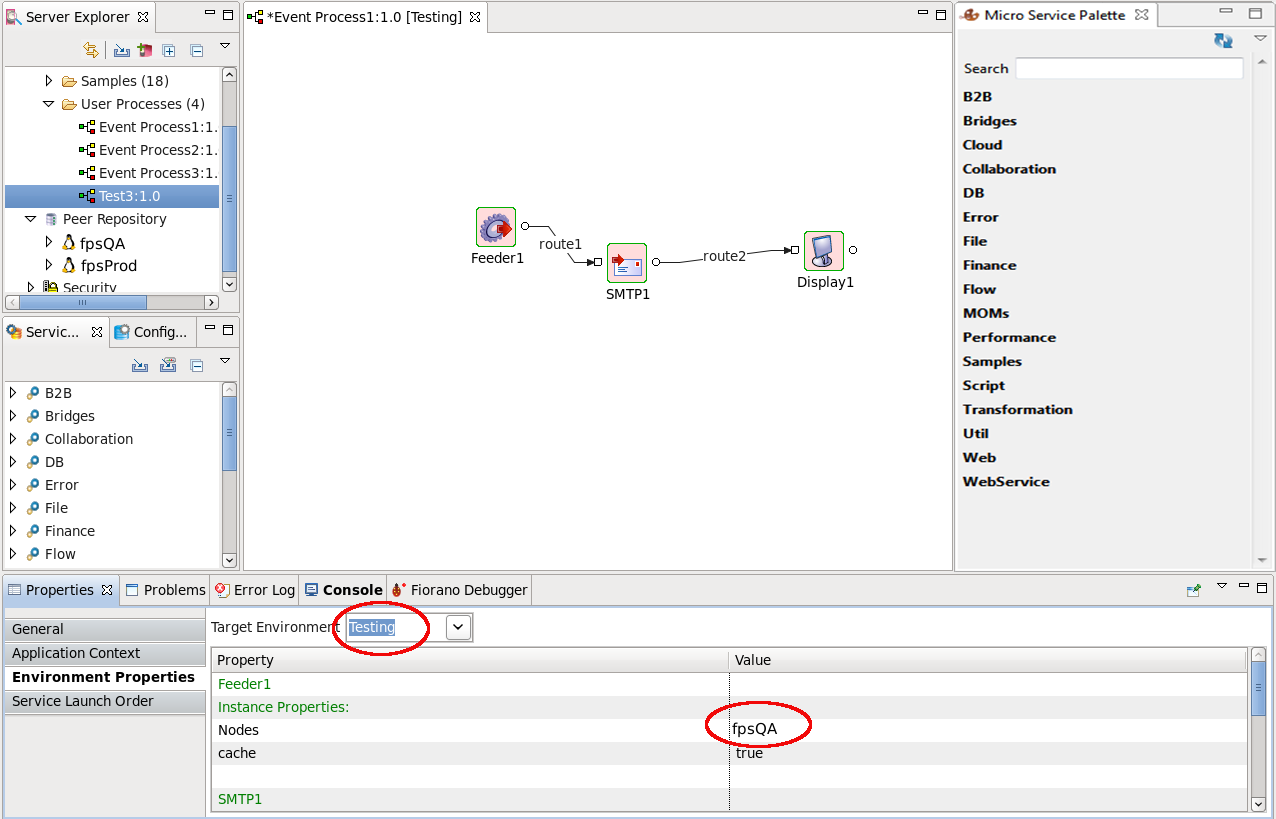
- Go to Properties > Environment Properties.
- Select the required Testing Environment.
Set the required peer.
- Select all the components.
- Go to Properties > Deployment > Nodes
Set the peer name to fpsQA
Save the Event Process. Once the Event Process is saved, notice the peer names being reflected in the Environment Properties of the Application as highlighted in the below image.
Configuring fpsProd peer to Production Environment
Configure the peer server with name 'fpsProd' similar to the steps described above.
Procedure Available from Fiorano 10.1
This function imports applications from one FES to another FES (Both Fiorano versions must be same). For example from Testing FES to Production FES.
With Configure Peer Server to Environment is done, execute the below function for all the components to be deployed in fpsProd, since Event Process is moved to Production Environment. If you do not want to change the peer deployment, then ignore Configure Peer Server to Environment and _ESTUDIO_TARGET_APPLICATION_LABEL in the below function.
- Set properties application to import, components to import, source FES and target FES connection details in file environmentMigration.properties file:
_ESTUDIO_IMPORT_APPLICATION_LIST=EVENT_PROCESS4:1.0,EVENT_PROCESS5:2.0_ESTUDIO_IMPORT_SERVICES_LIST=Feeder:4.0,Display:4.0,JmsIn:5.0SOURCE_RMI_CONNECTION_STRING=rmi://192.168.1.76:2047TARGET_RMI_CONNECTION_STRING=rmi://localhost:2047 _ESTUDIO_TARGET_APPLICATION_LABEL=Production - Run command ant
EnvironmentMigrationin CLI_HOME/EnvironmetMigration. Refer the figure below for sample output.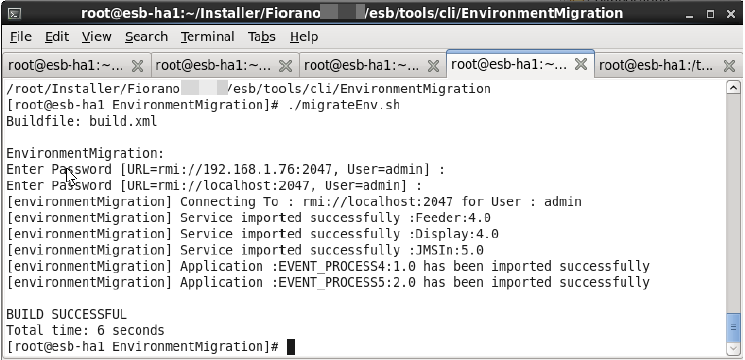
Sample output for importing Applications from remote FES
For elaborate descriptions of the targets and the usage of other targets, go through CLI Readme file (CLI_HOME/Readme.txt).
To use these functions in the previous version of Fiorano Refer Environment Migration (Before Fiorano 10.1), follow the steps mentioned below.
Procedure Before Fiorano 10.1
- Refer Configure Peer Server to Environment to configure the Environment to a peer server.
- Export the required application from Testing Enterprise Server.
- Copy the exported zip file to the local disk of the Production Enterprise Server machine.
- Import the application to Production Enterprise Server.
- Refer the Change Environment Of the Event Process From CLI to change the Environment to Production also deploys components into fpsProd
Replace Property
After exporting an Event Process zip file, if any property needs to be changed before using it again, use this function.
- In the above SIMPLECHAT_1.0.zip exported, all the components are deployed in peer 'fps' by default, to deploy that peer to 'mypeer' when imported.
- Create a file with any name, for example, 'replace.properties' with content: <string to be replaced>=<replacement string>. In this example, content is: fps=mypeer
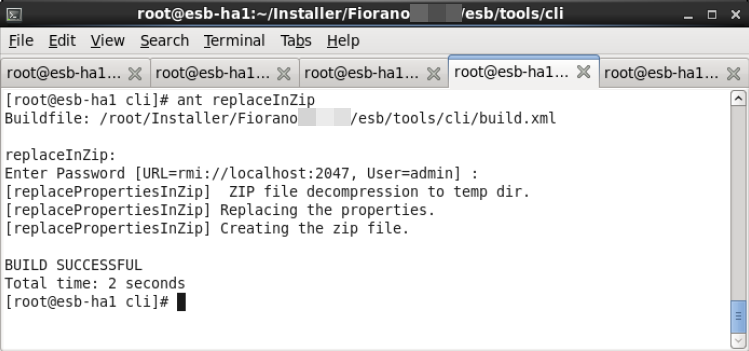
- Set the properties for necessary options such as input zipfile, output zip file and properties in eStudio.properties file:
_ESTUDIO_INPUT_ZIP_FILE=/temp/import/SIMPLECHAT_1.0.zip_ESTUDIO_OUTPUT_ZIP_FILE=/temp/import/SIMPLECHAT_1.0_MYPEER.zip_ESTUDIO_PROPERTIES_FILE_ZIP=/temp/import/replace.properties - Run command "ant replaceInZip" in CLI_HOME. Refer the below figure for sample output.