To use FioranoMQ WMT, the latest version of the web browser (Internet Explorer, Mozilla Firefox, Safari, Opera) is needed. The WMT URL is http://ipaddress:jettyport. In this URL, the 'ipaddress' refers to the IP address or hostname (only one ipaddress is present) where the FioranoMQ Server is running and 'jettyport' refers to the port on which the WMT is running. If FioranoMQ server is running on IP address 192.168.1.46 and the WMT Server is running on port 1780, the URL will read http://192.168.1.46:1780.
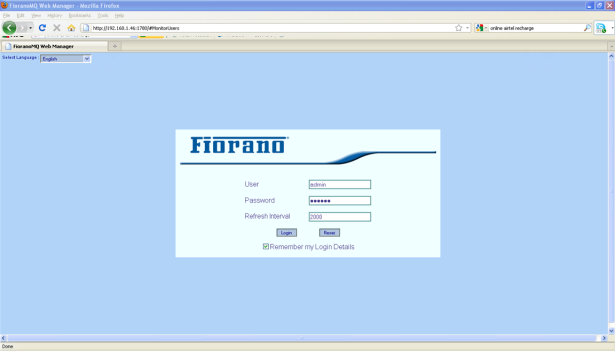
Figure 32.2: FioranoMQ Web Management Tool Homepage
The WMT homepage has three fields:
Field Name | Description |
|---|---|
User | The User Name by which User will login tothe WMT. The User logging in must exist in the security Realm of FioranoMQ Server. The default User is 'admin'. |
Password | Password of the User Name by which the User connects to the WMT. The default password for the 'admin' is pre set. |
Refresh Interval | Time Interval after which data is fetched from the Server. This Interval is measured in milli seconds. The value of this interval should be more than 1000 milliseconds. The default value is 2000 (which equivalent to two seconds). This interval should be sufficiently large to allow minimum CPU usage. |
To perform certain operation administrator permissions are required.
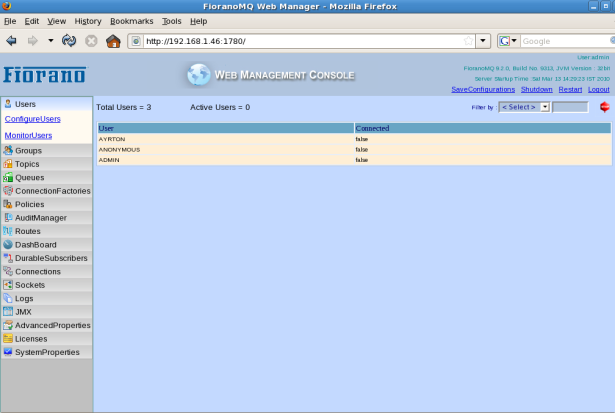
Figure 32.3: MonitorUsers View
Once logged into WMT, the MonitorUsers may be view. All the tables present in the views can be sorted in both ascending and descending orders by clicking the header of the corresponding column. The images displayed in the column explain the order.
The Filter option can be viewed in the top right-hand corner. The Filter is used to filter tabular data based on the text present in textbox. Filtering is done based upon the filtering column selected in the menu.

Figure 32.4: Filter Options
All data present in the 'Monitor' view is refreshed automatically. 'Configure' views, on the other hand, need to be refreshed manually. For refreshing 'configure' view click on any Configure view and click again on the old configure view. Only ConfigureFMQServer present in JMX will be refreshed automatically. There is an image next to it.
Data is fetched from the Server after every refresh interval. All tables get updated with the new values fetched. To stop refreshing this view, select the image and click the image to start refresh.
During interaction with the Server, if the Server shuts down due to unknown reasons, the WMT will display a warning to the User that reads 'disconnected from server'. When this warning is displayed, the logout prompt will change to the login prompt.
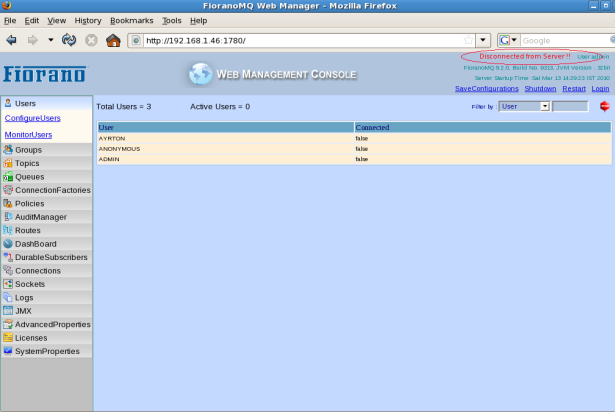
Figure 32.5: Server Disconnected Status
If the FioranoMQ Server running the User can click login to go directly to the page being viewed earlier. If the FioranoMQ Server is not running, the User will be redirected to the login page.
If the Server is restarted and the WMT did not interact with the Server, then clicking on any operation reconnects to Server. To avoid this/override this the User needs to click the same operation manually.
Four links at the top right-hand side top of the page may be viewed:
SaveConfigurations | Saves all the modified properties to the FioranoMQ Server from the current browser page. |
|---|---|
Shutdown | Closes the Server that is running. Do not connect any other application to FioranoMQ server before 'shutdown'. |
Restart | Closes and restarts the Server. Do not connect any other application to FioranoMQ server before 'shutdown'. When the Server restarts, login from the browser window. |
Logout | Disconnects the current page from the WMT Server. |
The different views present in the WMT are as follows:
- 1. Users
- 2. Groups
- 3. Topics
- 4. Queues
- 5. ConnectionFactories
- 6. Policies
- 7. Routes
- 8. Dispatcher
- 9. DashBoard
- 10. DurableSubscribers
- 11. Connections
- 12. Logs
- 13. JMX
- 14. AdvancedProperties
- 15. HighAvailability
- 16. StandAloneBridge
- 17. StandAloneRepeater
- 18. Sockets
- 19. Licenses
- 20. SystemProperties
- 21. Status Information
- 22. Audit Manager
1. Users
- MonitorUsers view contains all existing Users and their respective connection status. Users are set as connected an 'admin' Connection or JMX Connection is made or if the JMS Application is started. This view also gives information about the maximum connection limit that is set for each user and the current number of connections created by the user.

- ConfigureUsers view contains the function to modify Users (such as Add User, Delete Selected Users, Changing Password, and Setting Maximum Connections per user). The Import Users and Export Users enable to copying Users to another FioranoMQ Server. These actions are present in the Select Action drop-down menu. To use any one of the actions, select the action from the Select Action drop-down menu and click the Go button. These actions allow the export of all data to a standard file present on most machines. (Mapping needs to be done if file is present on another machine.) The data can be imported to any other Server that starts with FioranoMQ.

Figure 32.6: Configure Users View
Note: Only the users from 'Administrators' group will have the permissions to do any of the operations mentioned above.
2. Groups
'Groups' contain information about all groups and its members. Groups can be added using Add Groups and deleted using Delete Selected Groups. For modifying members of an existing group, use Edit Members in Group after selecting the required group. These Actions are available in the Select Action drop-down menu. Select the action and click the Go button.
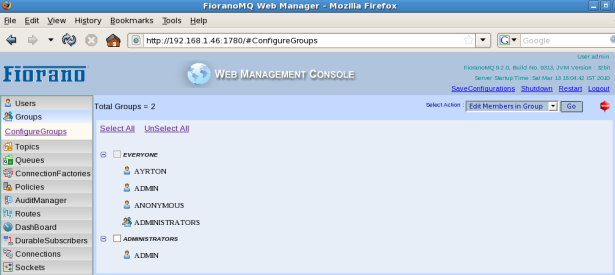
Figure 32.7: GroupView
Once you click the Go button, a window pops up with existing members and possible options, if the selected action is Edit Members in Group. Select Add Members to see the existing members.
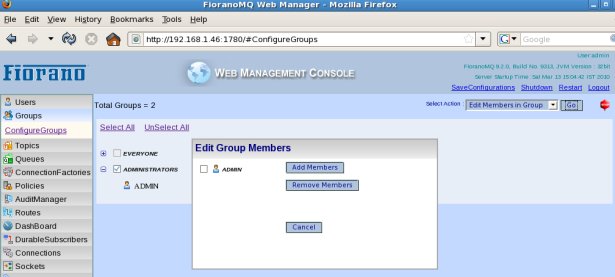
Figure 32.8: Editing Group Members
3. Topics
Monitor Topics contains the information about existing topics. Summary is present at the top of the table. An Active Topic refers to a topics that contain either a publisher or a subscriber. The 'Select Action' drop down box lists the operations that can be executed on each Topic destination selected. 'SendMessage' operation will send Persistent Text Messages to the Topic(s) selected. The 'Corrupted Topics' check box, if selected, will display all the corrupted topics in the 'MonitorTopics' view and by default the view displays all the Topics (Corrupted and Non-Corrupted Topics). The corrupted topics can be recovered and replayed using 'Recover Selected Topics' and 'Replay Messages from Topics' operations. More information on this feature can be found under 'Handling data base corruption' chapter.

Figure 32.9: MonitorTopics View
Configure Topics allows all operations to be performed on topics such as CreateTopic and DeleteSelectedTopics. One can restart a specific Topic destination to get the parameter changes effected using 'Restart Topics' operation. Also available the 'Shutdown Topics' operation to shut unwanted Topic destinations.
'Edit Topic Properties' can be used to edit all properties related to a topic destination, whereas, 'Edit Topic Subsystem Properties' can be used to modify similar properties at the global level for all Topics. More information on Destination Level Configurations can be found here.
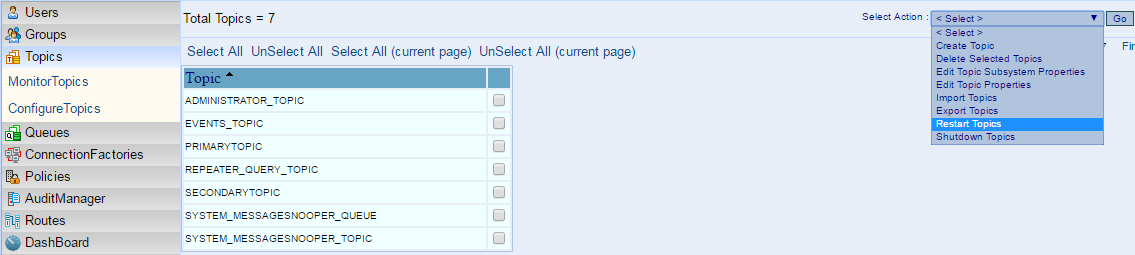
Figure 32.10: ConfigureTopics View
By selecting the EditTopicProperties options from the Select Action drop-down menu and clicking the Go button, it is possible to view all properties and their corresponding values. Values with a different background color need to be saved. Once saved, the Server needs to be restarted to make them take effect or if the changes are done at destination level Topic restart alone will get the changes effected. A description of the property that is selected is provided at the bottom of the browser. The mouse may be moved over the textbox to view the description of the property. Export Topics and Import Topics can be used to save topics to a standard file as well as to create all of them in a FioranoMQ server that is running. Import Topics and Export Topics can be used only by the 'admin' User.
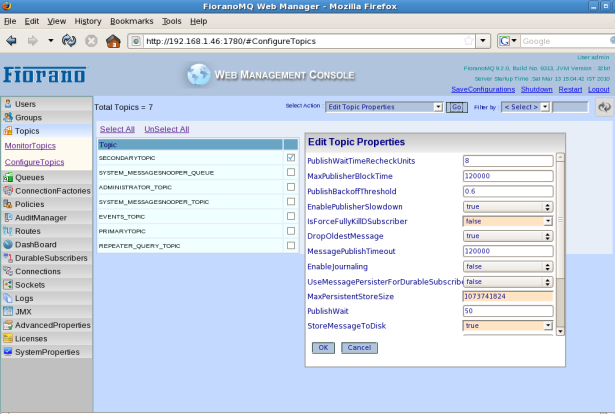
Figure 32.11: Editing Topic Properties
4. Queues
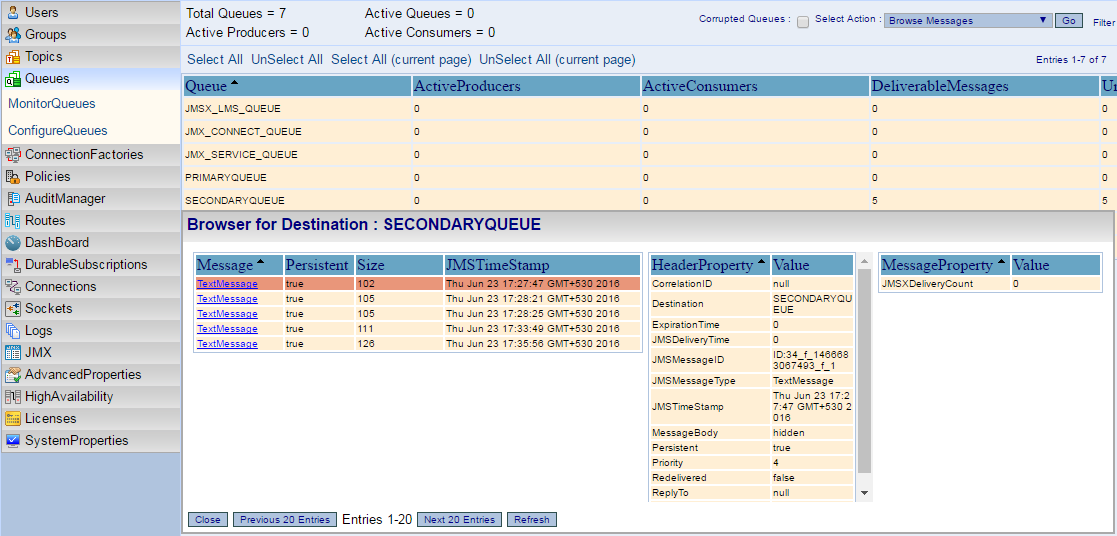
Monitor Queues contains the information about existing queues. A summary is present at the top of the table. Here, Active Queue refers to the queues which contain either a sender or receiver. DeliverableMessages and UndeletedMessages are not updated at regular intervals. To update these values select all the required queues or invoke UpdateSelectedQueues or UpdateAllQueues present in the Select Action drop-down menu. Deliverable Messages count is the number of messages yet to be delivered from the Queue, and Undeleted Messages count denotes the number of messages yet to be acknowledged by the Consumer and deleted from the data base.
'SendMessage' operation will send Persistent Text Messages to the Queue(s) selected. The 'Corrupted Queues' check box, if selected, will display all the corrupted queues in the 'MonitorQueues' view and by default the view displays all the Queues (Corrupted and Non-Corrupted Queues). The corrupted queues can be recovered and replayed using 'Recover Selected Queues' and 'Replay Messages from Queues' operations. The 'Purge Messages' operation deletes all the messages in a selected Queue.

Figure 32.12: MonitorQueues View
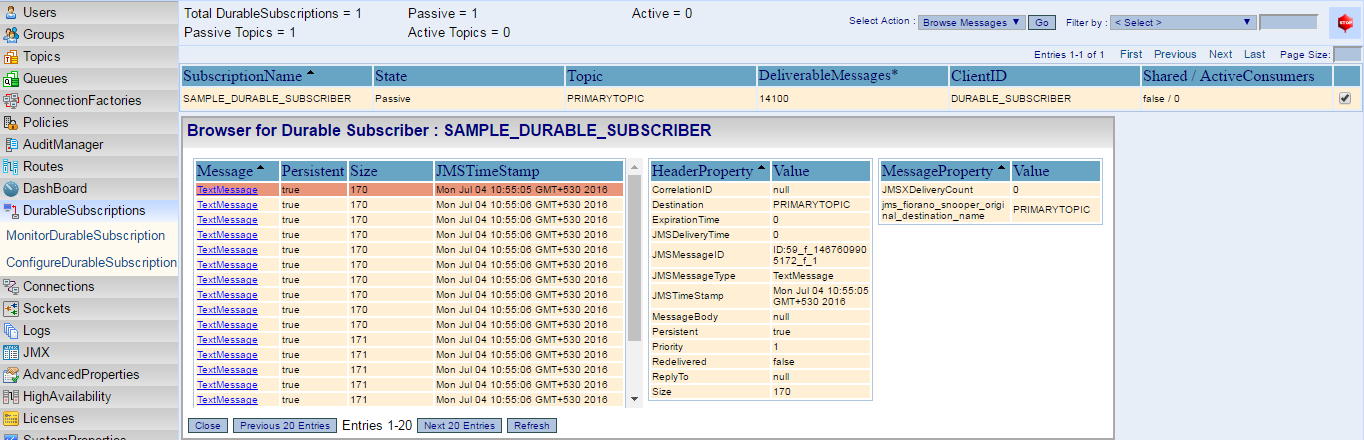
The 'Browse Messages' operation can be handy in browsing messages on a selected Queue and view its properties. When 'Browse Messages' operation is invoked, a new dialogue box is popped up to view the Messages and its properties.
Configure Queues allows all operations to be performed on queues such as CreateQueue and DeleteSelectedQueues. One can restart a specific Queue destination to get the parameter changes done on it to get effected using 'Restart Queues' operation. Also available the 'Shutdown Queues' operation to shut unwanted Queue destinations.
'Edit Queue Properties' can be used to edit all properties related to a queue destination, whereas, 'Edit Queue Subsystem Properties' can be used to modify similar properties at the global level for all Queues. More information on Destination Level Configurations can be found here.
By using EditQueueProperties option present under the Select Action drop-down menu it is possible to view all properties and their corresponding values. Values with different background colour need to be saved. Once saved the Server needs to be restarted to make them take effect or if the changes are done at destination level Queue restart alone will get the changes effected. Description of each property that is selected is provided at the bottom of the browser. The mouse may be moved over the textbox to view the description of the property. You are notified if any property requires save configuration and server restart was modified. Export Queues and Import Queues can be used to save queues to a standard file as well as to create all of them in a FioranoMQ Server that is running. Import Queues and Export Queues can be used only by the 'admin' User.
5. ConnectionFactories
MonitorConnectionFactory lists all the connection factories along with their important properties (such as ConnectUrl, AutoUpdate, Type, Description). A summary is present at the top of the table.
ConfigureConnectionFactory allows various operations to be performed such as Create CF, Delete Selected CF, Edit CF Properties on Connection Factories. The Edit CF Properties can be used to edit all the properties related to the selected connection factory. The Create CF option present under the Select Action drop-down list can be used to create new Connection Factories and the Delete Selected CF can be used to delete existing Connection Factories.
Export and Import CF can be used to save Connection Factories to a standard file and to create all of them in a FioranoMQ Server that is running. Import and Export CF can be used only by the 'admin' User.
6. Policies
ConfigurePolicies
Policies allow users to change permissions on a specific destination for a specific principal. By default, the view will show No restrictions on policies if user had not modified any permission. If user wants to modify any particular permission then the user needs to use the Add Permissions option present in the Select Action drop-down menu. A pop-up window will appear along with UserName, Destination Name, Permission types, and new permission type. Once all required values are selected then the user can click on OK button. The new modified permissions will be shown in the table.

Figure 32.13: Editing policies of a destination
Click any row and view the permissions on a specific destination.
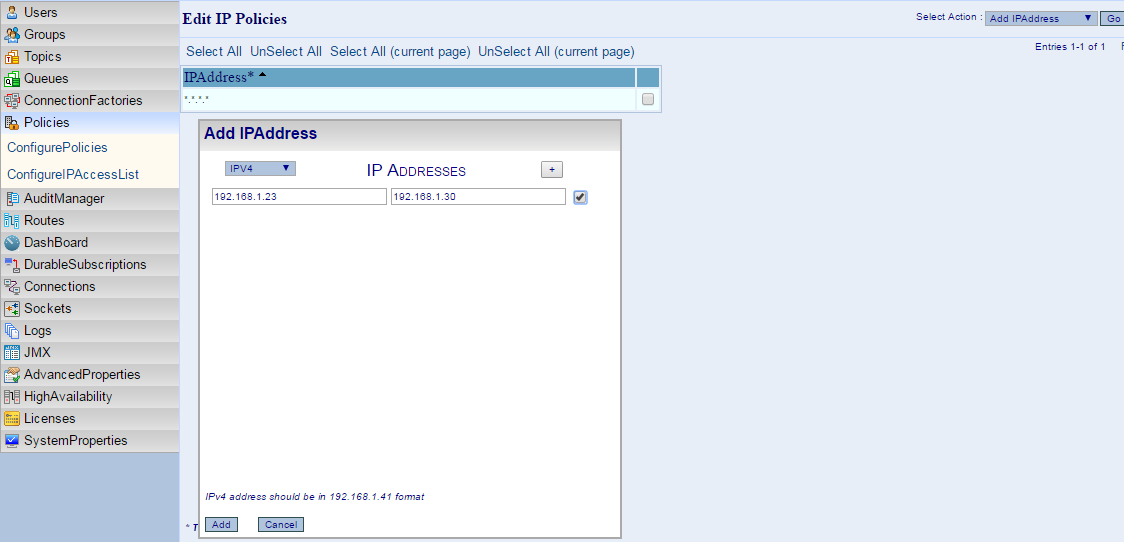
ConfigureIPAccessList
The IP Access List tab lists down the list of IP addresses which are allowed to connect to the FioranoMQ Server. By default, all the IP addresses are accepted by FioranoMQ Server, denoted by *.*.*.* representation. The 'Select Action' drop-down lists "Add IPAddress", for adding a new IP Address set/range to the allowed list and a "Remove IPAddress" operation, for removing the IP Address entry from the list already available. While adding a new IP Address set/range, option has been provided to add it as IPV4 or IPV6 address(es).
7. Routes
A Route enables the transport of messages between destinations. A message arriving on one destination can be made available to another provided a route exists between the two destinations.
ConfigureRoutes view contains information about the properties of the route managerThese are the properties of the individual routes present on the server.
The table displays various properties of the route manager (such as MaxTopicBuffer, NumberOfRoutesExistingInServer, MaxCreateSessionTries).
If there are any routes present on the Server, they will be displayed in the Route GUID box. If no routes are present, the message No routes available in the Server is displayed below the route manager properties table.
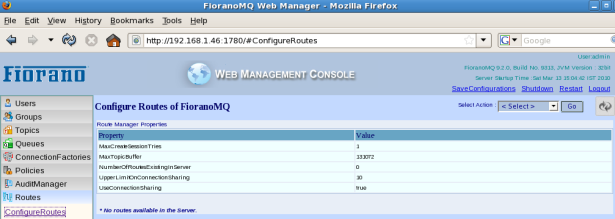
Figure 32.14: Route
To Add or Delete a route from the Server, the appropriate action must be chosen from the Select Action drop-down menu.
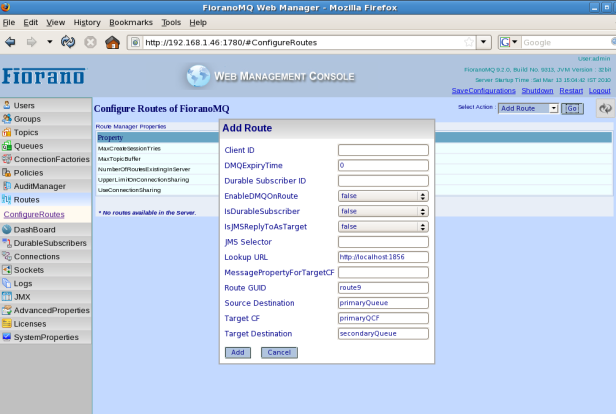
Figure 32.15: Adding Route
On selecting any of the routes present in the Route GUID box the properties of the corresponding routes are displayed in the table below this list-box.
Figure 32.16: Route Added
8. Dispatcher
This tab is available only when logged into the web console of a dispatcher enabled Server.
A Dispatcher distributes the messages received to different Servers that are connected to it. The Dispatcher performs the load balancing function of a network connected to FioranoMQ Servers.
ConfigureDispatcher view contains information about the properties of the Dispatcher Manager and the properties of the Servers to which it dispatches messages. The Server URL list-box contains the list of server URLs to which the Dispatcher can dispatch messages. On selecting a URL, its properties are displayed on the table as shown in the figure 32.17.

Figure 32.17: Dispatcher
To Add or Delete a Dispatcher Server, the appropriate action must be chosen from the Select Action drop-down menu..
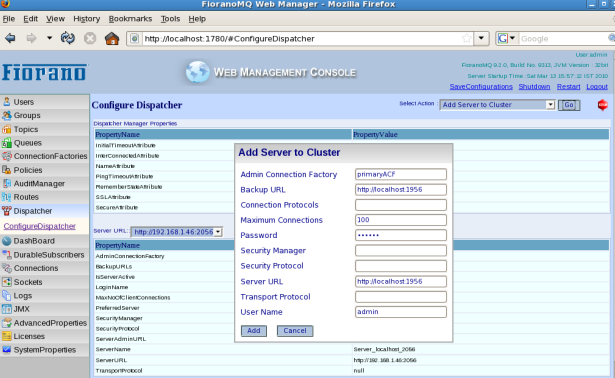
Figure 32.18: AddDispatcher Server
9. DashBoard
DashBoard shows the graphs between Time vs Threads, Connections and MemoryThe entry for which graphs are required needs to be selected.. The Remove selection, removes a graph from view.
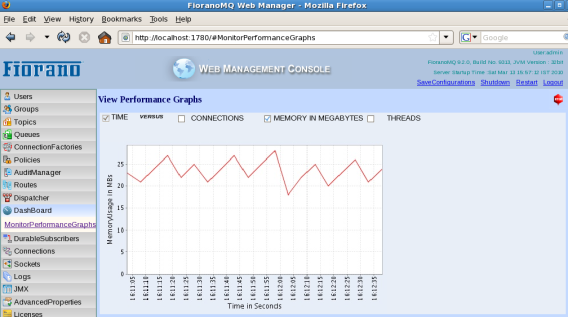
Figure 32.19: Displaying a graph of Time Vs Memory
10. DurableSubscribers
- Monitor DurableSubscriber view contains all existing durable subscribers listed along with its other relevant information such as Subscription state, the Topic destination it is subscribing to, the deliverable number of messages for each durable Subscriber, the ClientId of the connection, and if it is a Shared Subscriber or not and the number of active consumers under each Shared Subscriber.
A summary is present at the top of this window, denoting the total number of Durable Subscriptions for this instance of FioranoMQ Server. The 'Active Topics' counter is updated based on the number of Topics having Active Durable Subscribers running. The 'Passive Topics' counter is updated for Topics having Passive Durable Subscriptions.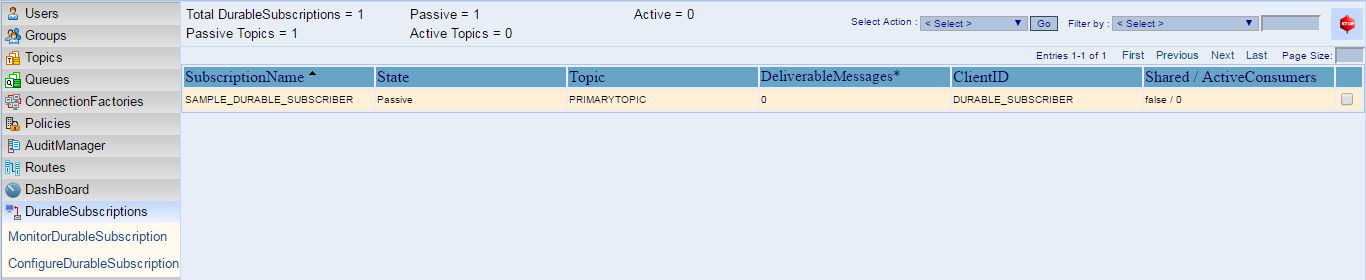
The Select Action drop down has a single operation, 'Browse Messages' on a Durable Subscriber.
- Configure DurableSubscriber view contains all durable subscriber names in the form of subscriberID::clientID. Messages can be unsubscribe or purged messages for passive durable subscribers from this view. Any operations involving active durable subscribers throw a warning message.
11. Connections
- Monitor Connections lists all types of connections along with their relevant properties, such as the 'ClientID' of the connection, the 'ClientAddress' indicates the ip address from which this connection is created, 'Type' of connection, if it belongs to PTP or PUBSUB model or an MQTT Connection type, the 'Destinations' column gives the list of destinations that this connection is using in the form either creating Producers or Consumers, the 'CreationTime', the 'User' credentials used for creating this connection, and the 'Protocol' used.
A summary is present at the top of this window denoting the total number of connections and the under each category, PTP/PUBSUB/Admin connections.
When clicked on each Connection, it displays the following additional Connection Information:
Build Number: The build number of the client connection
Number of Consumers: The number of Consumers created under this connection
Number of Producers: The number of Producers created under this Connection
Server Port: The server port to which this Connection is created.
Session Count: The number of Sessions created under this Connection
Version Number: The FioranoMQ Version number used by the Client Connection.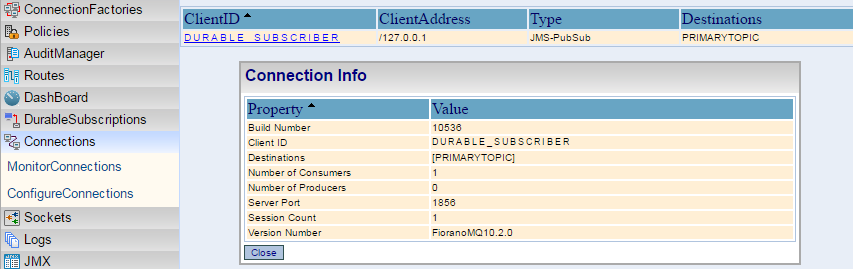
- Configure Connections allows the disconnection of a connection based on the clientID.
12. Logs
- Monitor Logs allows the user to fetch details of logs, view log details and clear log details.\
- Configure Logs lists all those logged into the FioranoMQ Server. You can select any particular log and change its level.
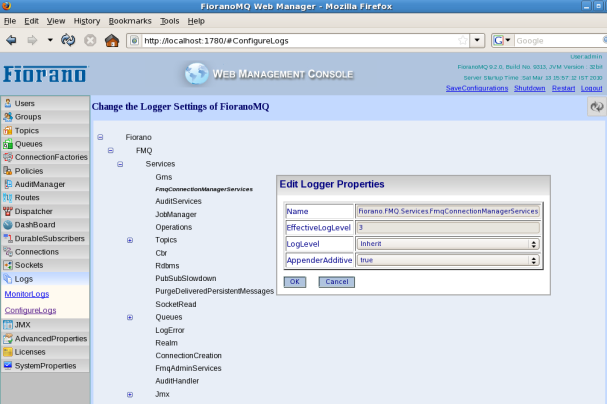
Figure 32.20: Changing log level of a particular logger
13. JMX
This view lists all the Mbeans along with their attributes and operations. Mbeans are listed in this hierarchical view with a brown color bullet.
When a particular Mbean is selected, a table containing two tabs is displayed. The Attributes tab lists all the attributes of the Mbeans along with their values, parameter types and whether a restart of the Server is required for changes to take effect.
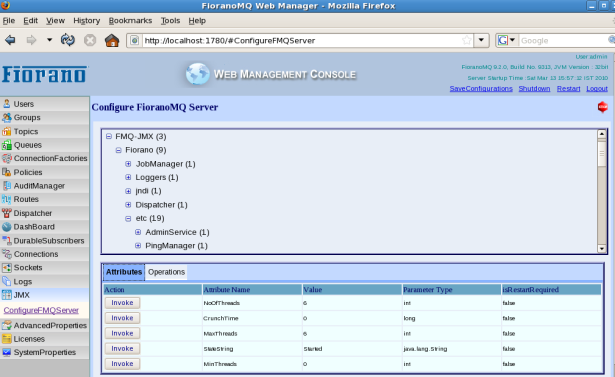
Figure 32.21: Attribute View of JMX
The Operations tab lists the operations present in that Mbean enabling the User to invoke these operations.
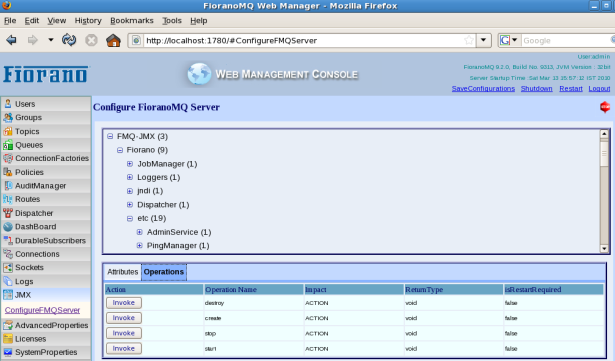
Figure 32.22: Operations View of JMX
Clicking on SHOW_OPERATIONS lists the operations present in that MBean enabling the User to invoke the operation.
14. AdvancedProperties
This view contains frequently used properties and their values.
For example, the first category, Port properties contain RMIBasedJMXServerPort and JettyServer port. These are the two ports and the JMS Server listening port which need to be unique for running a server on the same IPAddress. These values can be modified. By default, from FioranoMQ10.2.0 onwards 'ConnectionManager Properties' will have two tabs for MQTT and JMS connection managers, both accepting connections at different ports..
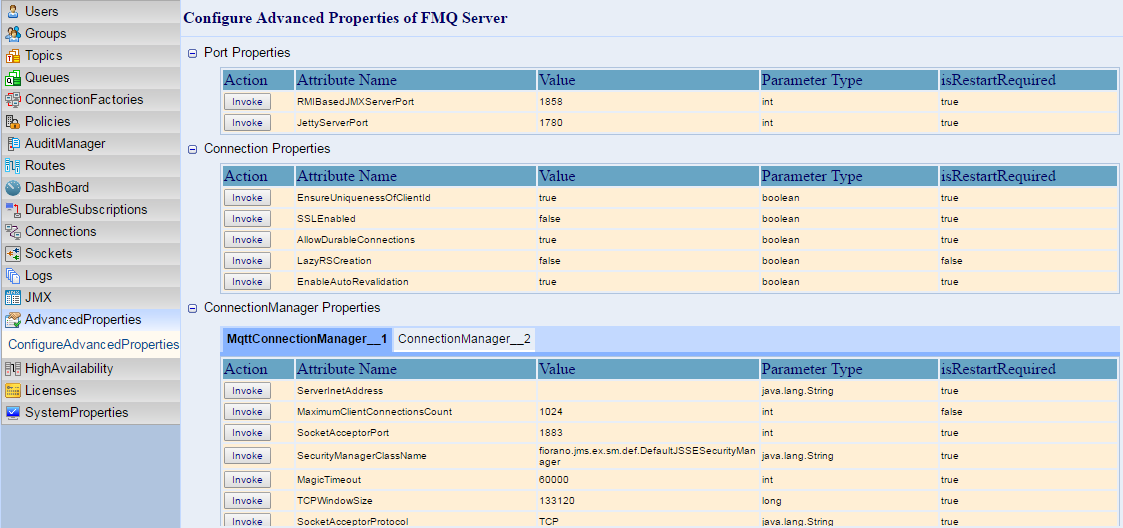
Figure 32.23: AdvancedProperties View
15. HighAvailability
This view contains properties related to the HA Servers. When using the StandAlone Server this view shows a message with: The Server you logged in is not running in HA Mode.
If the HA server is running this view displays all relevant properties for HA. Please note that the word 'remote server' means backup server, it can be either of HAPrimary or HASecondary Servers.
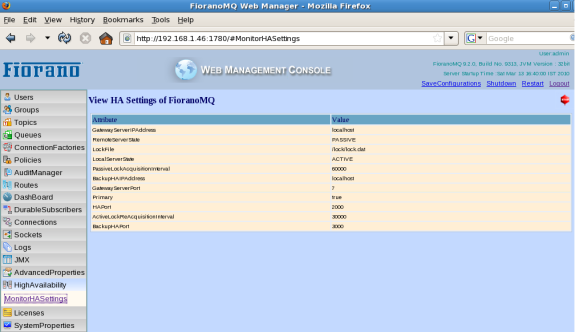
Figure 32.24: HA view
16. StandAloneBridge
This tab is available only when logged into the web console of a Server running on the StandAloneBridge profile.
A Bridge transmits a message received on one queue (source queue) to another queue (target queue).
ConfigureBridge view lists all the Bridges currently available on the server. The Select Action drop-down menu contains various options , such as:
- View Bridge Attributes
- Add Link
- Delete Link
- View Link Configuration
- Edit Link Configuration
- Add Channel
- Delete Channels
- View Channel Configuration
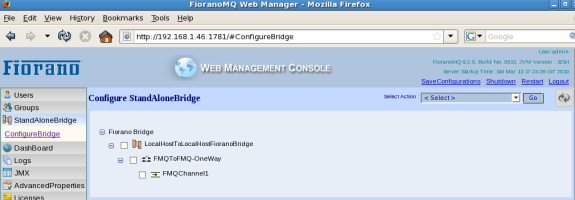
Figure 32.25: StandAloneBridge
AddLink Attributes
To add a link select Action list-box, choose the AddLink action and click the Go button. Following are the parameters present in AddLink window:
LinkName | The name of the link which is to be added. |
|---|---|
SourceServerInitialContextFactory | The class name of the initial context factory which is used to open connection with the source server. |
SourceServerName | The name of the source server. |
SourceServerPassword | The password which the bridge uses to connect to the source server. |
SourceServerProtocol | The transport protocol used for establishing a connection with the source server. |
SourceServerQCF | The connection factory with which the connection is to be established. |
SourceServerSecurityCredentials | The SecurityCredentials (password) used for connecting to the source server. |
SourceServerSecurityManager | ServerSecurityManager of the source server linked by the bridge. |
SourceServerSecurityPrincipal | The SecurityPrincipal (username) used for connecting to the source server. |
SourceServerType | Need to mention the type of the source server. |
SourceServerURL | The URL of the source server should be given here. - The default provider URL of the server. |
SourceServerUserName | The UserName which the bridge uses to connect to the source server. |
TargetServerInitialContextFactory | The class name of the initial context factory which is used to open connection with the target server. |
TargetServerName | The name of the target server. |
TargetServerPassword | The password which the bridge uses to connect to the target server. |
TargetServerProtocol | The transport protocol used for establishing a connection with the target server. |
TargetServerQCF | The connection factory with which the connection is to be established. |
TargetServerSecurityCredentials | The SecurityCredentials (password) used for connecting to the target server. |
TargetServerSecurityManager | ServerSecurityManager of the target server linked by the bridge. |
TargetServerSecurityPrincipal | The SecurityPrincipal (username) used for connecting to the target server. |
TargetServerType | Need to mention the type of the target server. |
TargetServerURL | The URL of the target server should be given here. - The default provider URL of the server. |
TargetServerUserName | The UserName which the bridge uses to connect to the target server. |
To perform any of the actions listed in the Select Action list-box, choose the appropriate action and click the Go button.
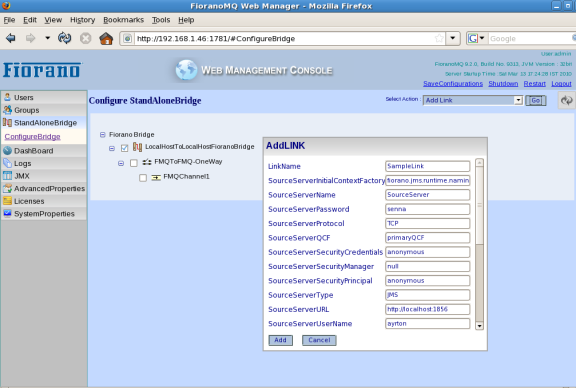
Figure 32.26: AddLink
AddChannel Attributes
To add a channel to a link select Action list-box, choose the AddChannel action and click the Go button. Following are the parameters present in AddChannel window:
AddSourceQueueParams | Specify the source queue parameters. |
|---|---|
AddTargetQueueParams | Specify the target queue parameters. |
ChannelName | The name of the channel which is to be added. |
SourceQueueMessageSel | The message selector of the queue. Allows the user to set message selectors for the |
SourceQueueName | The name of the queue present in source server which is to be linked by the bridge. |
TargetQueueMessageSel | The message selector of the queue. Allows the user to set message selectors for the |
TargetQueueName | The name of the queue present in target server which is to be linked by the bridge. |
17. StandAloneRepeater
This tab is available when logged into the web console of a Server running on the StandAloneRepeater profile.
A Repeater transmits a message received on one topic (source topic) to another topic (target topic).
ConfigureRepeater view lists all the Repeaters currently available on the server. The Select Action list-box contains various options such as:
- View Repeater Attributes
- Show Repeater Info
- Add Link
- Delete Link
- View Link Configuration
- Edit Link Configuration
- Add Link Topic
- Show Link Topic Configurations
- Remove Link Topic
- Add Reply Topic
- Show Reply Topic Configurations
- Remove Reply Topic

Figure 32.27: StandAloneRepeater
To perform any of the actions listed in the Select Action list-box, choose the appropriate action and click the Go button.
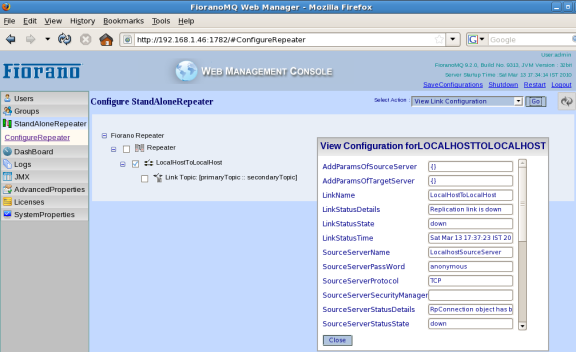
Figure 32.28: View Link Configuration
18. Sockets
MonitorSockets view contains information about all the sockets currently open within the Server. The sockets are created for each of the connections made to the server by the clients. The table gives information on Server ports, about the client, the transport type, IP address of the Server and whether SSL is enabled.
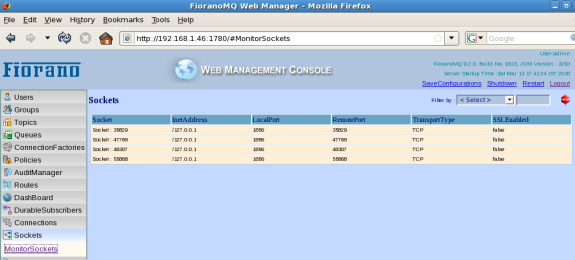
Figure 32.29: Monitor Sockets
19. Licenses
MonitorLicense displays information of about all the licenses available. The License Filename list-box lists the available licenses. Selecting a licensedisplays its corresponding license information in the table shown in the figure below:
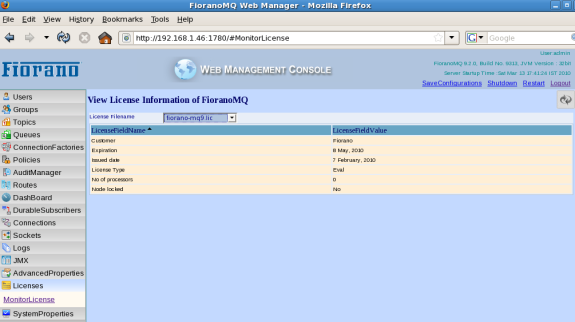
Figure 32.30: Licenses
20. SystemProperties
SystemProperties view lists the all the relevant properties of the system on which the FioranoMQ Server is hosted. These values cannot be modified through the WMT.
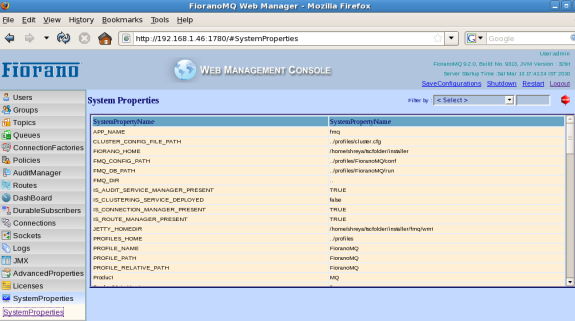
Figure 32.31: System Properties
21. Status Information
The JVM version indicates whether the server JVM is 32 or 64 bits. This information, along with the information of when the FioranoMQ Server was started is displayed at the top right-hand corner of the WMT screen.
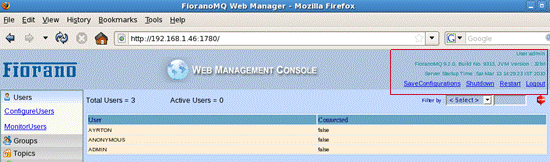
Figure 32.32: Status information
22. Audit Manager
Using the Audit Manager view it is possible to configure the Audit Storage Policies as well as monitor the audit events recorded in the Server.
Monitoring Audit Events
In the Monitoring Audit Events view, the audit events that are recorded in the System can be monitored. To enable this, the 'Audit Filter' set for the current view needs to be changed. The figure below shows how to modify the view:
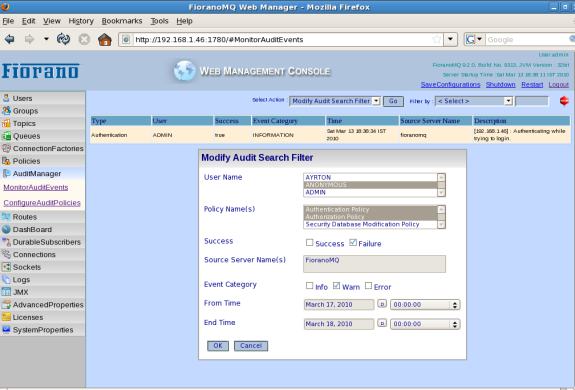
Figure 32.33: Modify Audit Search Filter
23. Configuring Audit Policies
In the Configuring Audit Policies view, the various kinds of Storage Policies which are responsible for generating Audit events are configured. In order to do this, the action 'Modify Audit Storage Policy' needs to be invoked after selecting one of the Storage Policies listed in the table inside the view. The storage policy will then need to be configured. The figure below shows how to configure the storage policy:
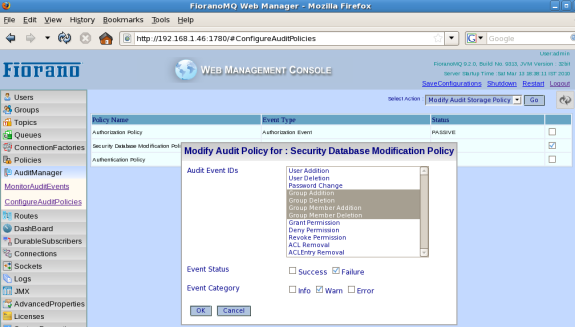
Figure 32.34: ConfigureAuditPolicies > Modify Audit Storage Policy
The recording of Audit events can be stopped by configuring the same storage policy that is used for enabling Audit Events. In order to do this, the action 'De-activate Storage Policy' needs to be invoked after selecting the Storage Policy which is to be de-activated. The figure below shows how to deactivate the storage policy:.
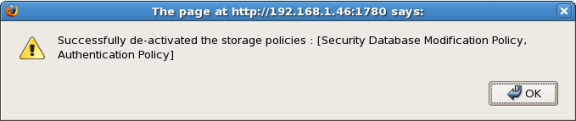
Figure 32.35: De-Activate Storage Policy message
For more information on Audit Management, please refer to Chapter 30 Audit Management of this document.