Once the server is setup as explained in the Document Tracking section, follow instructions below to configure tracking in Event Processes.Documents passing through an entire flow can be tracked using the Document Tracking option in the Dashboard. Tracking needs to be configured and set for instances (as required) explained in the section below.
Document Tracking in Workflow
A workflow in Fiorano terminology consists of an entry point, an end point and intermediary points between them.
The entry and intermediary points are defined as Workflow Items and the end point is defined as a Workflow End. To track the documents going through the Service Instances, document tracking can be enabled on service instance ports. If tracking is enabled, the documents that pass through that port are stored in a database. By default these documents are stored in the H2 database that runs inside the Enterprise Server.
A workflow starts with a Workflow Item and ends at Workflow End. A workflow is defined within an Event Process scope through which a large number of documents pass. Whenever a new document enters into the workflow, a new workflow instance is generated. Each workflow instance has a unique ID assigned by the Fiorano Platform environment. In a state enabled workflow, all the states that these workflow instances traverse are stored for tracking purposes.
Each workflow instance contains information about documents that pass through it. Each time a document passes through a trackable state, a state event is generated and the document is given a new Document ID by the tracking state enabled. Information related to the documents can be viewed in the Fiorano Web Console.
The eStudio provides a state-based workflow view that enables tracking and monitoring of documents from one state to another.
Enabling Document Tracking
To enable document tracking in an Event Process, perform the steps below:
- Select the Service Instance Port on which document tracking is to be enabled. The Properties pane is displayed. (if the Properties pane does not appear after selecting the service instance, navigate to Window > Show View > Others).
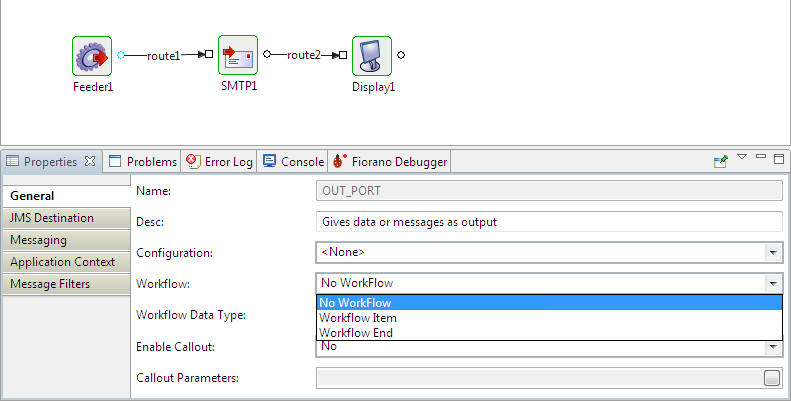
- To enable Document Tracking, select the Workflow Item/Workflow End option in the Workflow property drop-down list.

Figure 3: Enabling Document Tracking
In the sample Event Process shown below, the workflow starts at the Feeder output port. The SMTP output port is marked as an intermediary point and the workflow ends at the Display input port.

Figure 4: Event Process with Document Tracking enabled
Workflow Data Type
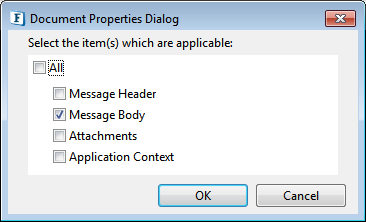
The default Workflow data type (Properties > General > Workflow Data Type) is set to 'Message Body'. This implies that only the JMS message body is tracked. To configure message tracking, click the button against the Workflow Data Type property to track Message Header, Message Body, Attachments, Application Context, or all of these options.

Figure 5: Document Tracking Properties
Configuring SBW Selectors on ports
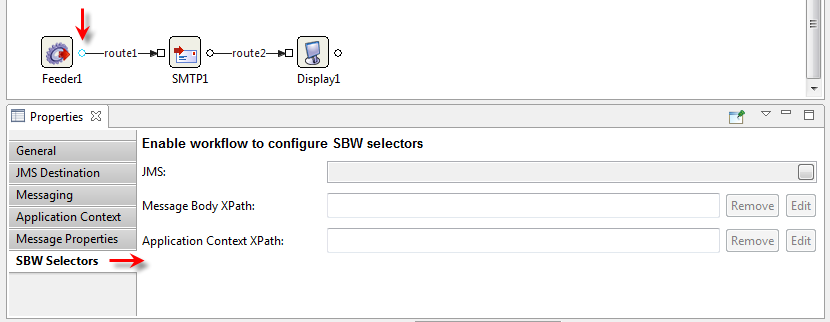
After configuring Workflow as explained in the above section, it is possible to set filters for the data flow through ports, which is similar to Configuring Selectors on Routes. The Selectors can be defined based on:
- the value of a JMS property in the message
- an XPath defined on the incoming XML message
- an XPath defined on the Application Context (wherein Application Context is defined).
Click the port where a selector needs to be configured and go to the SBW Selectors tab in the Properties panel to apply any of the methods above.

Other References
Tracking in Dashboard
To track data and manage the tracked data, log on to the Dashboard (Fiorano Web Console) and navigate to the Document Tracking tab on the left navigation panel.
Re-injecting a failed document
If a document fails in a workflow, it can be re-injected from the Document Tracking tab in the Dashboard.
Deleting Document Tracking data
To avoid issues such as Low Disk Space error, free some disk space by discarding old entries in the Document Tracking Database.
In the Event Process, the state tracking is enabled for Feeder1 output port, SMTP1 output port and Display1 input port. All the messages which pass through these ports are tracked.