Creating the .bindings file
To connect Rabbit MQ using JMS API, 'RefFSContextFactory' has to be used as Initial Context Factory to lookup JNDI objects. In order to lookup, we need to create a '.bindings' file with JNDI administered objects.
To create the bindings file, save a text (.txt) file naming it as ".bindings" and edit the file by providing object definitions represented in Content/Type/Encoding triplet as per requirement.
Objects in the .bindings file
ConnectionFactory
Specify the ConnectionFactory objects in the .bindings file with the corresponding ClassName and FactoryName for each object.
ConnectionFactory/ClassName=javax.jms.ConnectionFactory ConnectionFactory/FactoryName=com.rabbitmq.jms.admin.RMQObjectFactory |
This .bindings file contains attributes that are used to lookup a ConnectionFactory object and other JNDI resources. Each attribute has a name, a value and the type of variable that holds the value.
Attributes in the ConnectionFactory object
The attributes to lookup connection factory object are name, type, factory, and hostname.
name
A 'name' attribute contains the value 'jms/ConnectionFactory' of type 'String'.
ConnectionFactory/RefAddr/ 0 /Content=jms/ConnectionFactory ConnectionFactory/RefAddr/ 0 /Type=name ConnectionFactory/RefAddr/ 0 /Encoding=String |
type
A 'type' attribute contains the value 'javax.jms.ConnectionFactory' which is of the type 'String'.
ConnectionFactory/RefAddr/ 1 /Content=javax.jms.ConnectionFactory ConnectionFactory/RefAddr/ 1 /Type=type ConnectionFactory/RefAddr/ 1 /Encoding=String |
factory
A 'factory' attribute contains the value 'com.rabbitmq.jms.admin.RMQObjectFactory' which is of the type 'String'.
ConnectionFactory/RefAddr/ 2 /Content=com.rabbitmq.jms.admin.RMQObjectFactory ConnectionFactory/RefAddr/ 2 /Type=factory ConnectionFactory/RefAddr/ 2 /Encoding=String |
hostname
hostname attribute can be created for ConnectionFactory object as below.
ConnectionFactory/RefAddr/ 3 /Content= 192.168 . 1.172 ConnectionFactory/RefAddr/ 3 /Type=host ConnectionFactory/RefAddr/ 3 /Encoding=String |
Destinations
Similar to that of ConnectionFactory objects, destinations can be specified as objects in .bindings file.
Examples
Considering the destination as queue, to define the destination object, specify the name, type, factory and destinationName attributes.
Queue
Take for example queue name as 'queue1', then the object definition looks like:
# queue1 Queue queue1/ClassName=javax.jms.Queue queue1/FactoryName=com.rabbitmq.jms.admin.RMQObjectFactory queue1/RefAddr/ 0 /Content=jms/Queue queue1/RefAddr/ 0 /Type=name queue1/RefAddr/ 0 /Encoding=String queue1/RefAddr/ 1 /Content=javax.jms.Queue queue1/RefAddr/ 1 /Type=type queue1/RefAddr/ 1 /Encoding=String queue1/RefAddr/ 2 /Content=com.rabbitmq.jms.admin.RMQObjectFactory queue1/RefAddr/ 2 /Type=factory queue1/RefAddr/ 2 /Encoding=String queue1/RefAddr/ 3 /Content=queue1 queue1/RefAddr/ 3 /Type=destinationName queue1/RefAddr/ 3 /Encoding=String |
Topic
If the destination is Topic, an example of definition of Topic is given below:
# topic1 Topic topic1/ClassName=javax.jms.Topic topic1/FactoryName=com.rabbitmq.jms.admin.RMQObjectFactory topic1/RefAddr/ 0 /Content=jms/Topic topic1/RefAddr/ 0 /Type=name topic1/RefAddr/ 0 /Encoding=String topic1/RefAddr/ 1 /Content=javax.jms.Topic topic1/RefAddr/ 1 /Type=type topic1/RefAddr/ 1 /Encoding=String topic1/RefAddr/ 2 /Content=com.rabbitmq.jms.admin.RMQObjectFactory topic1/RefAddr/ 2 /Type=factory topic1/RefAddr/ 2 /Encoding=String topic1/RefAddr/ 3 /Content=topic1 topic1/RefAddr/ 3 /Type=destinationName topic1/RefAddr/ 3 /Encoding=String |
Sending AMQP message to the destination
If AMQP message needs to be sent to the destination, then provide additional attributes such as:
- amqp
- amqpExchangeName
- amqpRoutingKey
- amqpQueueName.
queue1/RefAddr/ 4 /Content= true queue1/RefAddr/ 4 /Type=amqp queue1/RefAddr/ 4 /Encoding=String queue1/RefAddr/ 5 /Content=jms.durable.queues queue1/RefAddr/ 5 /Type=amqpExchangeName queue1/RefAddr/ 5 /Encoding=String queue1/RefAddr/ 6 /Content=queue1 queue1/RefAddr/ 6 /Type=amqpRoutingKey queue1/RefAddr/ 6 /Encoding=String queue1/RefAddr/ 7 /Content=queue1 queue1/RefAddr/ 7 /Type=amqpQueueName queue1/RefAddr/ 7 /Encoding=String |
If the message is amqp message, then the configuration of JMSIn:5.0 and JMSOut:5.0 microservices are shown below,
JMSIn:5.0 Configuration
- In the Send Configuration panel, click the ellipsis button for the Message Type Configuration property.
Enable the Use XML Interface property and provide a Message type from the drop-down menu.
Figure 1: Message Type Configuration property options for JMSIn:5.0
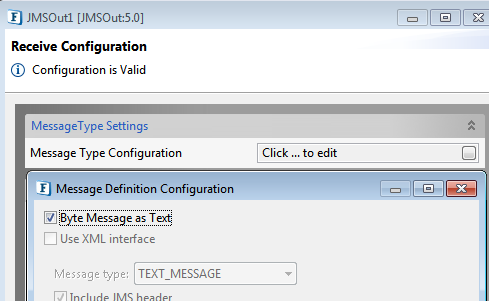
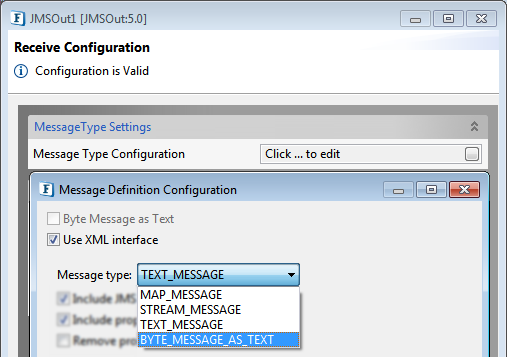
JMSOut5.0 Configration
- In the Receive Configuration page, click the ellipsis button for the Message Type Configuration property.
- If the input does not contain any XML content, then enable the Byte Message as Text property. Else, enable the Use XML Interface property and choose 'BYTE_MESSAGE_AS_TEXT' in the Message Type drop down.
Figure 2: Message Type Configuration property options for JMSOut:5.0
#Connection Factory Object ConnectionFactory/ClassName=javax.jms.ConnectionFactory ConnectionFactory/FactoryName=com.rabbitmq.jms.admin.RMQObjectFactory ConnectionFactory/RefAddr/ 0 /Content=jms/ConnectionFactory ConnectionFactory/RefAddr/ 0 /Type=name ConnectionFactory/RefAddr/ 0 /Encoding=String ConnectionFactory/RefAddr/ 1 /Content=javax.jms.ConnectionFactory ConnectionFactory/RefAddr/ 1 /Type=type ConnectionFactory/RefAddr/ 1 /Encoding=String ConnectionFactory/RefAddr/ 2 /Content=com.rabbitmq.jms.admin.RMQObjectFactory ConnectionFactory/RefAddr/ 2 /Type=factory ConnectionFactory/RefAddr/ 2 /Encoding=String # Change this line accordingly if the broker is not at localhost ConnectionFactory/RefAddr/ 3 /Content= 192.168 . 1.172 ConnectionFactory/RefAddr/ 3 /Type=host ConnectionFactory/RefAddr/ 3 /Encoding=String # test Queue for non-AMQP destination test/ClassName=javax.jms.Queue test/FactoryName=com.rabbitmq.jms.admin.RMQObjectFactory test/RefAddr/ 0 /Content=jms/Queue test/RefAddr/ 0 /Type=name test/RefAddr/ 0 /Encoding=String test/RefAddr/ 1 /Content=javax.jms.Queue test/RefAddr/ 1 /Type=type test/RefAddr/ 1 /Encoding=String test/RefAddr/ 2 /Content=com.rabbitmq.jms.admin.RMQObjectFactory test/RefAddr/ 2 /Type=factory test/RefAddr/ 2 /Encoding=String test/RefAddr/ 3 /Content=test test/RefAddr/ 3 /Type=destinationName test/RefAddr/ 3 /Encoding=String |
sample/ClassName=javax.jms.Queue sample/FactoryName=com.rabbitmq.jms.admin.RMQObjectFactory sample/RefAddr/ 0 /Content=jms/Queue sample/RefAddr/ 0 /Type=name sample/RefAddr/ 0 /Encoding=String sample/RefAddr/ 1 /Content=javax.jms.Queue sample/RefAddr/ 1 /Type=type sample/RefAddr/ 1 /Encoding=String sample/RefAddr/ 2 /Content=com.rabbitmq.jms.admin.RMQObjectFactory sample/RefAddr/ 2 /Type=factory sample/RefAddr/ 2 /Encoding=String sample/RefAddr/ 3 /Content=sample sample/RefAddr/ 3 /Type=destinationName sample/RefAddr/ 3 /Encoding=String sample/RefAddr/ 4 /Content= true sample/RefAddr/ 4 /Type=amqp sample/RefAddr/ 4 /Encoding=String sample/RefAddr/ 5 /Content=jms.durable.queues sample/RefAddr/ 5 /Type=amqpExchangeName sample/RefAddr/ 5 /Encoding=String sample/RefAddr/ 6 /Content=sample sample/RefAddr/ 6 /Type=amqpRoutingKey sample/RefAddr/ 6 /Encoding=String sample/RefAddr/ 7 /Content=sample sample/RefAddr/ 7 /Type=amqpQueueName sample/RefAddr/ 7 /Encoding=String |
Adding Dependencies
To use JMS API of RabbitMQ, add the following jars to the JMSAdapters node under System Lib in the Micro Service Repository panel:
amqp-client-4.1.1.jar
fscontext-4.5-b25.jar
rabbitmq-jms-client.jar
Configuring the Microservice
The JMS microservice connection related properties are configured in the landing panel of the microservice CPS (Managed Connection Factory panel for version 4 and JMS Connection Configuration for version 5).
- In the Provider URL Settings property, specify the JMS Provider as '"RABBIT_MQ".
In the JNDI Settings, Initial Context Factory will be pre-loaded with the value "com.sun.jndi.fscontext.RefFSContextFactory".
In the Connection Configuration, specify the location of the JNDI .bindings file in Server URL.
To validate the connection, click the Test Button. A confirmation message 'Connection created successfully' gets displayed if the connection is succesful.