The DB component is an all-encompassing powerful component which can be used to configure simple and nested queries such as insert, update, delete and select. It can also be used to monitor tables by value, by reference, by using alter tables and by using stored procedures. Monitoring feature can be used for loop detection in replicating databases. The graphic user interface of this component allows designing queries with the application of zero coding effort using the Design mode. However, the SQL mode can also be used to write queries. Syntactical validity of the SQL can be ensured by using the Check Syntax SQL button provided on the SQL configuration panel in the SQL mode. Following are some salient features of the DB component:
- Query execution - Using this component, simple select, update, insert and delete queries can be executed.
- Nested Query Execution - The DB component provides one level of nesting for insert, update, delete, and stored procedures.
- Grouping - DB components support query grouping which is the execution of a set of queries in a pre-defined order.
- Stored Procedures - The DB component supports execution of Stored Procedures.
- Failover Queries - These queries are executed when an SQL Statement fails to execute due to an error. Failover queries maintain data consistency even in a case when an unexpected error while executing an SQL Statement is experienced by the component flow.
- Post Processing - SQL statements for post processing can be defined after a single query execution or after an execution of multiple queries.
- Table Monitoring - The DB component supports monitoring of simple and nested tables for data insertion, updation, and deletion. This component also supports monitoring for updation of selected columns. Multiple tables can be monitored using this component.
- Customized Transactions - The component can be configured to commit the entire transaction after a row, document, batch, or can be committed automatically.
- Customized Response Size - The response size for the output of the component can be configured. This allows the processing of multiple records in a single transaction. For example, if only 100 records should be processed in a transaction, it can be set using the Response Size field. This ensures that only 100 records are sent as part of one message. If there are 500 records, 5 responses are sent with 100 records in each.
- Support for Advanced and Complex Data types - The DB component supports BLOB, CLOB, User Defined Data types (UDTs) and different date-time formats.
Points to note
- It is recommended NOT to use JDBC-ODBC Bridge driver to connect to any RDBMS in your production environment. Please use a commercial JDBC driver instead.
- The JDBC drivers or the resources must be directly added onto the JDBC system lib and not as resource to the DB component itself. To add JDBC drivers to DB component, please refer to Adding Resources to a Microservice section.
Configuration and Testing
Managed Connection Factory
Connection details are configured in the first panel, which is Managed Connection Factory - MCF of Configuration Property Sheet (CPS).
The figure below shows the panel with the Show Expert Properties checkbox selected.
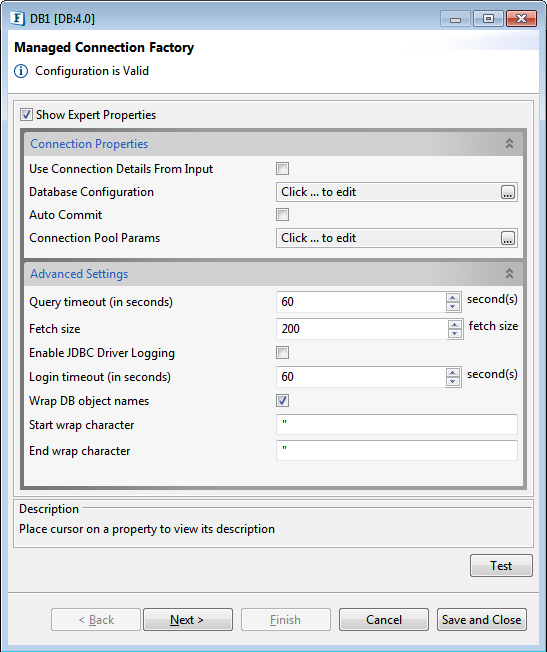
Figure 1: Managed Connection Factory Panel
Connection Properties
Use Connection Details From Input
Parameters to create the connection can be specified in the input message when this option is selected
Database Configuration
Click the Ellipsis ![]() button to add the configuration details.
button to add the configuration details.
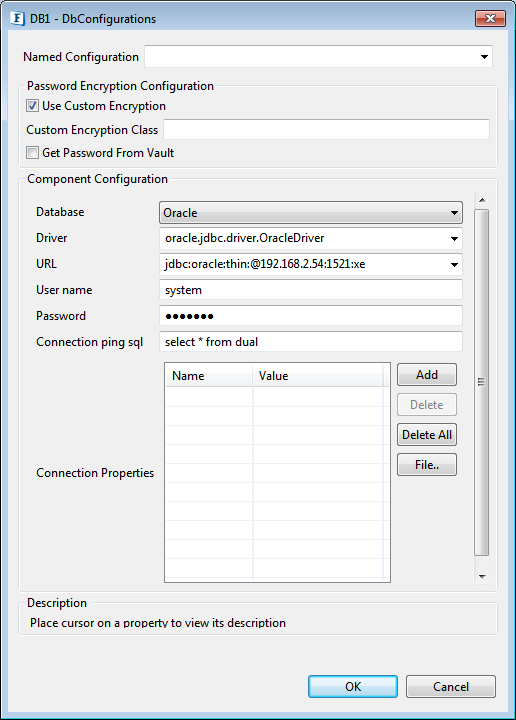
Figure 2: Database Configuration
Password Encryption Configuration
This property helps to use your own keys and algorithms to encrypt passwords.
Use Custom Encryption
Please refer "Custom Encryption of Passwords used in Event Processes" section in the Security page for details.
Component Configuration
Database
Select the appropriate database in the Database property; the drop-down lists all the supported databases as shown in the figure below. If the required database is not listed, select Other as the database option.
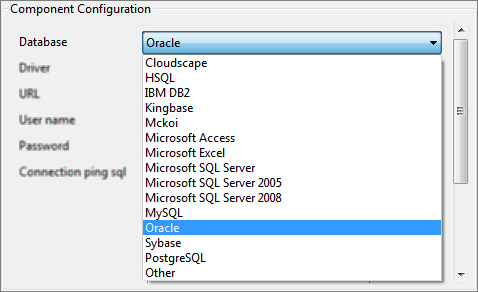
Figure 3: Database Drop-Down List
Driver
Driver class name that should be used to connect to the database. On selecting required database, Driver value is populated with standard value (This can be changed to required values based on driver being used).
URL
URL at which the database is running. On selecting required database, URL value is populated with standard value (This can be changed to required values based on driver being used). The populated value will have place holders which have to be replaced to point to correct database location, for example, replace <hostname> with the actual IP address where the database is located and provide the name of the database in the respective placeholder.
User name
User Name of the particular database.
Password
Password for the respective User Name.
Connection ping sql
A SQL statement which is guaranteed to execute without exception, except when connection to database is lost. When a SQL exception occurs on executing a configured query, this SQL statement is executed. If execution of this SQL statement fails as well, then it is assumed that connection to database is lost and appropriate configured action (say, reconnect) is taken.
Example: "select * from dual" for oracle, "select 1" for MS SQL
Connection Properties
Any driver-specific connection properties which may have to be passed while creating a JDBC connection should be provided against Connection Properties. For example, fixedString=true (click Add and type-in name and value) uses FIXED CHAR semantics for string values in oracle.
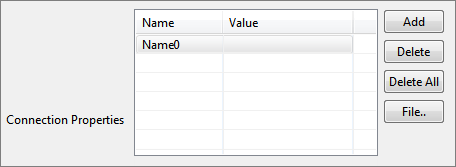
Figure 4: DB Connection Properties
Auto commit
Commit mode that should be used by the JDBC connection.
Connection Pool Params
Here you can specify the details for maintaining the pool of connections in the component. Click the Ellipsis ![]() button for the ConnectionPoolAttributes dialog box to appear.
button for the ConnectionPoolAttributes dialog box to appear.
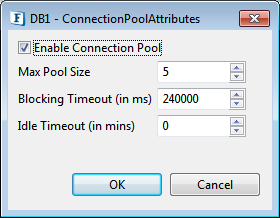
Figure 5: Connection Pool Attributes
Enable Connection Pool
If selected, the connections created are cached in to a pool and used whenever required and available. This can reduce the time for creating a new connection for every input request. If disabled, a new connection is created for each request and it will be closed after completion of that request.
Max Pool Size
The maximum number of connections that can be allocated for the pool.
Blocking Timeout (in ms)
The time after which the call to fetch a connection from the pool will timeout if there is no unused connection available.
Idle Timeout (in ms)
The time after which the idle connections are returned back to the pool.
Advanced Settings

Figure 6: Advanced Setting section
Query timeout
Time, in seconds (>= 0), after which an exception is thrown if the query execution is not complete. For example, if this value is set to 60 and a query to database does not return within 60 seconds, then an exception is thrown and query execution is stopped.
Fetch size
Number of rows (>=0), which should be fetched from database into the component when iterating through result sets. This value provides a tradeoff between the number of trips on networks and memory requirement. For example, a query results in 1000 rows and fetch size is set to 500, then result set gets all rows from database in two sets of 500 rows each.
Enable jdbc driver logging
Selecting the checkbox enables logging at the driver level. This is used as a debugging option.
Login Timeout (in seconds))
Time, in seconds (>= 0), after which an exception is thrown if the login process is not complete.
Wrap DB object names
When database object names (viz. table names, column names, schema names…) contain spaces, they should be wrapped in database dependent special characters. For example, " " for Oracle and [ ] for excel.
Database object names are wrapped as below:
Start wrap character + object name + End wrap character
Start wrap character
Character which should be used before the object name
End wrap character
Character which should be used after the object name
Interaction Configurations
SQL configuration details and advanced configurations are configured in the second panel (click Next in the Managed Connection Factory dialog box) of CPS, that is, Interaction configurations.
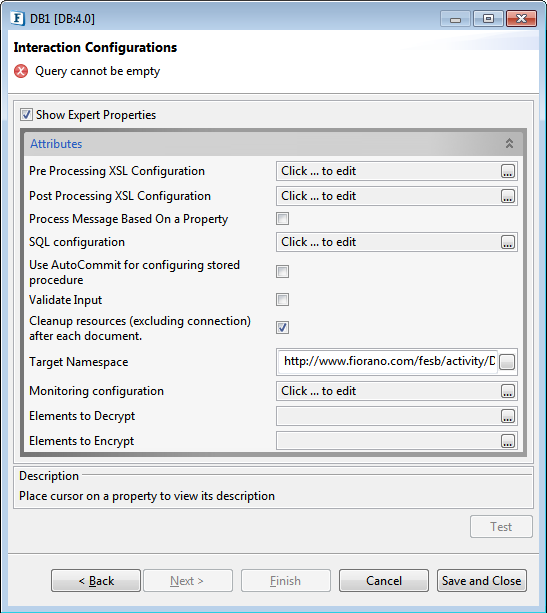
Figure 7: Interaction Configurations
Pre Processing XSL Configuration
Pre Processing XSL configuration can be used to transform request message before processing it. Click the ellipses button against the property to configure the properties.
Refer to the Pre/Post Processing XSL Configuration section in the Common Configurations page for details regarding Pre Processing XSL configuration and Post Processing XSL configuration (below).
Post Processing XSL Configuration
Post Processing XSL configuration can be used to transform response message before sending it to the output port.
Process Message Based on Property
The property helps components to skip certain messages from processing.
Refer to the Process Message Based On a Property section in the Common Configurations page.
SQL Configuration
Click the SQL configuration Ellipsis ![]() button to launch the wizard which allows configuring queries that have to be executed.
button to launch the wizard which allows configuring queries that have to be executed.
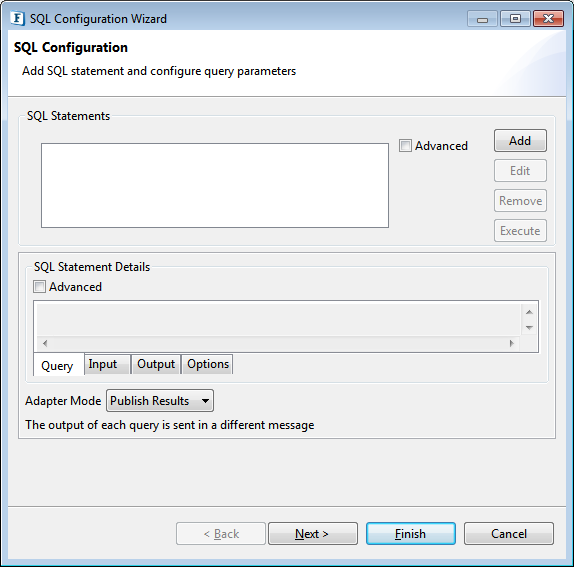
Figure 8: SQL Configurations Panel
SQL Configuration panel allows configuring multiple queries. To configure a query, click Add button and select required type of query from the pop-up menu.
Adding Query Configuration
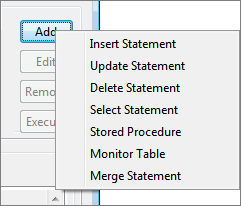
Figure 9: Adding a Query
Explanation for different types of queries is given in the following table:
| Type of Query | Description |
|---|---|
Insert Statement | Inserts/adds data into database table |
Update Statement | Modifies existing data in database table. This option also allows to configure upsert queries (explained later) |
Delete Statement | Deletes data from database table |
Select Statement | Retrieves data from database table |
Stored Procedure | Executes stored procedure in database |
Monitor Table | Checks for inserts/updates/deletes on a table and reports them |
Object Selection
Configuring queries requires selecting database objects on which actions have to be taken. Three kinds of objects are dealt within SQL configuration: tables, stored procedures, and user-defined data types. UI for selecting objects are very similar in appearance and functionality.
Table selection UI appears after selecting a query statement by clicking Add button, first in the SQL Configuration panel and then in the Query Builder panel.

Figure 10: Adding Table from Query Builder
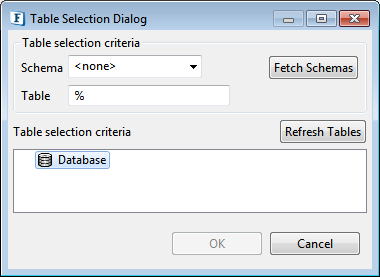
Figure 11: Table Selection Dialog
Click the Refresh <object> (Refresh Tables, for table selection) button to select from the entire list of objects/tables. However, to narrow-down the search to select a particular database object, provide the selection criteria under Table selection criteria as explained below.
Schema
Click the Fetch Schemas button and then select Schema from the Schema drop-down, or type the name in the drop-down box or just type a pattern to find the appropriate Schema and select from the filtered list in the drop-down.
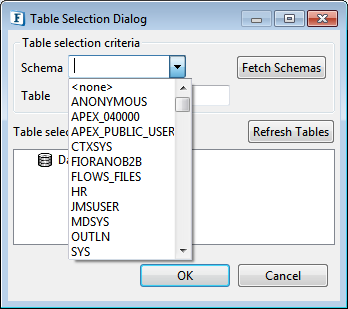
Figure 12: Selecting a Schema
Object/Table
Type the exact table name or a pattern and click the Refresh <object> (Refresh Tables, for table selection) button to fetch the list of objects matching the criteria specified, and then select the object/table from the Database.
Schema and Object/Table name pattern, used to find objects by their specific names, comprise of SQL wild cards:
- % represents a set of characters
- _ represents one character
Examples:
- S% finds all object names starting with S
- %S% finds all object names containing S
- _S% finds all object names whose second character is S
Result can be incrementally searched for the appropriate value by typing in first few characters when the result tree filters as per the criteria. In the below figure, "EMP%" is used in Table field, which has filtered the tables starting with "EMP".
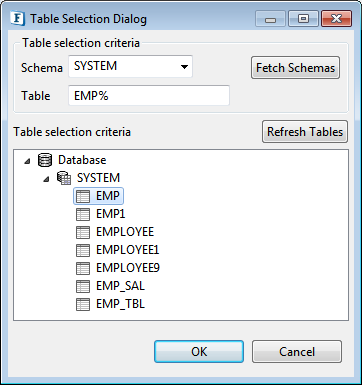
Figure 13: Searching a Table
Insert Statement Configuration
Click Add button and select Insert Statement option to launch Insert Query Builder.
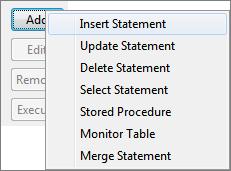
Figure 14: Selecting Insert Statement
Simple Insert Statement
Behavior: Inserts a row in configured table with column values taken from input XML or with constant column values.
- Provide a name for the query against Query Name.
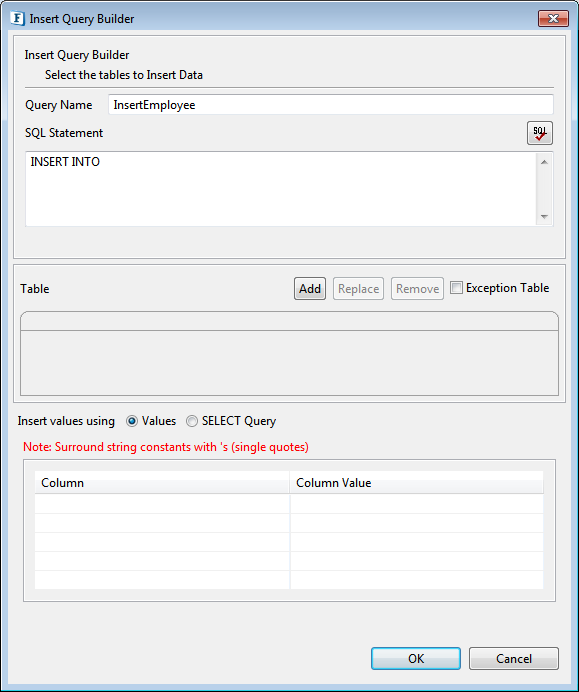
Figure 15: Insert Query Builder - Click Add button to launch Table Selection Dialog panel.
- Select required table as explained in Object Selection section. Selected table is added to the easel under Table. Primary key column, if exists, is marked with
 adjacent to column name.
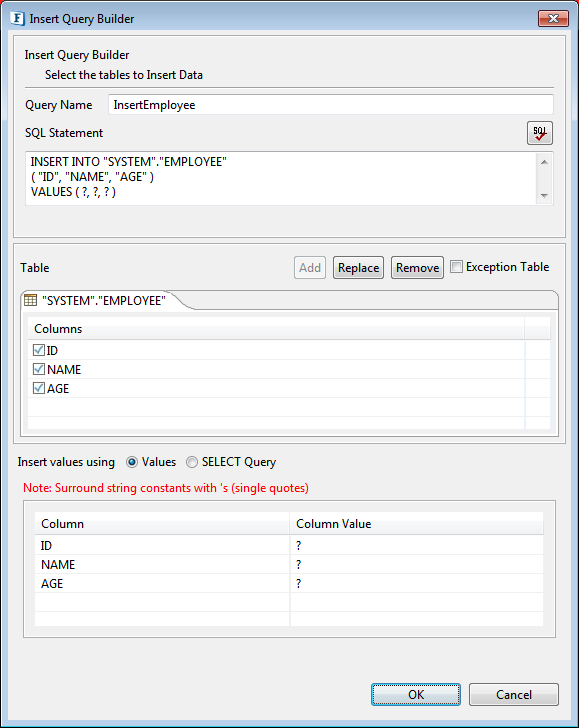
Figure 16: Selected table added to easel with all columns - Table can be changed by clicking Replace button and removed by clicking Remove button.
- If values are never to be inserted into a particular column, then that column can be unchecked (this requires column to have a default value or support null values

Figure 17: Ignoring column for insertion To insert a constant value for a particular column, specify the required value in the Column Value column against the required column name.

Figure 18: Inserting constant value into a table
Figure 19: Generated insert queryClick OK to close the dialog box.
Insert Statement with Select
Behavior: Insert rows in configured table by selecting rows from another table.
- Follow the steps from 1 to 6 as described in the Simple Insert Statement section.
- Select SELECT Query option against Insert values using and click the Select Query Wizard button to launch Select Query Builder dialog box.

Figure 20: Option to insert values into a table using select query - Follow the steps as described in the Simple Select Statement section.
As the Select Query Builder dialog box is closed, Insert Statement is automatically generated and shown in the text editor under SQL Statement in the Insert Query Builder dialog box.

Figure 21: Generated query to insert values using select
Click OK to close the dialog box.
Insert Statement with failover
Behavior: Insert rows in configured table. If an exception occurs, insert in the exception table.
- Follow the steps from 1 to 8 as described in the Simple Insert Statement section.
- Click the Exception Table checkbox; the checkbox turns uneditable and Query Name also becomes uneditable holding a default name. This is the table wherein the values that raised exceptions are stored.
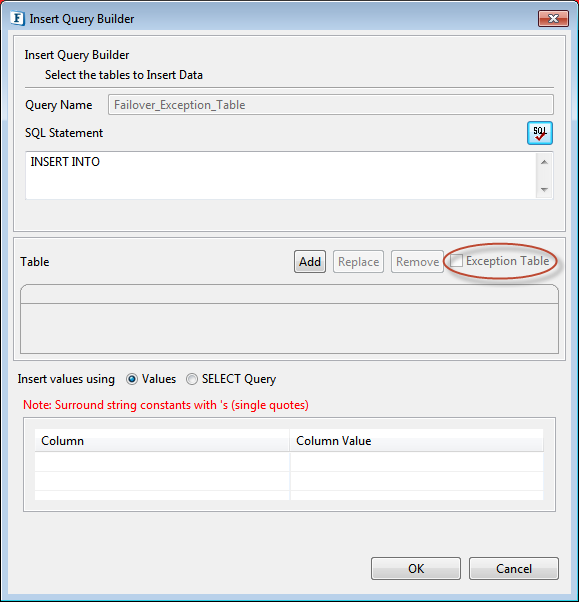
Figure 22: Exception Table Selection - Click Add and configure the exception table following steps from one of the previous Insert Statement sections based on the requirement (Clicking Cancel brings back the normal Insert Query Builder dialog box with the actual Table Name).
- Click OK to close the dialog.
Update Statement Configuration
Click Add button and select Update Statement to launch UPDATE Query Builder
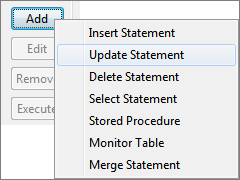
Figure 23: Adding Update Statement
Simple Update Statement
Behavior: Update rows satisfying defined condition in configured table, with column values taken fr98om input XML or with constant values. Condition values can also be taken from input XML or defined as constant values.
- Provide a name for the query against Query Name.
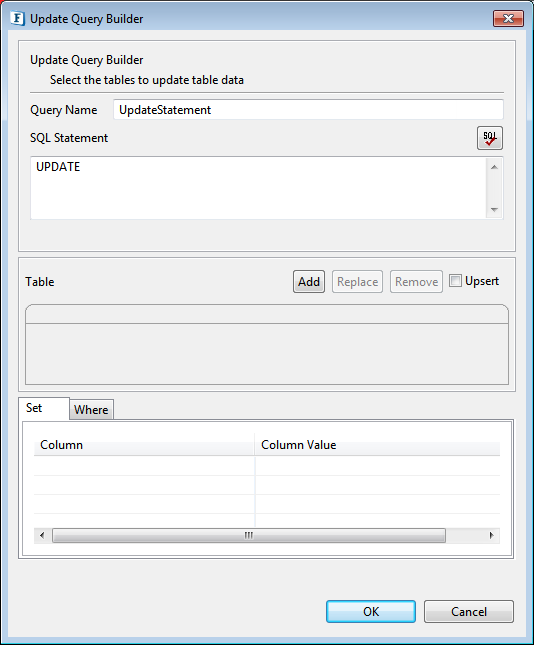
Figure 24: Update Query Builder - Click the Add button to launch Table Selection Dialog.
- Select required table as explained in the Object Selection section.
- Selected is added to the easel under Table. Primary key column, if exists, is marked with
 adjacent to column name.
Figure 25: Selected table added to easel with all columns - Table can be changed by clicking Replace button and removed by clicking Remove button.
- Select the columns whose values have to be set (Below figure shows that NAME and AGE columns are for update).

Figure 26: Ignoring column that does not need update - Selected columns automatically reflect under the SET tab.

Figure 27: Columns added to SET clause - Click the WHERE tab and select a column name on which where condition has to be applied.
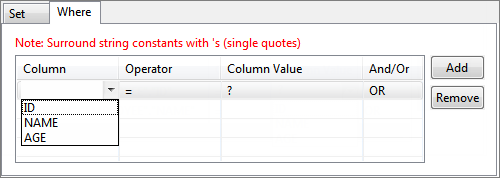
Figure 28: Adding condition on column to WHERE clause - To select multiple columns for where condition, conditions can be combined by using AND or OR under And/Or column; click Add button to add more rows.
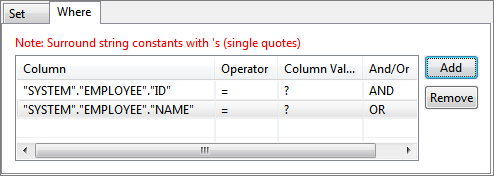
Figure 29: Specifying multiple conditions for WHERE clause - Operator of choice can be selected from the drop-down list under Operator column.
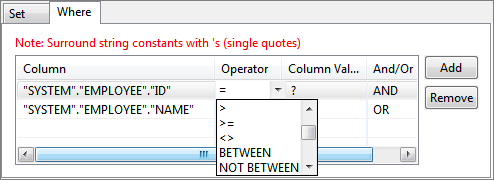
Figure 30: Selecting operator for a condition
Figure 31: WHERE tab with conditions and operators selected - Constant values can be set to columns that have to be updated (under SET tab) or for values in where condition (under WHERE tab).
- To update a column with a constant value, specify the required value in the Column Value column against the required column name in SET tab.

Figure 32: Specifying constant value for a column in SET clause To specify a constant value for where condition on a column, specify the required value in the Column Value column against the required column name in WHERE tab.

Figure 33: Specifying constant value for a column in condition for WHERE clauseTo specify where condition on a column whose value is equal to value defined in another column, select the required column from the drop-down list in the Column Value column against the required column name in WHERE tab.

Figure 34: Specifying comparison between columns for WHERE clause condition

Figure 35: Generated update query - To update a column with a constant value, specify the required value in the Column Value column against the required column name in SET tab.
Click OK to close the dialog.
Update Statement with Failover Insert (aka upsert)
Behavior: Updates a row satisfying defined condition in the configured table with column values taken from input XML. Condition values can also be taken from input XML. If the update fails to update any rows (update count = 0), then insert a row with provided values.
- Configure Update Statement following the steps mentioned in Simple Update Statement.
- Check UPSERT check box.
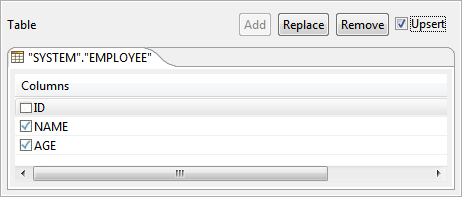
Figure 36: UPSERT Check Box
Delete Statement Configuration
Click Add button and select Delete Statement to launch DELETE Query Builder.
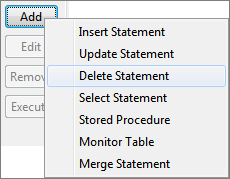
Figure 37: Selecting Delete Statement
Simple Delete Statement
Behavior: Delete rows satisfying defined condition in configured table, with column values taken from input XML or with constant values
- Provide a name for the query against Query Name.
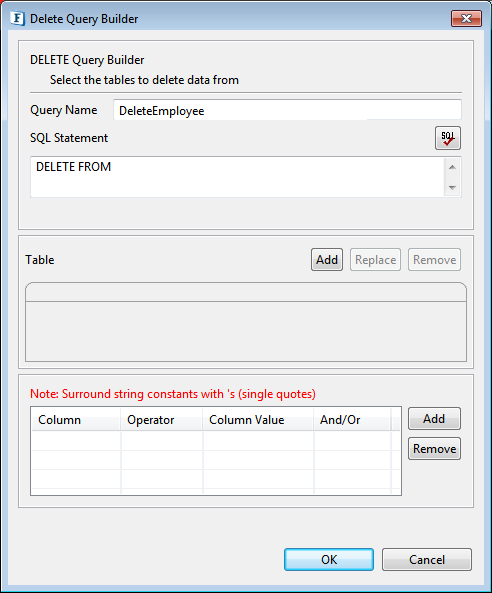
Figure 38: Delete Query Builder - Click the Add button to launch Table Selection Dialog panel.
- Select required table as explained in Object Selection section.
- Selected table is added to the easel under Table.
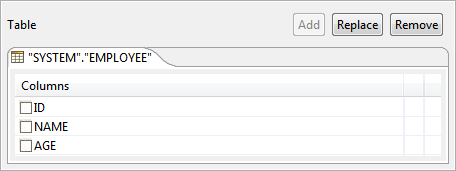
Figure 39: Selected table added to easel with all columns - Table can be changed by clicking Replace button and removed by clicking Remove button.
- Specify condition which should be satisfied for deleting a row using WHERE condition. Select a column name on which WHERE condition has to be applied.

Figure 40: Adding condition on column to WHERE clause - When selecting multiple columns for where condition, conditions can be combined using AND or OR under And/Or column; click Add button to add more rows.

Figure 41: Specifying multiple conditions for WHERE clause - Operator of choice can be chosen from the drop down under Operator column.

Figure 42: Selecting operator for a condition
Figure 43: With conditions and operators selected To specify a constant value for where condition on a column, specify the required value in the Column Value column against the required column name.

Figure 44: Specifying constant value for a column in condition for WHERE clauseTo specify where condition on a column whose value is equal to value defined in another column, select the required column from drop down in the Column Value column against the required column name in where tab.

Figure 45: Specifying comparison between columns in condition for WHERE clause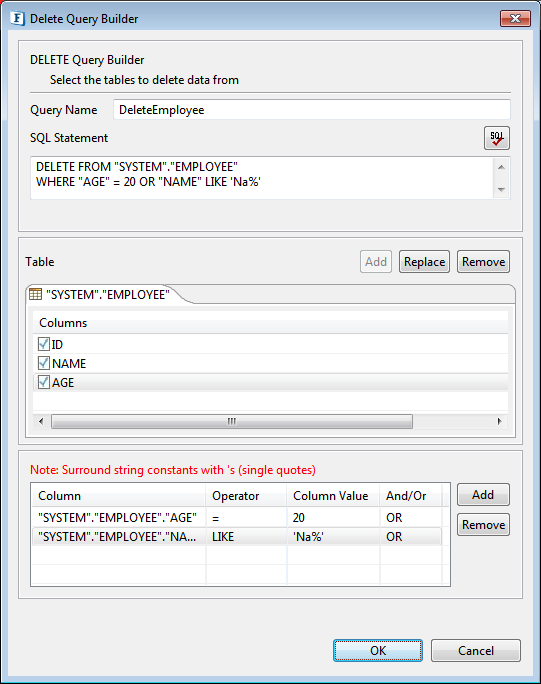
Figure 46: Generated Delete QueryClick OK to close the dialog box.
Select Statement Configuration
Click Add button and select Select Statement option to launch Select Query Builder.
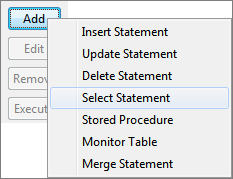
Figure 47: Selecting Select Statement
Simple Select Statement
Behavior: Retrieves data from all columns or from selected columns in a configured database table.
- Provide a name for the query against Query Name.
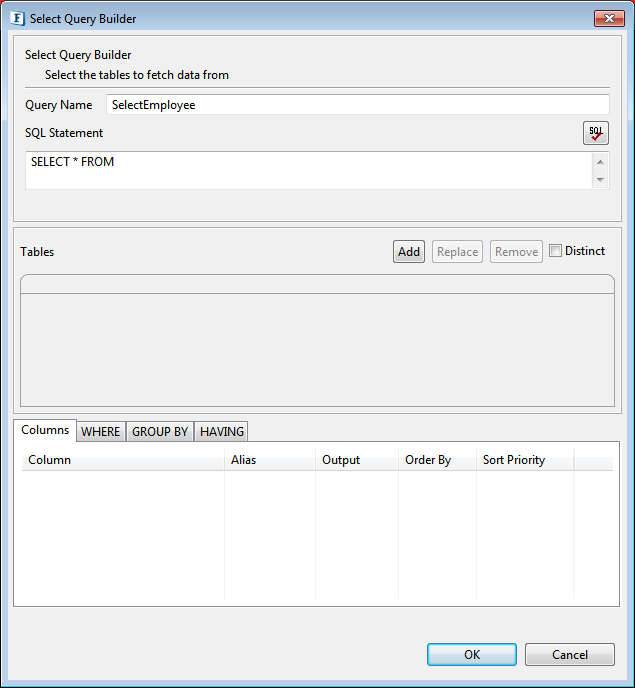
Figure 48: Select Query Builder - Click Add button to launch Table Selection Dialog.
- Select required table as explained in Object Selection section.
- Selected table is added to the easel under Table. Primary key column, if exists, is marked with
 adjacent to column name.
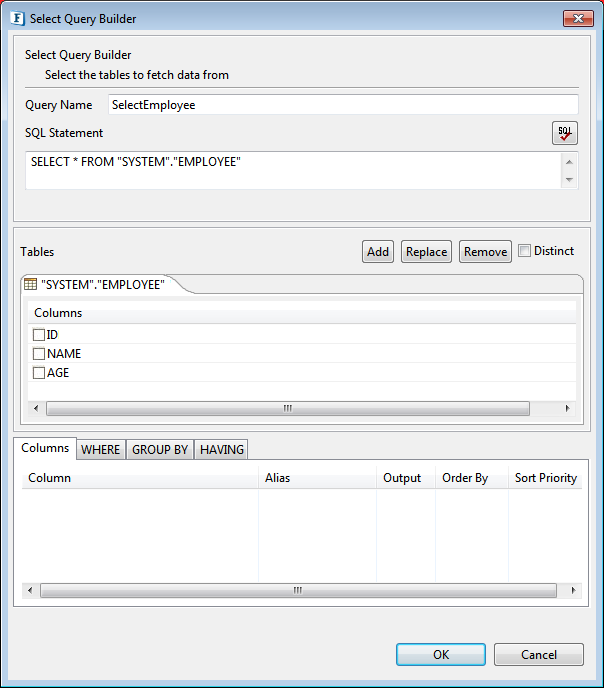
Figure 49: Selected table added to easel with all column - Table can be changed by clicking Replace button and removed by clicking Remove button.
To retrieve values from specific columns in the table, select the required checkboxes under Columns (in the Tables section, right below the table name) to build a Select Query with specific columns.
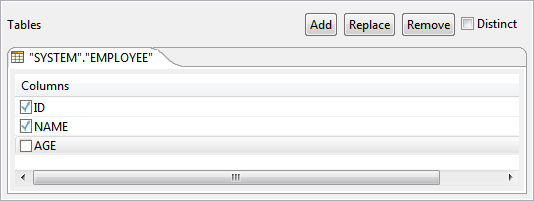
Figure 50: Ignoring column for selectionSelected columns are shown under Columns tab in the bottom part of the Select Query Builder. Check/Uncheck the check box in Output column against required column name to include/exclude the respective column in the output XML.
For example, configuration in the following image generates ID in the output XML but does not generate NAME in output XML even though values for both ID and NAME are retrieved from the table.

Figure 51: Selecting columns for output XMLTo define a column alias, provide the alias name under Alias column against the required column name. Aliases are useful when the column name is too long or is not intuitive. When an alias is specified, output XML contains an element with defined alias name instead of the column name.

Figure 52: Defining Column AliasCheck the DISTINCT check box to return unique rows, ignoring duplicate values.
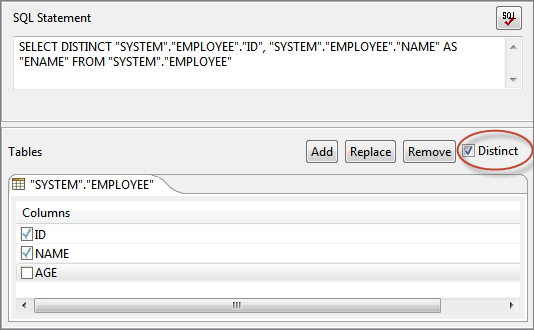
Figure 53: Distinct option to return unique values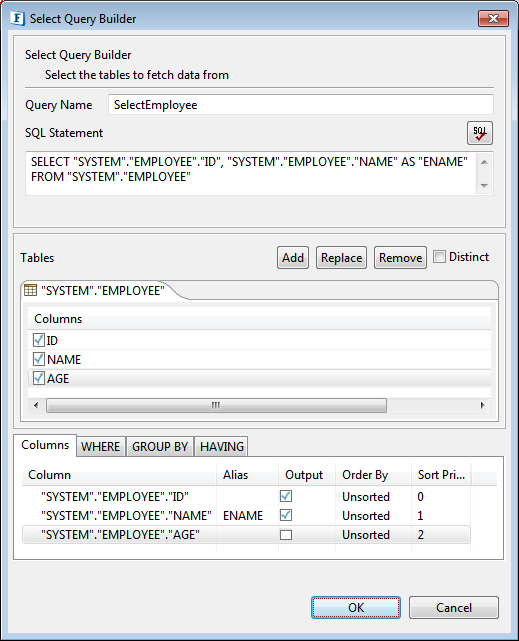
Figure 54: Generated select queryClick OK to close the dialog box.
Select Statement with Filter
Behavior: Retrieves data from all columns or from selected columns in a configured database table after applying specified conditions. Condition values can be provided from input XML or as constant values.
- Follow the steps from 1 to 8 as described in the Simple Select Statement section.
- Click the WHERE tab, click the Add button, and then select a Column name on which WHERE condition has to be applied.

Figure 55: Adding condition on column to WHERE clause - When selecting multiple columns for WHERE condition, conditions can be combined using AND or OR under And/Or column; click Add button to add more rows.

Figure 56: Specifying multiple conditions for WHERE clause - Operator of choice can be selected from the drop-down list under Operator column.

Figure 57: Selecting operator for a condition

Figure 58: WHERE tab with conditions and operators selected - Constant values can also be set for values in WHERE condition (under WHERE tab).
To specify a constant value for WHERE condition on a column, specify the required value in the Column Value column against the required column name in WHERE tab.

Figure 59: Specifying constant value for a column in WHERE tabTo specify WHERE condition on a Column whose value is equal to value defined in another Column, select the required Column from drop-down list in the Column Value against the required column name in WHERE tab.

Figure 60: Specifying comparison between columns in condition for WHERE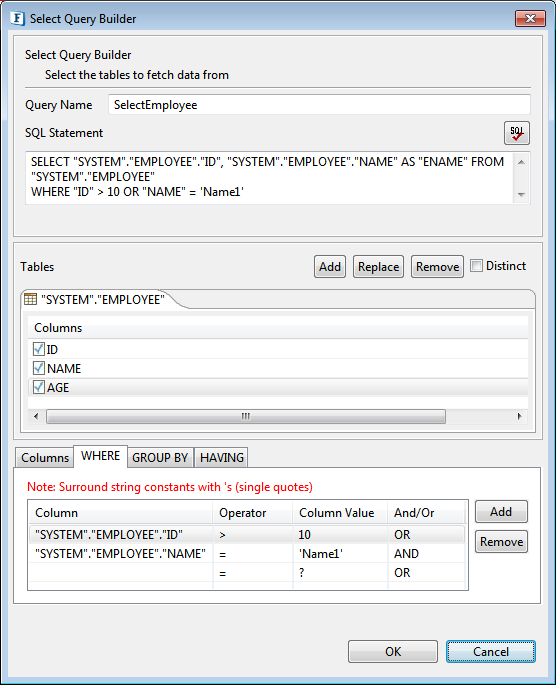
Figure 61: Generated select query with filter
Click OK to close the dialog box.
Select Statement with Sorting
Behavior: Retrieves sorted data from all columns or from selected columns in a configured database table. Data is sorted in configured order on columns configured for sorting.
- Follow steps 1 to 8 in the Simple Select Statement section.
To specify columns which have to be sorted, select the appropriate sort order from drop-down list under Order By column. Order By for each columns has one of the following values:
Order By Value
Explanation
Unsorted
Data is not sorted on values in the column, that is, no order by clause is added in the SQL statement.
Ascending
Data is sorted in ascending order on values in the column, that is order by clause is added in the SQL statement as ORDER BY <column name> ASC.
Descending
Data is sorted in descending order on values in the column, i.e. order by clause is added in the SQL statement as ORDER BY <column name> DESC.
Default
Data is sorted in default order for order by clause on values in the column, that is, order by clause is added in the SQL statement as ORDER BY <column name>.

Figure 62: Selecting sorting order for column
An example of SQL statement with different sort orders is shown below.
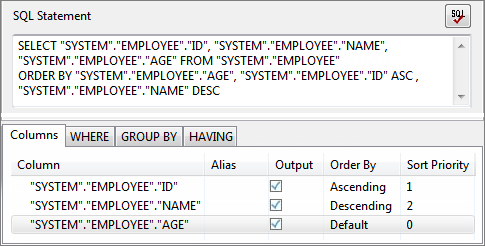
Figure 63: SQL Statement with different columns sorted in different orderWhen multiple columns have to be sorted, sorting priority for each column can be set under Sort Priority. Columns are sorted in order of increasing Sort Priority that is column with minimum value for Sort Priority is order first.
When values of Sort Priority for multiple columns are same, columns are sorted in the order in which they appear in select clause.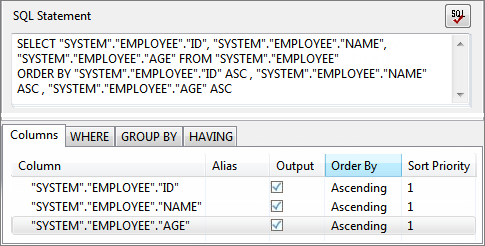
Figure 64: SQL Statement with Sort Priority- Click OK to close the dialog box.
Select Statement with Grouping
Behavior: Retrieves data, after applying grouping conditions, from all columns or from selected columns in a configured database table.
- Follow the steps from 1 to 5 as described in the Simple Select Statement section.
- Click on GROUP BY tab and check under Select against the columns under Group By on which group by condition should be applied.

Figure 65: Selecting columns for grouping condition - To filter the results click on HAVING tab and define required conditions. HAVING tab has functionality similar to WHERE tab (described in Select Statement with filter).

Figure 66: Adding condition to HAVING clause - Select required columns under Tables
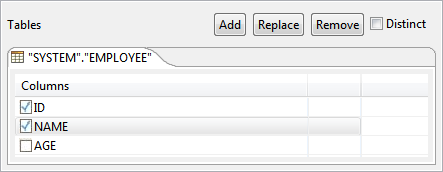
Figure 67: Selecting required columns Edit Select and HAVING clauses to apply appropriate grouping condition on selected columns.

Figure 68: Generated select query with grouping- Click the Ok button to close the dialog.
Select Statement with Multiple Tables
Behavior: Retrieves data from all columns or from selected columns from multiple configured database tables.
- Follow the steps from 1 to 5 as described in the Simple Select Statement section.
To add another table, click the Add button to launch Table Selection dialog.
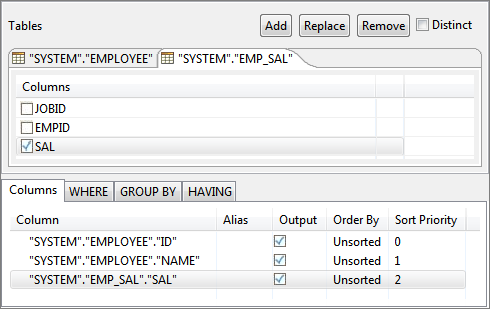
Figure 69: Selecting multiple tables- Add WHERE condition, described in Select Statement with filter section, to perform join on the tables. If no condition is specified, Cartesian product of rows in all selected tables is returned.

Figure 70: Usining WHERE condition for multiple Tables - To specify the join, in WHERE tab, select the required column from one table under Column and select the required column from another table under Column Value.

Figure 71: Generated SQL statement with join - To specify filtering, sorting or grouping conditions, refer the previous sections.
- Click the Ok button to close the dialog.
Merge Statement Configuration
Click Add > Merge Statement to launch Merge Query Builder.
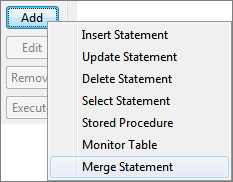
Figure 72: Adding Merge Statement
Behavior: Updates or inserts rows in target table with rows selected from one or more source tables.
- Provide a name for the merge query in the Query Name text field.
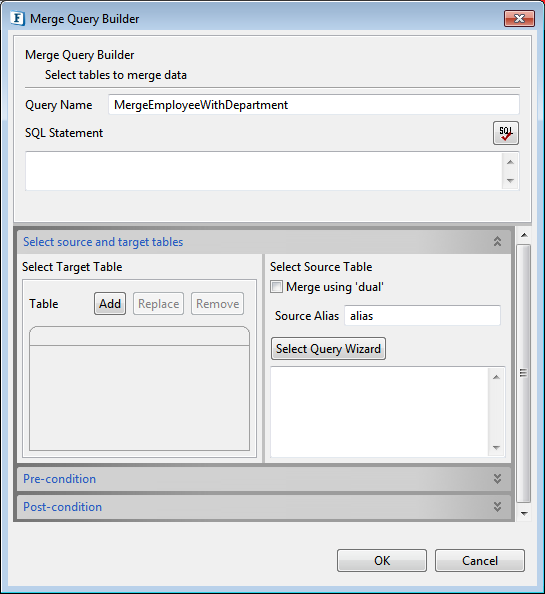
Figure 73: Adding name in Merge Query Builder Select Target Table
Select the target table using the Object Selection dialog by clicking the Add button under Select Target Table.
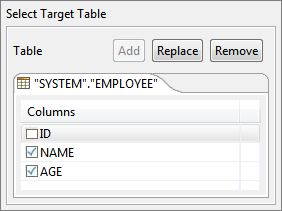
Figure 74: Select Target TableSelect Source Table
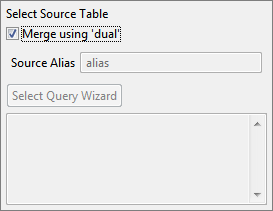
Figure 75: Select Source TableMerge using 'dual': Enabling this option manipulates data in the target table itself without a source table. Resulting MERGE statement would be like"'MERGE INTO <TargetTableName> USING DUAL ON...". Enabling this option would disable Source Alias and Select Query Wizard.
Source Alias: Specify a correlation name which is an alias for the SELECT subquery to be referenced elsewhere in the MERGE statement.
Select Query Wizard: Select the source subquery using the Select Query Wizard under Select Source Table. Configure the SELECT subquery as detailed in section Select Statement Configuration
Configure Pre-condition

Figure 76: Configuring Pre-condition- Use the Pre-condition option (click Expand
 icon) to specify the condition upon which the MERGE operation either updates or inserts.
For each row in the target table for which the search condition is true, the component updates the row with the corresponding data from the source table. If the condition is not true for any rows, the component inserts into the target table based on the corresponding row from the source table. - The drop-down list under the Column column consists of columns from target table and that of under the Column Value column consists of columns from both target and source tables.
- Use the Pre-condition option (click Expand
Configure Post-condition
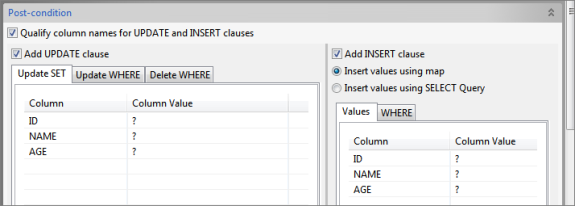
Figure 77: Configuring Post-condition
Based on whether Pre-Condition is satisfied or not for a given row in the target table, the query either updates or inserts data in the target table.- Qualify column names for UPDATE and INSERT clauses – Select this option to qualify, with the schema and table names, names of the columns in the target table.
- Add UPDATE clause – Select this option to add UPDATE clause to the MERGE statement.
- Add INSERT clause – Select this option to add INSERT clause to the MERGE statement.
Atleast one of UPDATE and INSERT clause should be added.
UPDATE
- The UPDATE clause specifies the new column values of the target table.
- Only the columns that are checked under Select Target Table will be shown here.
- The Configuration of Update SET and Update WHERE are detailed in Update Statement Configuration section.
- In the Update WHERE table, the drop-down list under the Column column consists of columns from target table and that of under the Column Value column consists of columns from both target and source tables.
DELETE

Figure 78: Configuring Delete WHERE Clause
Specify the Delete WHERE clause to clean up data in a table while populating or updating it.INSERT
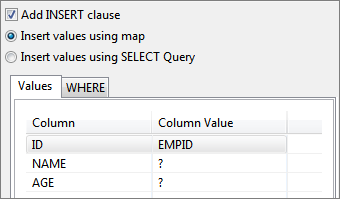
Figure 79: Configuring INSERT clause
- The INSERT clause specifies values to insert into the column of the target table if the condition of the ON clause is false.
- Configure INSERT query as detailed in Insert Statement Configuration Section
Points to Note
While configuring for MSSQL
- After configuring the MERGE query using UI, edit the sql statement and add a semi-colon (:) at the end of the query. Do not make any changes in the UI after adding the semi-colon.
- DELETE clause is not supported.
- Un-check the 'Qualify column names for UPDATE and INSERT clauses' option.
Stored Procedure Configuration
Behavior: Executes a stored procedure and returns the result (returns return value or out parameter values).
To configure the Stored Procedure, perform the following steps:
- Click the Add button and selectStored Procedure option to launch Stored Procedure Query Builder.
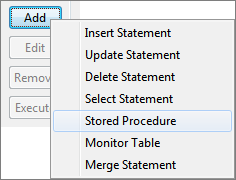
Figure 80: Adding Store Procedure - Provide a name against Query Name.
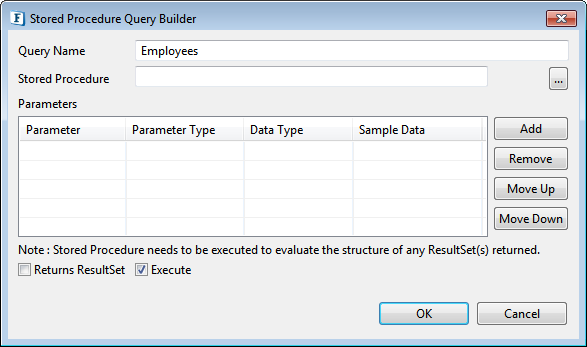
Figure 81: Adding Query name for Stored Procedure - Click Stored Procedure Ellipsis
 button.
 - Select required procedure as described in Object Selection section.
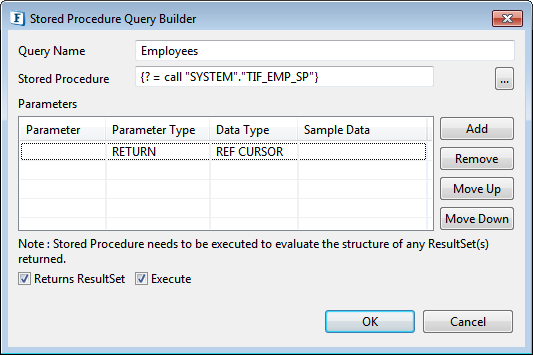
Figure 82: Stored procedure details Parameters and their configurations are automatically populated.
Column
Description
Parameter
Name of the parameter for named parameters; blank otherwise.
Parameter Type
Type of parameter – IN, OUT, INOUT, UNKOWN, RETURN, RESULT
Values of type OUT, INOUT, RETURN, RESULT form output structure.Data Type
SQL data type of the parameter.
Sample Data
NA
Before closing the Stored Procedure dialog, select Execute checkbox (as in the above figure) to execute the stored procedure to create output structure under the Output tab.
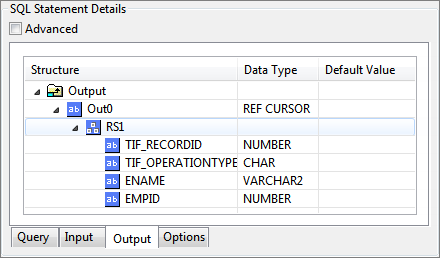
Figure 83: Output structure generated for selected stored procedure- Click OK to close the dialog box.
Monitor Table Configuration
Behavior: Monitors a configured table for any changes such as data addition, data removal and data updates.
Monitoring a table requires creation of temporary table/stored procedures and data types and hence is very specific to database in use. This option is not supported when Database selected is "Other" in MCF panel. This option is supported only for the following databases against Database in MCF panel – IBM DB2, HSQL, Kingbase, Microsoft Access, Microsoft SQL Server, Microsoft SQL Server 2005, Mckoi, MySQL, Oracle, Sybase.
In the SQL Configuration Wizard dialog box, click the Add button and select Monitor Table option to launch SQL Creation Wizard.
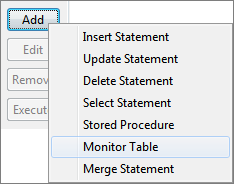
Figure 84: Adding Merge Statement
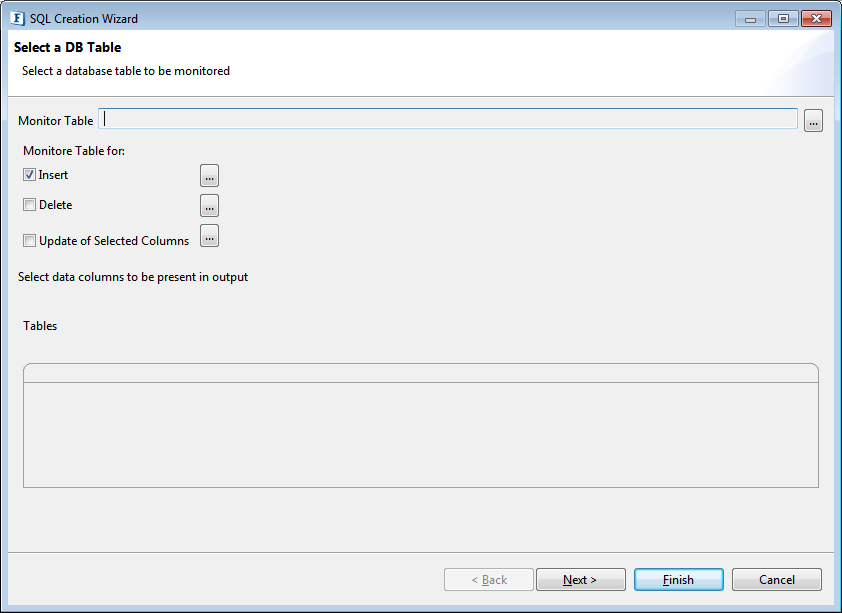
Figure 85: Monitor table wizard
Select DB Table
- Click Monitor Table Ellipsis
 button and choose the table to monitor (refer to Object Selection section).
 - Select actions which have to be monitored by choosing the options as below:
- Insert: Notifies when a row is added to monitored table.
- Delete: Notifies when a row is deleted from monitored table.
- Update Of Selected Columns: Notifies when a selected column is updated to new value. Column selection panel appears on the right side when this checkbox is selected.
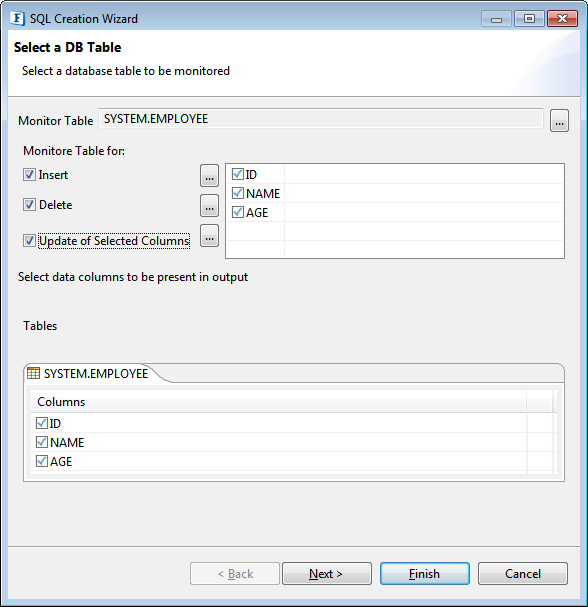
Figure 86: Selecting table for monitoring
- For each action which has to be monitored, specify conditions which filter changes to be notified, click the Ellipsis
 button for the respective option to configure expression to filter inserted records.
 In the Insert Trigger Expression dialog box, define condition on required columns in the same way as in WHERE tab (refer Select Statement with Filter section). Below figure shows configuring a condition – send notification if a row is inserted with ID > 500.
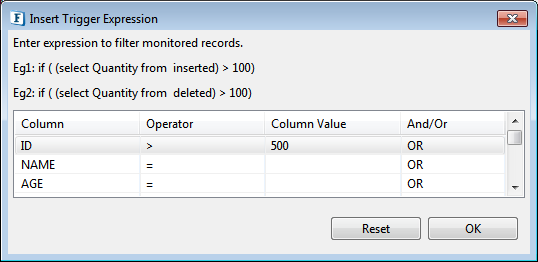
Figure 87: Specifying filter condition for monitoring- Click OK and then click Next.
Monitor Option
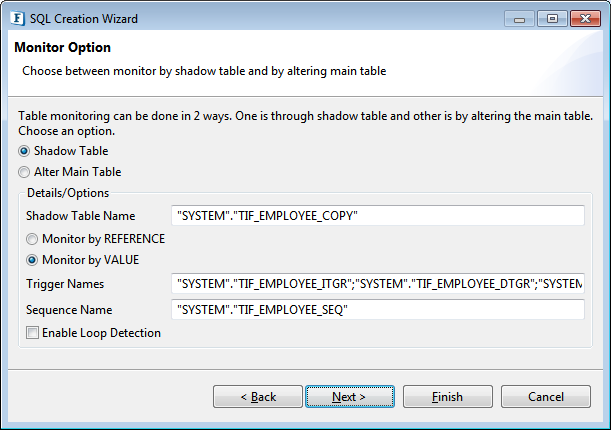
Figure 88: Selecting monitor option
Select one of the following options to monitor actions on table:
Shadow Table
Creates a table containing all columns in the monitored table and a few additional columns (TIF_RECORDID, TIF_OPERATIONTYPE and TIF_STATUS) required for monitoring. This option is supported only on following databases – IBM DB2, Kingbase, Microsoft SQL Server, Microsoft SQL Server 2005, Mckoi, Oracle, Sybase.
Alter Main Table
Modifies the monitored table to add TIF_RECORDID, TIF_OPERATIONTYPE and TIF_STATUS columns required for monitoring. This option is supported by all databases that support monitoring.
When monitor option is Shadow Table, select one the following methods to create a shadow table.
- Monitor By REFERENCE
Shadow table is created with columns TIF_RECORDID, TIF_OPERATIONTYPE, TIF_STATUS and primary key of monitored table.
- Monitor By VALUE
Shadow table is created with columns TIF_RECORDID, TIF_OPERATIONTYPE, TIF_STATUS and all columns of monitored table.
Enable Loop Detection: Modifies the monitored table to add an additional column TIF_SOURCE whose value should be NULL for notifications.
Polling Options
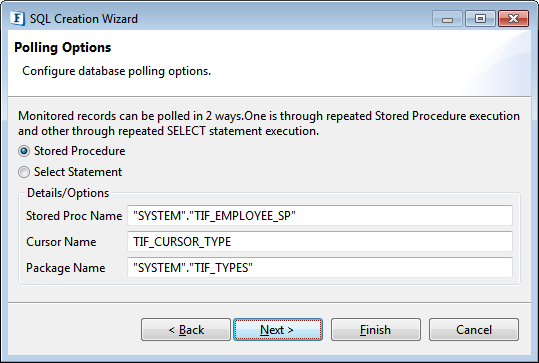
Figure 89: Selecting polling option
Based on monitor option selected, either shadow table or monitored table should be continuously polled to identify changes done to monitored table and notify. Select one of the following options for polling:
Stored Procedure
This option is supported only on following databases – IBM DB2, Kingbase, Microsoft SQL Server, Microsoft SQL Server 2005, Oracle, and Sybase.
Names for all databases that is created are populated automatically and can be changed.
Select Statement
This option is supported by all databases that support monitoring. It creates an update and a select statement instead of a single stored procedure.
Statements Overview
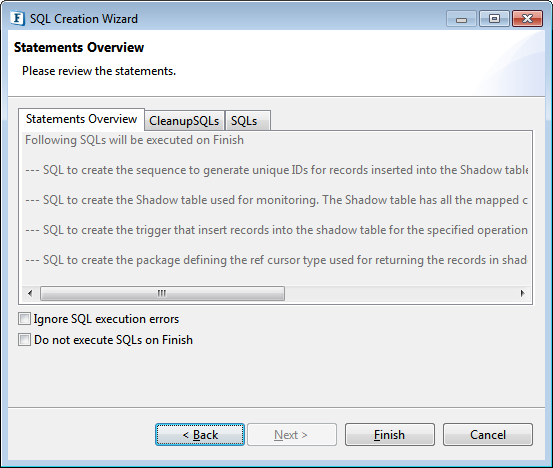
Figure 90: Statements Overview panel
- Click View SQLs to check SQLs which create database objects required for monitoring, . These SQLs are by default executed when Finish button is clicked.
Click View Cleanup SQLs, to check SQLs which remove all database objects created for monitoring.
Select Ignore SQL execution errors check box to finish the wizard even if some exceptions occur when executing SQLs to create database objects required for monitoring.
Select Do not execute SQLs on Finish check box to finish the wizard without creating database objects required for monitoring.
Click Finish after completing the above configuration to save the configuration set.
SQL Statement Details Configuration
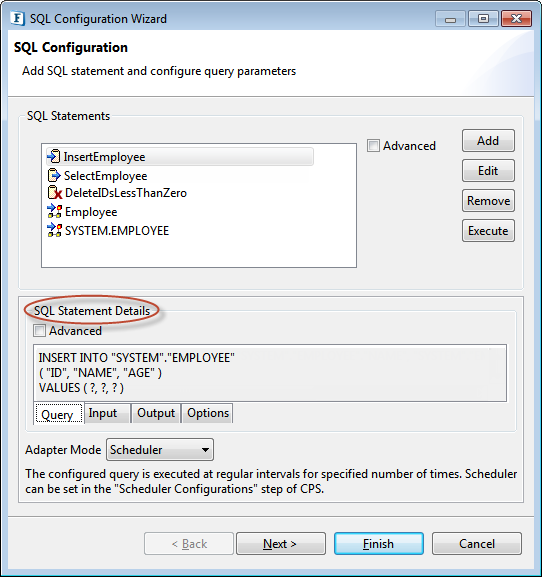
Figure 91: SQL Statement Details
SQL Statement Details shows detailed configuration of the selected query:
- SQL statement in Query tab.
- Configuration of input parameters which have to be passed to execute the query.
- Configuration of output parameters which are returned after query execution.
Input and output parameters are automatically populated when a query is configured and connection to database is available. However, the populated values can either be modified or defined manually. To define input/output structure manually, a sound understanding of database objects involved is required. ResultSets, parameters, and columns can be added to input or output structure by right clicking Structure column.
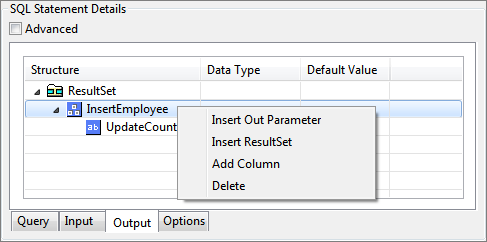
Figure 92: Building output structure manually
Configuring Input Parameters
Basic view of input tab is shown below.

Figure 93: Input tab showing basic view of input structure
Check advanced check box to see advanced configuration details.

Figure 94: Input tab showing advanced view of input structure
Column Name | Description |
|---|---|
Structure | This value is used to generate the schema for the query. In the above figure value for IDNO (field name) is changed to IDN. So the schema generated would contain IDN as the first element instead of default populated value, IDNO. |
Data Type | This defines the data type of this column in the database table. This should be correctly defined. |
Default Value | This value is taken for the column it is defined against, if the node satisfying the XPath, defined in MapTo, in the input XML is not present. Values $EMPTY_STR and $NULL represent empty string and null values respectively. |
Map To | The XPath like expression at which the value for this column is present in the input XML. This can be edited to any value to suit input XML. |
Bind Position | The position in the query where this value is bound to. |
Java Type | JDBC type which maps to Data Type. |
Configuring Output Parameters
Basic view of output tab is shown in the Figure below.

Figure 95: Output tab showing basic view of output structure
Check advanced check box to see advanced configuration details.

Figure 96: Output tab showing advanced view of output structure
Each of the columns in Output tab is explained in the table below:
Column Name | Description |
|---|---|
Structure | This value is used to generate the schema for the query. In the above figure value for EMPNO (field name) is changed to EMPN. So the schema generated would contain EMPN as the first element instead of default populated value, EMPNO |
Data Type | This defines the data type of this column in the database table. This should be correctly defined. |
Default Value | NA for output |
Output Name | NA |
Include | If the output XML should contain an element corresponding to column check this check box, else uncheck it. E.g. If the check box against COMM is unchecked, the output XML will not contain COMM element for any record |
XML | NA |
Bind Position | NA |
Java Type | JDBC type which maps to Data Type |
Configuring Input/Output Parameters for Inner Queries
The component does not recognize the input/output parameters present in the inner query. These parameters should be manually configured.
If the query has an inner query, when the query wizard is finished, an error occurs. To configure input/output parameters manually, ignore this error.

Figure 97: Sample Inner Query
To add Input parameters, click on Input tab in SQL Statement Details window. Right-click on Input under Structure column and select Add In Parameter.

Figure 98: Configuring Input Parameters for Inner Query
Similarly, to add ResultSets, click on Output tab. Right-click the ResultSet structure and select Add ResultSet.

Figure 99: Configuring Output Parameters for Inner Query
Editing Query Configuration
Editing DML Statements
- Select a configured query, for example, Update Statement, under SQL Statements.
- Click Edit to launch Query Builder in edit mode. This mode is same for all DML statements (Select, Insert, Update, and Delete).
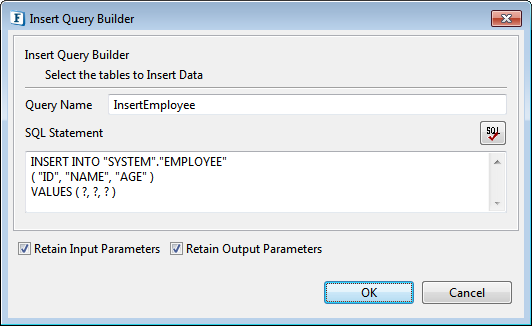
Figure 100: Editing configured SQL query Make necessary changes in the SQL Statement.
When the dialog is closed, the input / output parameters in Input/Output tab in SQL Statement Details Configuration are regenerated.
Click OK to close the dialog.
Editing Stored Procedure
- Select a configured stored procedure under SQL Statements.
- Click Edit to launch Query Builder for Stored Procedure and follow steps in Stored Procedure Configuration section.
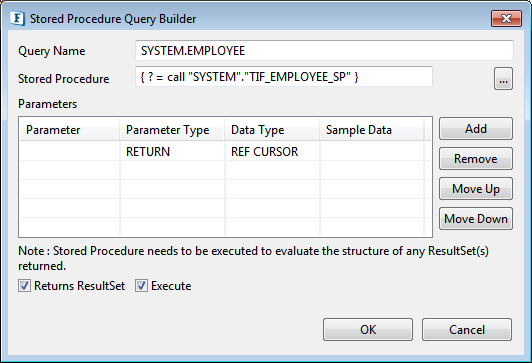
Figure 101: Editing stored procedure - Check Execute check box (as in the above figure) before closing Query Builder if the structure of result set returned by stored procedure is changed and Output tab in SQL Statement Details Configuration have to be regenerated.
- Click OK to close the dialog box.
Removing Query Configuration
Select the query to remove and click Remove button.

Figure 102: Selecting query to be removed
Testing Query Configuration
- A configured query can be tested from SQL Configuration panel. To test a query, select the query and click Execute button.
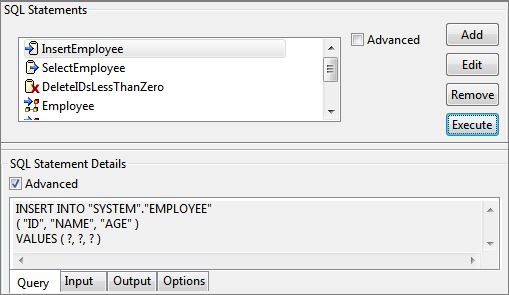
Figure 103: Selecting query to be tested - Specify Variable Values dialog box opens.
The parameters (below figure) represent the query present in the SQL Statement Details section of SQL Configuration dialog box (above figure)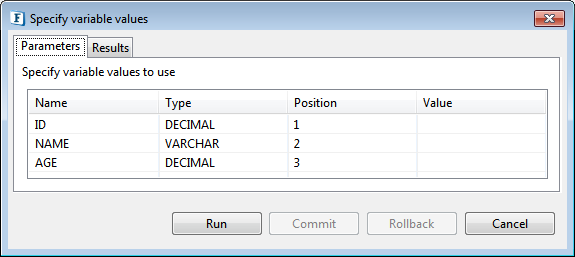
Figure 104: Input parameters which require user values - Specify values for parameters which require user input (values marked "?"), that is, enter values in the Parameters tab under Value column. Other columns are not editable.
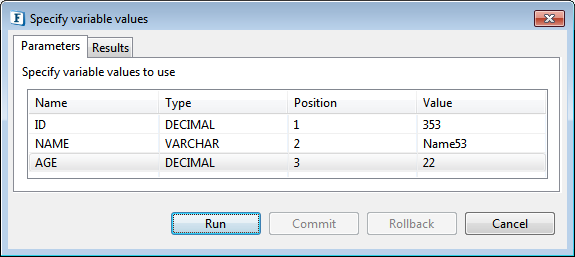
Figure 105: Specifying values for input parameters - Click Run. Result of the query is shown under Results tab.
- Click Commit to commit an insert / update or a delete to database, click Rollback otherwise.
- Click Cancel to close the dialog.
Child Queries
For each configured query, different types of child queries can be configured. Different types of child queries are listed below:
- Nested queries
- Post processing queries
- Failover queries
Nested Query
A query which executes once for each record returned from parent query.
- Nested query should ideally be configured for select statements.
- Nested query takes values from input.
- Nested query sends values in output.
- Nested query can have a failover query as a child query.
Example:
- For every row in employee table, get the department details to which the employee belongs.
- For every row in employee table, compute total income (salary + commission) and update in incomes table.
Post Processing Query
A query which is executed after the parent query is executed.
- Post processing query should ideally be configured as an insert or update or delete statements or as a stored procedure which updates database.
- Post processing query takes values from input.
- Post processing query does not send values in output.
- Post processing cannot have any child query.
Failover Query
A query which is executed when the parent query failed to execute, because of an exception.
- Failover query should ideally be configured as an insert or update or delete statements or as a stored procedure which updates database.
- Failover query should be configured to take same value, as the parent query, from the input XML. This can achieved using MapTo column in Output tab of SQL Statement Details Configuration.
- Output of the parent query and the failover query should match. For example, if both are either insert or update or delete independently, then the output matches (only update count is returned).
- Failover query cannot have any child query.
Child Query Configuration
- Configure any query.
- Check advanced check box against SQL Statements.
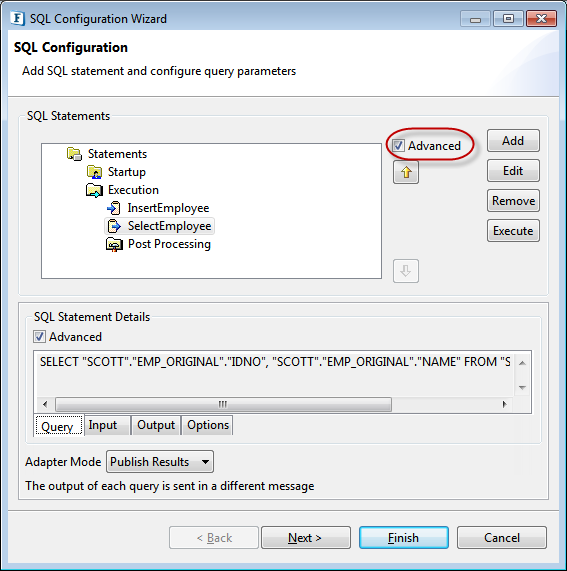
Figure 106: Advanced option for SQL Statements - Right-click on the query and navigate to:
- Add Nested Query > <query of interest> for Nested Query.
- Define Failover Query > <query of interest> for Failover Query.
- Add Post Processing Query > <query of interest> for post Processing Query.
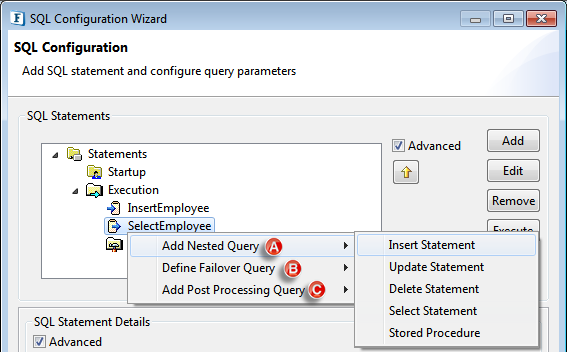
Figure 107: Adding a child query
- A query builder is launched. Refer to the appropriate section based on the query that has to be configured. Configured query is shown as a child node to initial query.
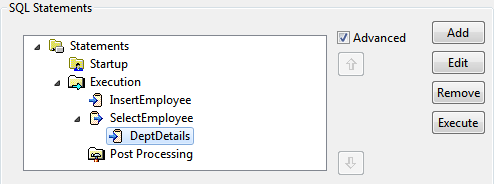
Figure 108: Configured query appearing as the child- If the child query requires any input, it is by default configured to be taken from input XML. Schema generated on the input port is computed to take inputs for child query as well.
- Child query can also take input from the result of parent query.
- To configure child query to take input from the result of parent query:
- Select the child query.
- Click Input tab in SQL Statement Details panel.
- Select the Advanced checkbox.
- In the MapTo column against the required column name ('DEPTNO' in the figure below), click on the MapTo drop-down list to see a list of entries, representing the corresponding columns present in the parent queries result.
Select the appropriate value from the MapTo drop-down list, which matches the parent output.
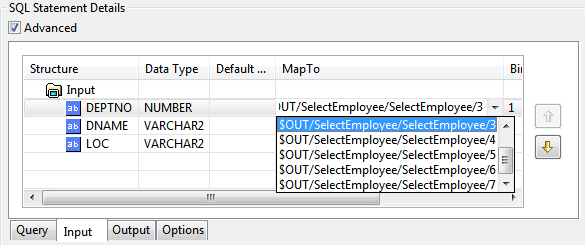
Figure 109: MapTo entries for result of parent query
For example, below figure shows that department number is the third field (Select SelectEmployee and click Output) in the output of parent query. Hence, choose the entry: $OUT/SelectEmployee/SelectEmployee/3 to map the DEPTNO of parent query (SelectEmployee) to input of child query (DeptDetails).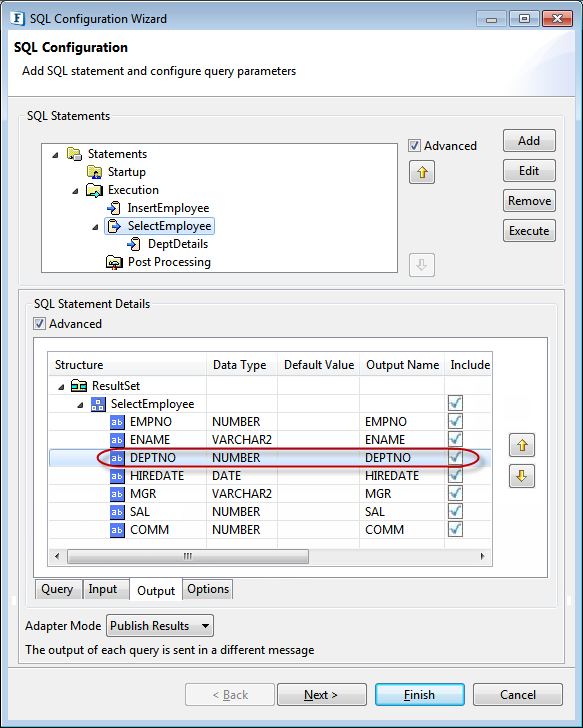
Figure 110: Output of parent query
Miscellaneous Configurations
Request Level Post Processing Query
Post processing query configuration under Child Queries executes once for every execution of parent query.
Request level post processing query is similar to post processing query with respect to input / output and child queries. However:
- Request level post processing query executes once for each request (input message) after all configured queries are executed, even when multiple queries are configured.
- Request level post processing query has no parent query.
Steps to configure request level Post Processing query:
- Select Advanced check box under SQL Statements section.

Figure 111: Advanced view showing Post Processing - Right-click Post Processing and navigate to Add Query > <query as required>
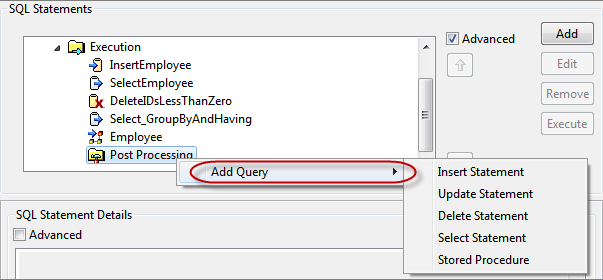
Figure 112: Navigating to choose the required statement - A query builder is launched. Refer to appropriate section based on the query that has to be configured.
Adapter Mode
Adapter mode can be selected from the Adapter Mode drop-down list in SQL Configuration panel as shown below.
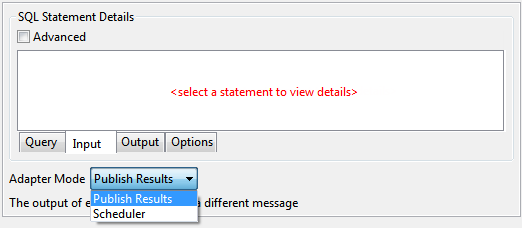
Figure 113: Adapter Mode
Publish Results: Component waits for input message and executes when an input message is received.
Scheduler: Component is scheduled and will have no input port. Scheduler configuration can be specified in Scheduler Configurations panel.
Output Options
- Select the advanced check box under SQL Statements section and select Execution node.

Figure 114: Selecting Execution node - Go to Options tab below SQL Statement Details section.
- Select Send output immediately after query execution to send output of each configured query in a separate message.
- Select Send output after executing all other queries to combine and send output of all queries in one message (as long as total response size does not exceed Max Response Size in Advanced Configuration).
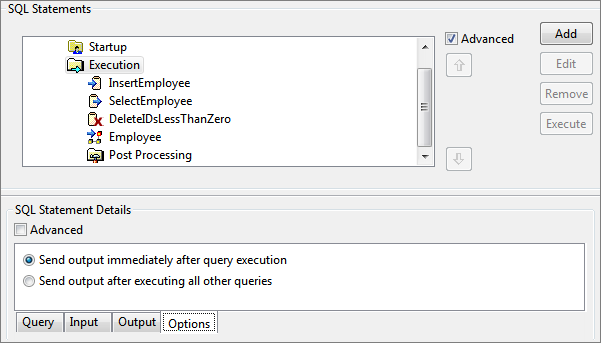
Figure 115: Options on Execution for sending output
Post Processing Execution
- Check advanced check box under SQL Statement Details and select any top level query node.
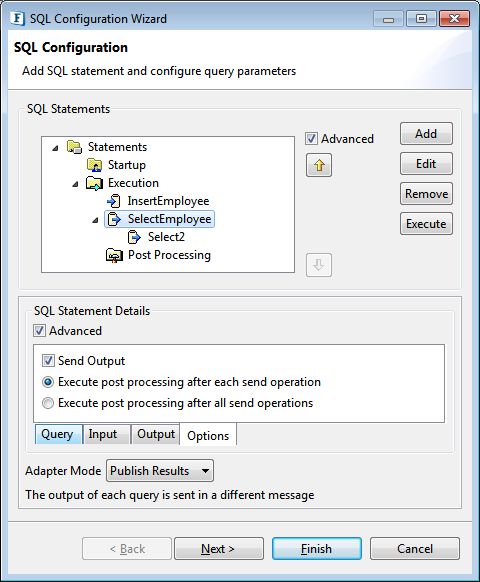
Figure 116: Options on configured query for post processing query execution - Select Send Output check box if the result of the selected query has to be sent in output message, else clear the checkbox.
- When response size of a query exceeds Max Response Size in Advanced Configuration, multiple responses are sent for each request. Select Execute post processing after each send operation if configured query level post processing query has to executed once for each output message sent, else select Execute post processing after all send operations.
Example: If a select statement returns 500 rows and Max Response Size in Advanced Configuration is configured as 200 rows. A post processing query, if defined, executes 3 times if Execute post processing after each send operation is selected, else it is executed once.
Advanced Configuration
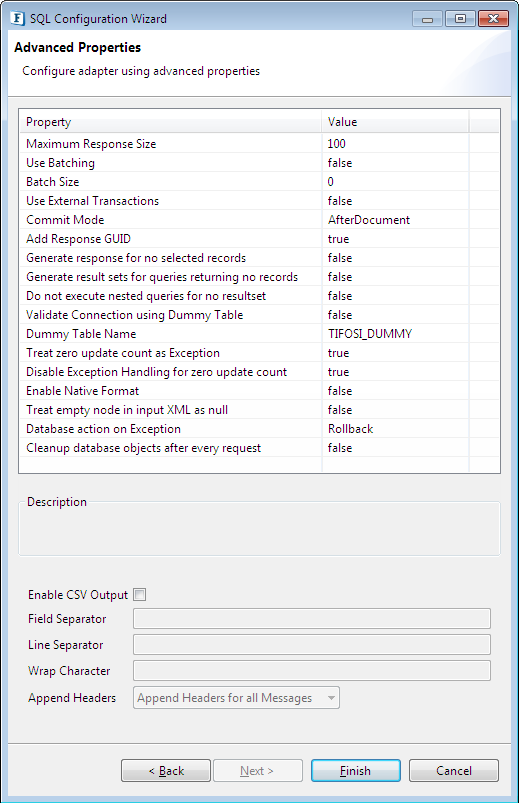
Figure 117: Advanced Properties
Maximum Response Size
The maximum number of rows to be added in a response and hence the records that each output message can contain.
For example, if a query returns 900 records, and Maximum Response Size is set as 200, then for each request there are 5 responses of which 4 responses contain 200 records each and last response contains 100 records.
Use Batching
Determines whether batching should be used or not. Batching should be used only for insert, update or upsert. After Row commit mode cannot be used when batching is used. The size of the batch can be specified by the property Batch Size.
Batch Size
The Batch size is used for batching. It indicates number of operations of main query that have to be performed in single batch. The value cannot be less than 0. If it is 0, all operations are performed in a single batch. This is valid when the property Use Batching is selected.
Use External Transactions
Determines whether External Transactions should be used or not. When this property is set to "true", the value of the next property, that is, Commit Mode, gets automatically changed to "Transaction" and turns uneditable (this value is otherwise not available under Commit Mode; the possible values are explained in the next section).
Use the below commands effectively:
BEGINTRANSACTIONandENDTRANSACTIONto begin and end the external transactions respectively.ROLLBACKcommand will rollback the transactions done upto that point in the current transaction, but this command will not end the current transaction.- DB component commits the database operations done in current transaction and ends the transaction on
ENDTRANSACTIONcommand. - If the commands:
ENDTRANSACTIONorROLLBACK, or any other commands are used beforeBEGINTRANSACTIONcommand, then the component throws an exception of type "INVALID REQUEST ERROR".
To configure the DB component for using External Transaction, refer Using External Transaction for DB Component section.
Commit Mode
Granularity of transaction is determined by the value specified against Commit Mode when Auto Commit is set to no in MCF panel.
Commit Mode | Granularity / Behavior |
|---|---|
Auto | Request database is automatically committed by JDBC driver implicitly when an operation is performed on the database. |
After Document | Request – Database is committed after all the queries in the request are executed. |
After Row | Query Database is committed after each top level query is executed for one input part in the input document. If there are any nested queries, commit is performed after the nested queries are executed. This is not relevant when Use Batching is selected. |
After Batch | Request Database is committed after executing n top-level queries when n is the batch size. If there are any nested queries, commit is performed after the nested queries corresponding to top-level are executed. This mode is visible only when Use Batching is selected. |
BasedOnInput | Commit is only done when commit instruction is received on the input port. |
AfterEachOutput | Request Database is committed after sending every output message. If this commit mode is selected then the last message from the component (in case of multiple messages for single request) doesn't contain the property "CLOSE_EVENT" set to true. |
BeforeEachOutput | Request Database is committed before sending every output message. If this commit mode is selected then the last message from the component (in case of multiple messages for single request) doesn't contain the property "CLOSE_EVENT" set to true. |
If an exception / error (which does not require creating new connection like request processing) occurs during the execution, then the action is taken based on the value for property Database action on Exception. If this action is set to Rollback, then a rollback is issued and all queries performed after last commit (based on commit mode) will be rolled back, that is, they will not take any effect. If this action is set to Commit, then all the queries except to the query that resulted in exception, performed until the exception are committed to database.
If a connection error occurs, then it will be equivalent to the rollback action on exception since commit should be performed on the same connection which executed the queries. Since the connection is no longer present, a new connection is created and all the uncommitted transactions are lost.
Example 1:
- After Document – commits all 4 inserts at once
- After Row – commits one insert at a time when use Batching is not selected
- After Batch – commits after 2 inserts, if batch size is 2 and useBatching is selected
- BasedOnInput –The transaction will be committed if the following message is received on input port
<ns1:SQL_CFG_1 xmlns:ns1=\"http://www.fiorano.com/fesb/activity/DB1/Response\" id=\"-4393189459883103232\"><ns1:COMMIT/></ns1:SQL_CFG_1>
It will be rolled back if the following message is received on input port:<ns1:SQL_CFG_1 xmlns:ns1=\"http://www.fiorano.com/fesb/activity/DB1/Response\" id=\"-4393189459883103232\"><ns1:ROLLBACK/></ns1:SQL_CFG_1>
- AfterEachOutput - commits after sending every message, if Maximum Response Size is set to 1 there will be 4 message from the DB component each contains single output record.
- BeforeEachOutput - commits before sending every message, if Maximum Response Size is set to 1 there will be 4 message from the DB component each contains single output record.
Example 2:
If we have a insert query q1 and a nested update query nq1 and let us assume the input has details for 4 inputs is as shown below:
- When commit mode is Auto, 8 commits are done by JDBC driver implicitly, one for each of the inputs for q1 and nq1. If any error occurs when executing nq1 from 3rd input (having value 'ncol1value3' and 'ncol2value3'), then, only the 3rd input nested query will not be present in database irrespective of type of exception and the value for Database action on Exception.
- When commit mode is AfterDocument, only 1 commit is done by DB component after processing all inputs for q1 and nq1. If any error happens when executing nq1 from 3rd input (having value 'ncol1value3' and 'ncol2value3'), then, if the Database action on Exception is set to commit, then the inputs for first, second and third 'q1' and the inputs for first and second 'nq1' are committed. If the Database action on Exception is set to rollback, nothing will be committed for the entire request.
- When commit mode is AfterRow, 4 commits are done, this happens after each q1 and nq1 pair are committed successfully to the database. If any error happens when executing nq1 from 3rd input (having value 'ncol1value3' and 'ncol2value3'), then, if the Database action on Exception is set to commit, then the inputs for first, second, third and fourth 'q1' and inputs for first, second and fourth 'nq1' are committed. If the Database action on Exception is set to rollback, then the inputs for first, second and fourth 'q1' and the inputs for first, second and fourth 'nq1' are committed.
- When commit mode is BasedOnInput, any action will be taken based on input sent. This option is usually used when a commit should be done after processing more than one message.
- When the commit mode is AfterBatch, commits are done after processing 'n' inputs from input message where 'n' is the value mentioned against Batch Size property. If the Batch Size is 0, then it will be same as AfterDocument. So in the Example 2, if the batch size is 2, then only two commits are done. This happens after first and second 'q1', 'nq1' pairs; and second after third and forth 'q2', 'nq2' pairs. If any error occurs when executing 'nq1' from 3rd input (having value 'ncol1value3' and 'ncol2value3'), then, if the Database action on Exception is set to commit, then the inputs for first, second and third 'q1' and inputs for first and second 'nq1' are committed. If the Database action on Exception is set to rollback, then the inputs for first and second 'q1' and inputs for first and second 'nq1' are committed.
- When commit mode is AfterEachOutput, if the Maximum Response Size is set to n, then the number of commits will be: 4 commits if n=1, 2 commits if n=2or 3, 1 commit if n is greater than or equal to 4. Commits will be happened after sending every message. If Maximum Response Size is set to 4 and any error happens when executing nq1 from 3rd input (having value 'ncol1value3' and 'ncol2value3'), then, if the Database action on Exception is set to commit, then the inputs for first, second, third and fourth 'q1' and inputs for first, second 'nq1' are committed, if the Database action on Exception is set to rollback, then the inputs for first, second and fourth 'q1' and the inputs for first, second 'nq1' are rollbacked. If any exception occurs while executing a third input of q1 then DB component will not process the fourth input.
- When commit mode is AfterEachOutput, if the Maximum Response Size is set to n, then the number of commits will be: 4 commits if n=1, 2 commits if n=2or 3, 1 commit if n is greater than or equal to 4. Commits will be happened before sending every message. If Maximum Response Size is set to 4 and any error happens when executing nq1 from 3rd input (having value 'ncol1value3' and 'ncol2value3'), then, if the Database action on Exception is set to commit, then the inputs for first, second, third and fourth 'q1' and inputs for first, second 'nq1' are committed, if the Database action on Exception is set to rollback, then the inputs for first, second and fourth 'q1' and the inputs for first, second 'nq1' are rollbacked. If any exception occurs while executing a third input of q1 then DB component will not process the fourth input.
Add Response GUID
When checked, an additional attribute id – if present in input message on SQL_CFG_1 element, is set onto all output messages for that particular request. If the input message does not contain id attribute, a unique value for each request is generated and set on all output messages for that particular request.
Generate response for no selected records
When all queries fail to return any data, an empty message is generated if this property is checked else there is no response message coming out.
Example: Assume a DB adapter is configured to get data from tables – table1 and table2 and both table do not have any data in them. If this property is not checked, there is no message from adapter, else following message appears: <SQL_CFG_1/>
Generate result sets for queries returning no records
When one of the queries does not return any results, an empty element is generated if this property is checked; else it is excluded from result.
Example: Assume a DB adapter is configured to get data from tables – table1 and table2 and table1 has some data but table2 does not have any data in it.
If this property is not checked there output is:
<SQL_CFG_1>
<table1>
…..data here…..
</table1>
</SQL_CFG_1>
else following message comes out
<SQL_CFG_1>
<table1>
…..data here….
</table1>
<table2/>
</SQL_CFG_1>
Do not execute nested queries for no resultset
When set to 'true', nested queries are not executed if parent query returns an empty result set. This property is honored only when Generate result sets for queries returning no records property is set to 'true'.
Validate Connection using Dummy Table
Database connectivity, in case of SQL Exception, is validated by querying a dummy table (created for this purpose alone). Value specified against Dummy Table Name is used as the table to query for validating connection failure.
While creating a connection to Database:
- If this option is checked and a table name is specified against Dummy Table Name, a table with name as value specified against Dummy Table Name is created using the following SQL statement:
CREATE TABLE <DUMMY TABLE NAME>
- If a table with this name already exists, then that table is used for validation
- If a table with this name does not exist and an exception occurs while creating dummy table, then table with this name should be manually created, else any exception is treated as a connection failure exception
- If this option is checked and table name is not specified against DUMMY TABLE NAME connection creation fails
- When a SQL exception occurs while executing any query, if this option is checked, connection is validated by executing:
SELECT COUNT(*) FROM <Start wrap character><DUMMY TABLE NAME><End wrap character>
Dummy Table Name
Name of the table which should be queried to validate connection when a SQL exception occurs while executing any query
Treat zero update count as Exception
For queries returning an update count – insert or update – an update count of 0 is treated as an exception if this option is checked, else the query execution is assumed to be successful.
Disable Exception Handling for zero update count
This property is used when the property 'Treat zero update count as Exception' is true. If this property is true, exception handling will not be done for NO_ROWS_UPDATED exception.
Enable Native Format
Sends/accepts binary data contained serialized objects. This option should be used only in case where the output format and input format of data is same (that is similar XSDs if this option is not checked)
Example: In case of database synchronization where data read from one table on a database is inserted without any transformation into exactly same table on a different database, check this option. This option provides better performance, since additional transformation is not required.
Treat empty node in input XML as null
Empty nodes in input XML (for example, <empno/>) implies corresponding column value is treated as a null value if this option is checked and treated as empty string value otherwise
Database action on Exception
When auto commit is not turned on and an exception occurs database transaction is committed if this option is checked and rolled back otherwise. This option provides atomicity for transactions when auto commit is not turned on.
Example: Consider a request containing 10 instances of an insert query is to be executed such that either all 10 queries are executed or none of them have to be executed. To achieve this, set Auto Commit to false in MCF panel, Commit Mode to After Document and Database action on Exception to false.
Cleanup database objects after every request
Set the value to 'true' if the database objects need to cleanup after every request.
Enable CSV Output
Select Enable CSV Output property to represent the output of the queries in CSV format.

Figure 118: Enable CSV Output option in Advanced Properties panel
After enabling this property, the below parameters becomes editable. These separators, which act as punctuation in the CSV output,can be customized by providing the respective values:
- Field Separator
The value of Column Separator to be used in CSV output. - Line Separator
The value of Row Separator to be used in CSV output. Wrap Character
The specified character is used to wrap each field that is returned when a query is processed.
Example:
When separators used are:
- Field separator → ;
- Line separator → ,
- Wrap Character → "
then the output will be like:
"13579008642";"john";"hyd","124";"joseph";"bang",
Append Header
Append Header option is used to append or not to append column name header to the query responses.

Figure 119: Append Headers option in Advanced Properties panel
The three options available are described below:
- Append Headers for all message: If a query returns more records than the Maximum Response Size specified, by selecting Append Headers for all messages, column name headers will be appended in the beginning of all the responses.
- Append Headers for first message: Column name headers will be appended to the first response only.
- Do not append headers: Column name headers will not be appended in the response.
Using Named Configurations
Refer "From CPS of the component" section in the Defining Named Configuration and utilize EPLCM page.
Input Schema
The Input Schema is auto generated based on the Database Configuration provided. Below figures show a sample Input schema:
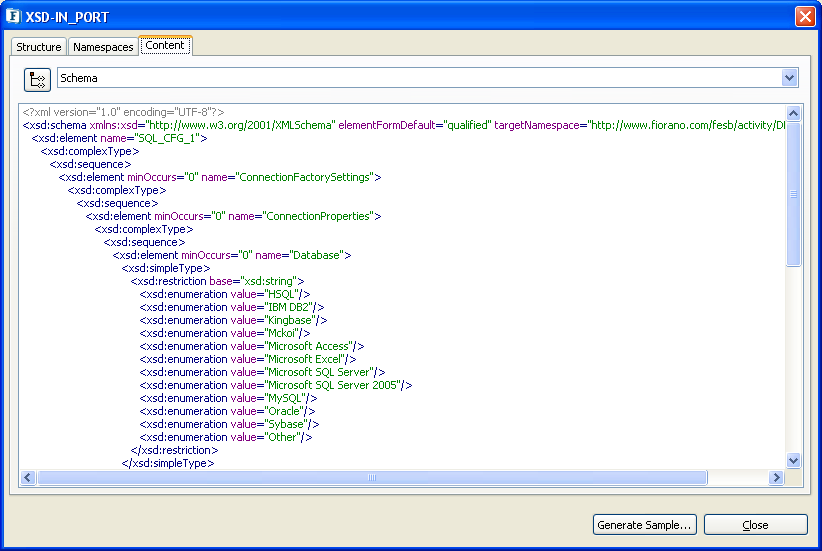
Figure 120: Input Schema
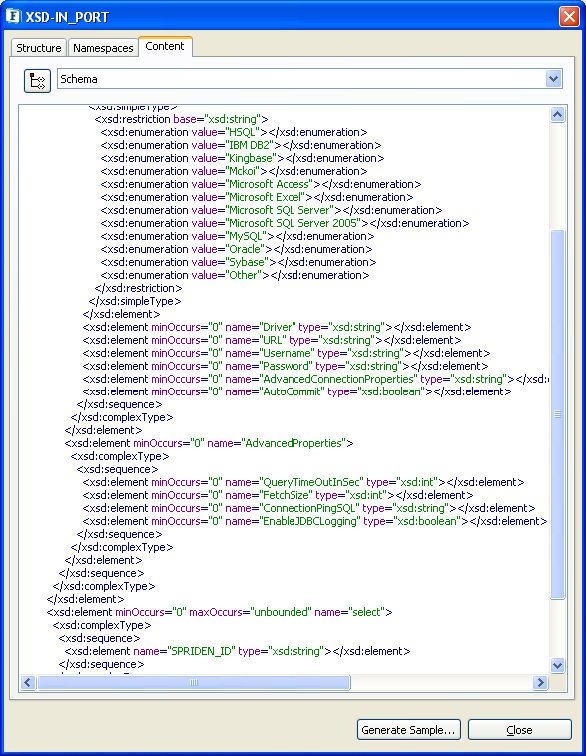
Figure 121: Input Schema (cont...)
When the property Use Connection details from input is chosen, an additional element ConnectionFactorySettings is added to the input schema, as shown in the figure. Properties that are used to create the connection are present under this element.
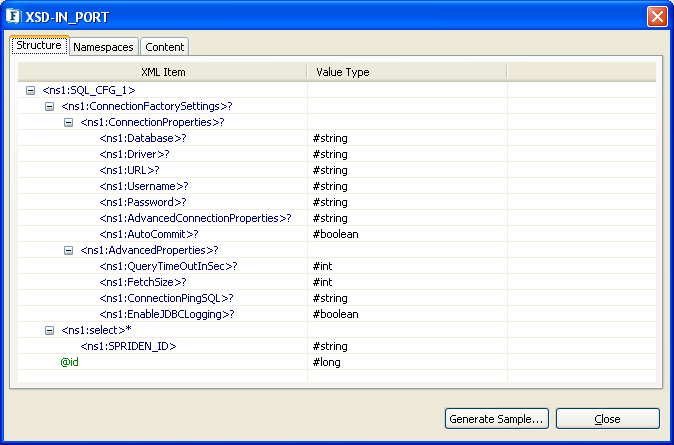
Figure 122: Input schema with ConnectionFactorySettings
Output Schema
The output schema is auto-generated based on the configuration provided. Below figure shows a sample Output Schema.
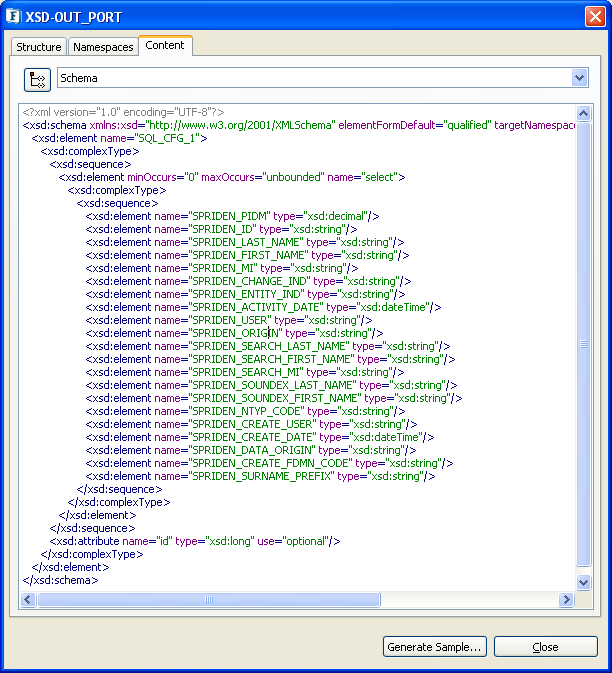
Figure 123: Output schema
Use AutoCommit for configuring stored procedure
Stored procedures have to be executed when configuring to generate the output structure based on the result set returned. Enabling this property
Validate Input
This property determines whether the input message has to be validated against the schema defined on the input ports.
Refer to the Validate Input section in the Common Configurations page.
Cleanup resources (excluding connection) after each document
If enabled, objects that are not connection-related are not destroyed and are reused for each request.
Refer to the respective section in the Common Configurations page.
Target Namespace
To avoid the clash of elements from different schema, the schema generated by the component use the value provided for this property to compute the namespace for input or output schema.
Refer to the Target Namespace section in the Common Configurations page.
Monitoring Configuration
When monitoring is enabled, it publishes USER_EVENTs containing various statistics to FPS_USER_EVENTS_TOPIC at the configured intervals of time.
Refer to the Monitoring Configuration section in the Common Configurations page.
Elements to Decrypt
Select elements to decrypt in the input.
Elements to Encrypt
Select elements to encrypt in the output.
Functional Demonstration
Scenario 1
Executing multiple queries using a DB component: The given scenario executes a select query and if successful executes an update query which changes the e-mail address of the same record which was selected.
Configure the DB component as described in the Configuration and Testing section and use feeder and display component to send sample input and check the response respectively.
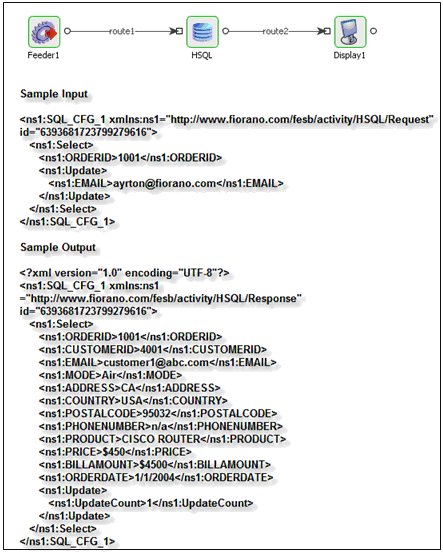
Figure 124: Demonstrating Scenario 1 with sample input and output
Use Case Scenario
Scenario 1
In a database replication scenario, updates to one database need to be monitored and subsequently updated in another database.
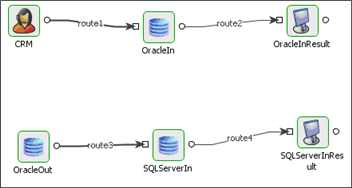
Figure 125: DB replication demonstration
The event process demonstrating this scenario is bundled with the installer.
Documentation of the scenario and instructions to run the flow can be found in the Help tab of flow when open in Studio.
Scenario 2
In DB transaction support scenario, transactions can be done across multiple steps in an event process.
The event process demonstrating this scenario is bundled with the installer.
Documentation of the scenario and instructions to run the flow can be found in the Help tab of flow when open in Studio.
Scheduling
Scheduling helps to execute the configured query at regular intervals for the specified number of times.
In the DB component, scheduling cannot be directly enabled from the Scheduler Configurations panel, whereas it has to be enabled in the SQL Configuration panel by changing the Adapter Mode value from 'Publish Results' to 'Scheduler'. The scheduling interval and rate has to be configured in the Scheduler Configurations panel.
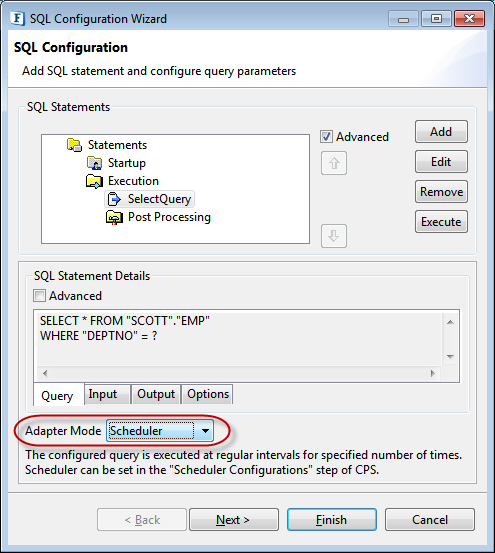
Figure 126: 'Scheduler' Adapter Mode option in SQL Configuration panel
Useful Tips
- Configuring DB adapter to read Ms Office 2007 excel sheet (.xlsx) :
- If the machine has Ms office 2007 already installed then this step can be ignored. Otherwise, install the 2007 Office System Driver from the link given. http://www.microsoft.com/downloads/en/details.aspx?FamilyID=7554F536-8C28-4598-9B72-EF94E038C891&displaylang=en
- Change the URL in Connection Properties(MCF) to "jdbc:odbc:Driver={Microsoft Excel Driver (*.xls, *.xlsx, *.xlsm, *.xlsb)};DBQ=(provide file path here).
- To connect to MSSQL server, the following changes have to be done.
- sqljdbc_auth.dll must be loaded. This can be done by adding system property "java.library.path" and set it to the path of the directory which contains sqljdbc_auth.dll file. To resolve this file during configuration of component, navigate to Tools->Options->Service Wizard and add "java.library.path" system property.To resolve this file during component runtime add "-Djava.library.path=$directory_of_sqljdbc_auth.dll" to runtime arguments of the component.
- "integratedSecurity=true" should be appended to the database connection URL.
Example : To connect to MSSQL 2005 the databse connection URL should be "jdbc:sqlserver:$server_host:$port;databaseName=$database_name;integratedSecurity=true" - Username and password need not be provided additionally.
To connect to linked servers, enable DTC access on both machines, that is, local and remote, and do the following in both the machines:
Go to Component Services > Computers > My Computer > Distributed Transaction Coordinator > Local DTC
Right-click the Local DTC > Properties
Go to Security Tab and enable the DTC access. Select all the Allow properties.
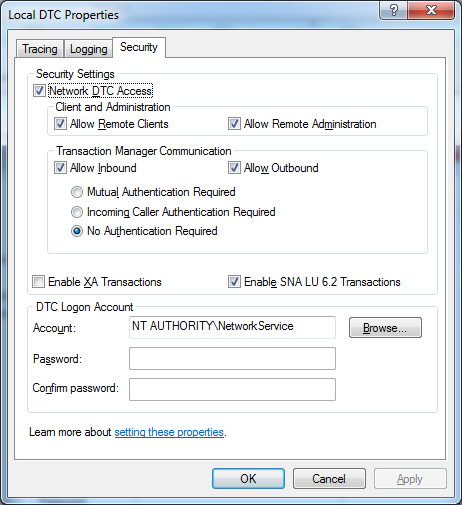
Figure 127: Enabling the DTC access to connect to linked servers
This property determines whether the input message has to be validated against the schema defined on the input ports.