Objective
To demonstrate the capability of an application that use FileTransmitter and FileReceiver components to transfer files (text or binary) from a file system to a defined destination.
Prerequisites
- Start Fiorano Enterprise Server (FES) and Fiorano Peer Server (FPS)
- Login to eStudio application
- Understand the basic menus and perspectives (panels) in eStudio application
Scenario
Use FileTransmitter component to send an AVI file (test.avi) from the file system and use FileReceiver to save the files to a specified destination. Choose an AVI format for this example so that the commands: 'pause' and 'resume' can be checked while the file gets transferred as chunks (a smaller file moves very fast making it difficult to test the commands).
How it Works
The FileTransmitter component reads files from the file system and sends their contents to the output port. Data from the source file is read as bytes and is sent to the output port as chunks. The component provides flexible monitoring capabilities and ensures reliable data transfer.
The FileReceiver component writes the data received on its input port to the output file specified. The component provides flexible monitoring capabilities and robust acknowledgement mechanism.
Components used
- FileTransmitter component
- FileReceiver component
- Feeder component
- Two Display components
Setting up the Example
Configuring FileTransmitter component
To configure FileTransmitter component, perform the following action in eStudio:
- Add a new Event Process with name 'FileTransfer_Example'.
- Drag the FileTransmitter component from File category in the Micro Service Palette to the FileTransfer_Example orchestrator.
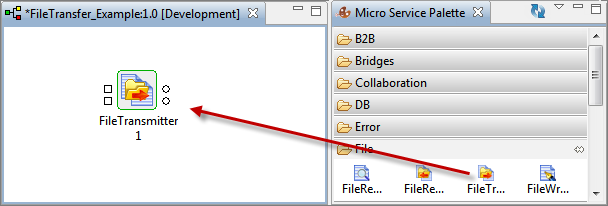
Figure 1: Adding FileTransmitter component to FileTransfer_Example event process - Double-click the FileTransmitter component in the orchestrator to open Configuration Property Sheet (CPS).
- In the Component Configuration panel, click the Source Configuration Ellipsis
 button to set source directory.
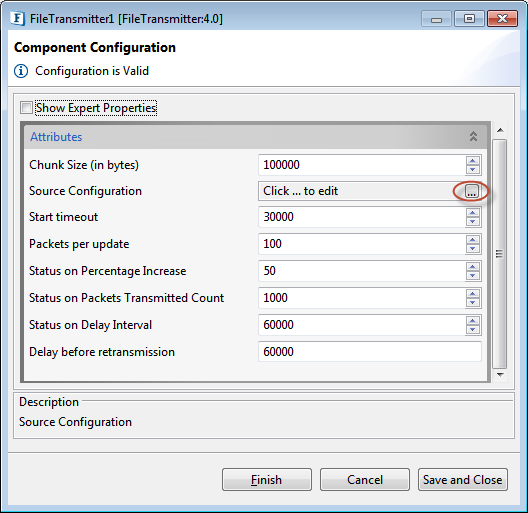
Figure 2: Navigating to Source Configuration in FileTransmitter component In the Source directory text field present in the SourceConfig dialog box, provide the path where the file to be transferred is present (D:\FileTransfer_Transmitter in this example) and click OK.
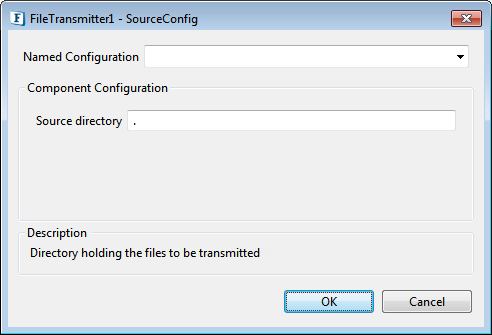
Figure 3: Providing Source locationClick Finish to complete the configuration.
Configuring FileReceiver component
To configure FileReceiver component, perform the following action in eStudio:
- Add a new Event Process with name 'FileTransfer_Example'.
- Drag FileReceiver component from File category in the Micro Service Palette to the FileTransfer_Example orchestrator.

Figure 4: Adding File Receiver to FileTransfer_Example event process - Double-click the FileReceiver component in the orchestrator to open Configuration Property Sheet (CPS).
In the Component Configuration panel, click the Destination Configuration Ellipsis
button to set the destination directory.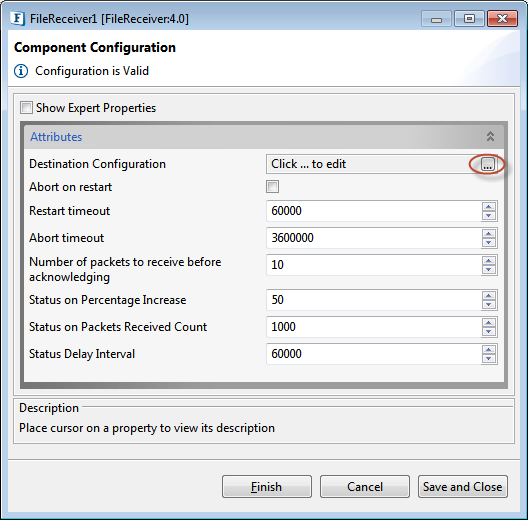
Figure 5: Navigating to Destination Configuration in FileReceiver component- In the Destination directory text box present in the DestinationConfig dialog box, provide the path where the file needs to be saved (D:\FileTransfer_Receiver in this example) and click OK.

Figure 6: Providing Destination location - Click Finish to complete the configuration.
To resume transfer (if an incomplete transfer exists) on restart of the application, enable component cache by performing the following actions:
- Click the FileReceiver component.
- Open Properties panel, go to Deployment tab and select 'Yes' from Cache Component drop-down.
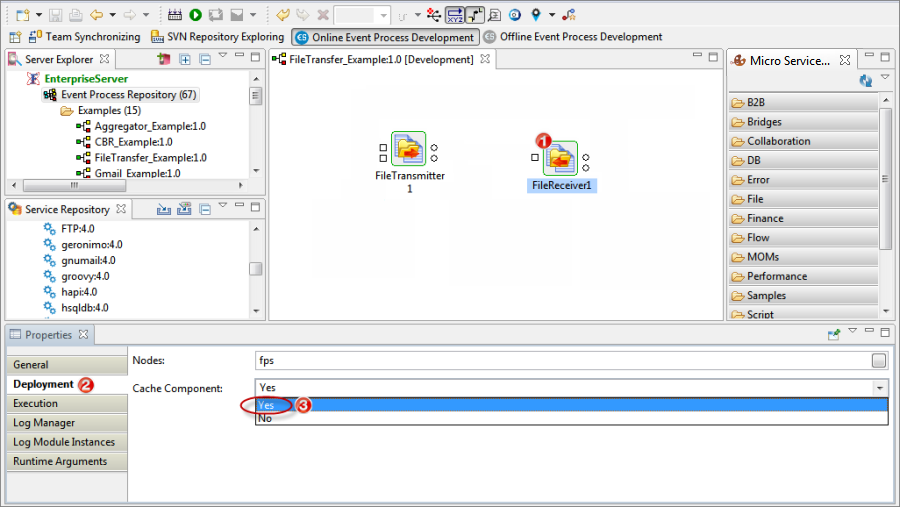
Figure 7: Enabling Component Cache
Input and Output Ports
Unlike most of the components, both of these components have more than two ports as briefed below.
FileTransmitter Ports
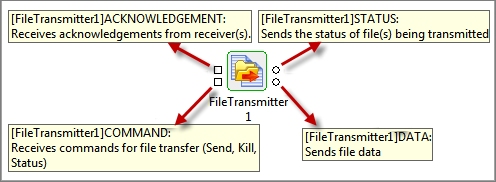
Figure 8: FileTransmitter ports
- Input ports
- ACKNOWLEDGEMENT: Receives acknowledgements from receiver
- COMMAND: Receives commands for file transfer
- Output Ports
- STATUS: Sends the status of file being transmitted
- DATA: Sends file data
FileReceiver Ports
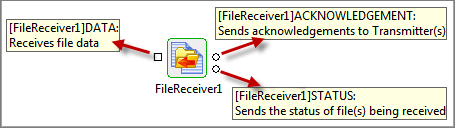
Figure 9: FileReceiver ports
- Input Port
- DATA: Receives file data
- Output Ports
- ACKNOWLEDGEMENT: Sends acknowledgements to transmitter
- STATUS: Sends the status of the file being transferred
Composing the Event Process
To compose the Event Process, perform the below actions:
- Drag one Feeder component and two Display components from Util category in the Micro Service Palette to the FileTransfer_Example Fiorano Orchestrator.
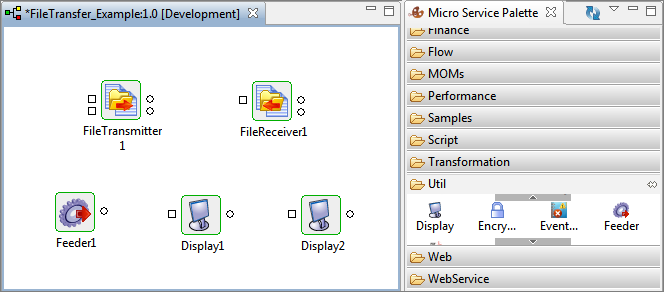
Figure 10: Adding Feeder and Display components to FileTransfer_Example - Use any of the two ways mentioned below to rename the components as follows: 'Display1' to 'Display_Transmitter' and Display2 to 'Display_Receiver':
- Press F2, change the name and click OK.
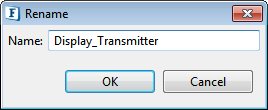
Figure 11: Renaming using Keyboard action 'F2' - Go to Name property under General tab in Properties, change the name and press ENTER.

Figure 12: Renaming using General Properties
- Press F2, change the name and click OK.
- Connect the components in the following manner:
- Feeder output port to FileTransmitter COMMAND port to feed the required file to the FileTransmitter
- FileTransmitter DATA port to FileReceiver DATA port to transfer data from FileTransmitter to FileReceiver
- FileReceiver ACKNOWLEDGEMENT port to FileTransmitter ACKNOWLEDGEMENT port to convey acknowledgements about the transfer
- FileTransmitter STATUS ports to each Display_Transmitter input port
- FileReceiver STATUS ports to each Display_Receiver input port to check the status of events
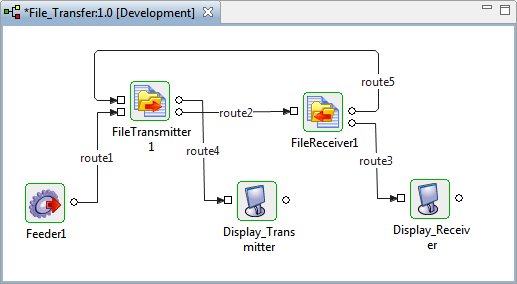
Figure 13: Connecting the components in FileTransfer_Example
Running the Example
To run the example, perform the following actions in the Orchestrator:
- Click Check Resource and Connectivity
 icon (or press ALT+SHIFT+C) to check resource and connectivity.
 - Click Run Event Process
 icon (ALT+SHIFT+R) to run the event process. Two Display windows and one Feeder component get opened.
 In Feeder component, type the following and click Send and immediately move to the next step:
send <SourceFileName> o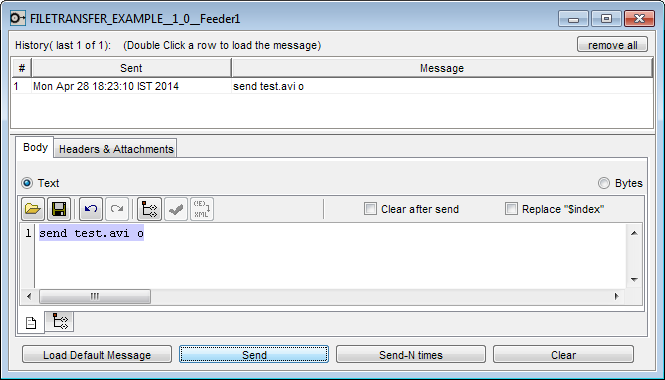
Figure 14: Sending the command to FileTransmitter component- Type the command 'pause' in the Feeder and click Send to pause the file transfer.
- Click the message just above the 'pause' message in Display_Transmitter. It will have the Percentage of completion less than 100% since it got paused before that.
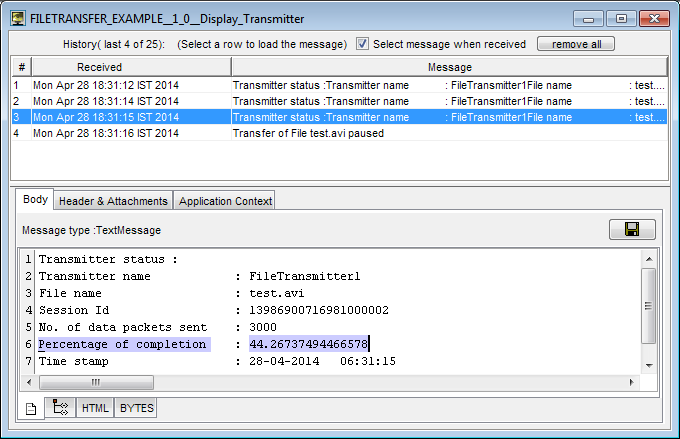
Figure 15: Display_Transmitter showing partial transfer after pausing the transfer - Display_Receiver reflects the same value for Percentage of completion, as that much amount of transfer is only happened before it got paused.
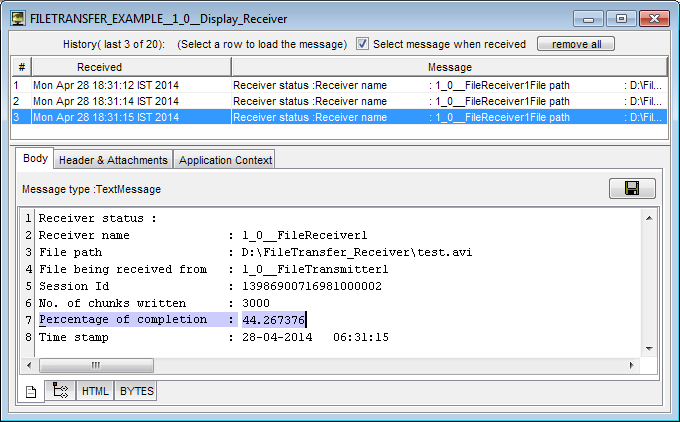
Figure 16: Display_Transmitter showing partial receipt of file after pausing the transfer - Now, type 'resume' in the Feeder and click Send to resume the file transfer.

Figure 17: Sending 'resume' command to resume file transfer - Last message in Display_Transmitter displays the Percentage of completion as 100% indicating that the file got transferred completely.

Figure 18: Message indicating that the file is transferred completely - Last message in Display_Receiver also will have the Percentage of completion as 100% which indicates that the entire file got transferred.
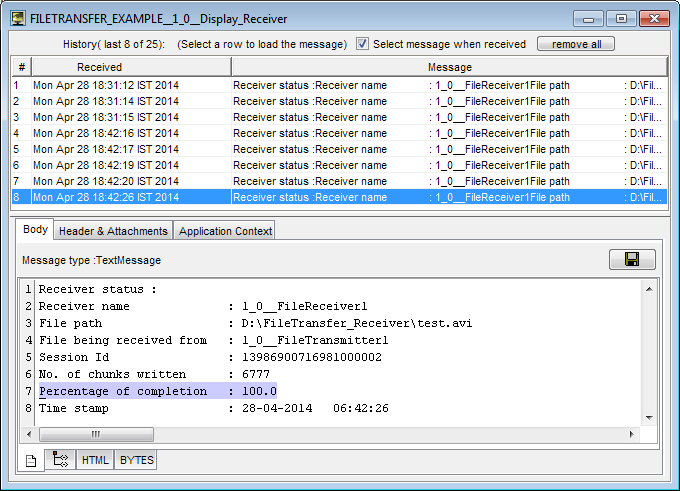
Figure 19: Message indicating that the file is received completely
Points to Note
- You may try the following command as well:
- 'status' to know the status of the file being transferred
- 'stop <sourceFileName>' to abort the file transfer completely where 'resume' command won't work and have to use 'send' again.
- When multiple Send requests are executed using Send-N times in Feeder, use another Feeder component to send pause/status command.
- Content of the file in the Source Folder can be edited. The edited file will overwrite the old one present in the Destination Folder as you use 'o' in the command upon next transfer.
- If you send two files, say the test.avi first and test.txt at the next moment, it waits for the test.avi file to get transferred completely and keep the test.txt waiting until it finishes the first chucks of file.
- Only one file can be send at a time and polling of a directory is not possible. Each action requires designated commands as explained in this example document.
Reference
- Please note that the component options used in this example are minimum, which helps you to get an overview of the application. To explore the other options present in the FileTransmitter and FileReceiver, Feeder and Display components, refer FileTransmitter, FileReceiver, Feeder and Display sections respectively.