This section talks about how the functionality of the component can be tested. A very simple way to test the component is to use it the way it is intended to be used, that is, to create a flow with the component and run the flow to check if desired results are obtained. Unfortunately, at times the result may not be the desired one, not due to the fault in the component logic but for external reasons. Therefore, Fiorano provides a more isolated way to test the synchronous components' logic.
Testing Synchronous Components
Synchronous components can be tested:
- During the configuration time using the Test button in the CPS
- Using JUnit Test Cases
Testing in Configuration Property Sheet (CPS)
For all the synchronous components, the Configuration Property Sheet (CPS) contains a Test button in the Managed Connection Factory (MCF) panel (in case of a connection-based component as in Figure 1) and the Interaction Configurations panel (Figure 4).
Testing the Connection
To test the connection that the component makes with the underlying EIS, specify the connection details in the Managed Connection Factory panel and click Test.

Figure 1: Managed Connection Factory (MCF) panel showing the connection details and Test button
A dialog pops up showing the result of the operation (connecting to EIS) performed. A text/XML result shows the connection details of the EIS to which the component successfully connects to.
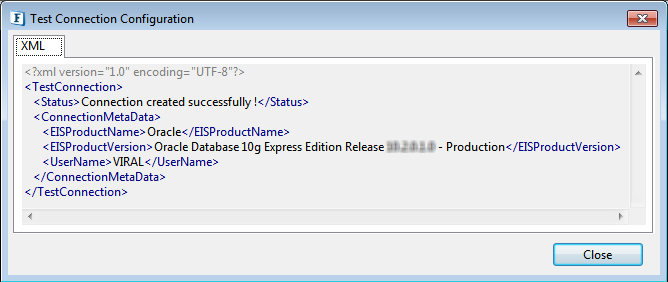
Figure 2: The result of test on MCF. The connection to the database is successfully established.
A trace of error/exception occurs while the component fails while trying to connect to MCF.
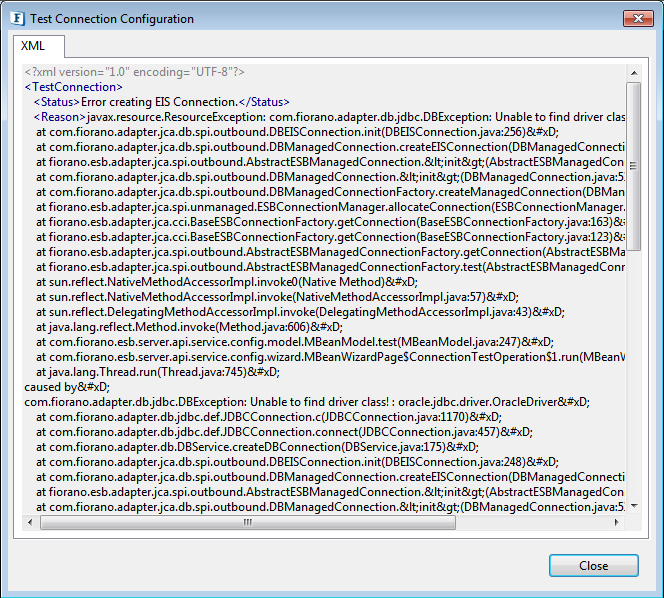
Figure 3: Exception when the test in MCF panel fails
Testing the Business Logic
The second step in the CPS, called Interaction Configurations step, contains the details defining the business logic that the component executes. The business logic of the component can be tested using the Test button in the Interaction Configurations panel.
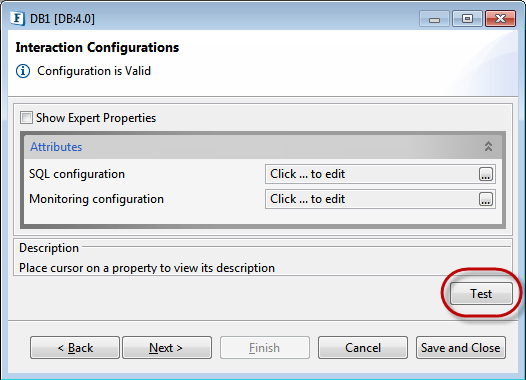
Figure 4: Interaction Configurations panel showing the test button
The Test dialog allows to invoke the component with sample input, which would be pushed onto the input port of the component during runtime. The component processes the input message and displays the output message, which comes out onto the output port of the component during runtime.
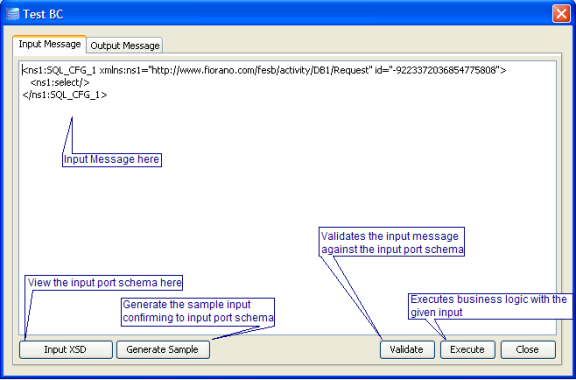
Figure 5: Test dialog to test the component's business logic, showing the input message details
The Input Message tab allows to specify the input message and shows the details of the input message. To view the input port schema, click the Input XSD button. The dialog box (Figures 6 to Figure 8) that pops up shows the input port schema details.
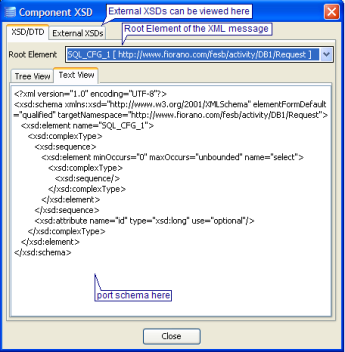
Figure 6: Port schema (text view)
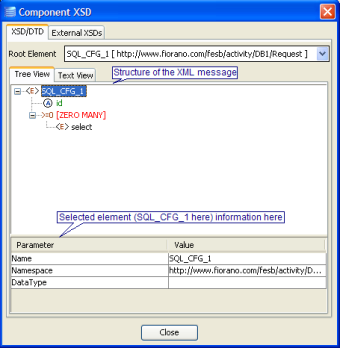
Figure 7: Port schema (tree view)
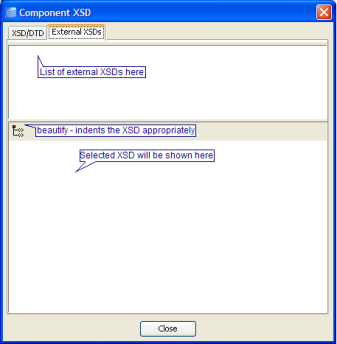
Figure 8: External XSDs for the port schema
To test the component, click the Execute button (Figure 5). The output is shown in the Output Message tab (Figure 9). To view the output port schema, click the Output XSD button. A dialog similar to the dialog of input port schema (Figure 6 to Figure 8) pops up showing the output port schema details. To validate the output message against the output port schema, click Validate.
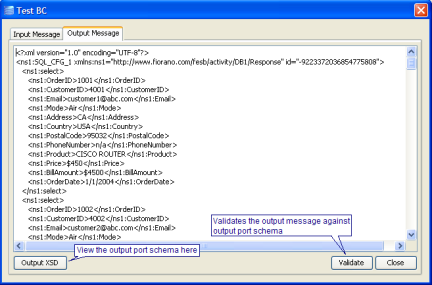
Figure 9: Result of the test operation
Testing using JUnit test cases
Fiorano provides a JUnit test framework to test the logic of the component created. A JUnit Test Case can perform both the test operations, that is, the one in the Managed Connection Factory panel and the Interaction Configurations panel.
Configuring a JUnit test case
To write a JUnit Test Case, create the test hierarchy as shown in the figure below.
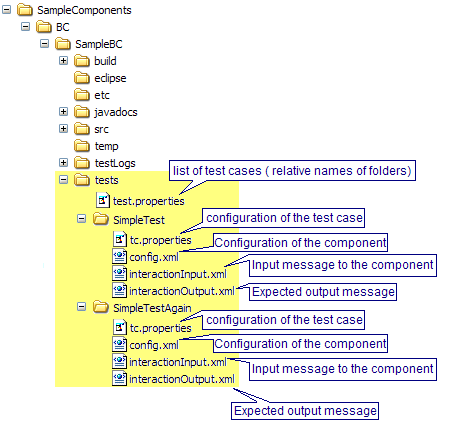
Figure 10: Structure for JUnit test cases for the component
The test.properties file is a properties file that contains the list of paths to Test Cases relative to the tests directory. The entry in test.properties file for a structured output as shown in Figure 10 looks as below:
![]()
Figure 11: Entry in test.properties, listing all the test cases
Each test should contain a file 'tc.properties' that contains the configuration of the test case. The configuration of a test case includes configuration of the component, input message text that has to be passed to the component and expected output the component should return, among other properties. The list of properties that can be specified is shown in the following table.
| Property | Description | Default |
|---|---|---|
bcConfig | Configuration XML of the component saved using configureBC.bat utility | bcConfig.xml |
configuredUsingStudio | Indicates whether the configuration is given as mcf and jca files or as configuration XML
| true |
compareInteractionOutput | Specifies whether output of the component should be compared with jca.output or not
| true |
connectionLess | Indication to test framework whether a test for connection has to be performed or not.
| false |
inputContentType | The type of input message text. Values from:
| XML |
inputPropsFile | Location pointing to a file containing message properties that should be passed to the component. Example: COMPLETED=true in case of FileWriter | inputProps.properties |
Jca | jca file containing the interaction configurations | bc.jca |
jca.exception | File containing the expected exception for a negative test case | interactionException.xml |
jca.input | File containing the input message content that should be used to test the component | interactionInput.xml |
jca.output | File containing the expected output from the component. | interactionOutput.xml |
Mcf | mcf file containing the connection configurations | bc.mcf |
mcf.output | File containing expected result of the connection test | mcfOutput.xml |
mcf.exception | File containing the expected exception message for a negative test case | mcfException.xml |
negativeTest |
| false |
xmlDiffClass | Custom comparison class for comparing outputs of interaction. Usage: Add it to the class path for tests by specifying it in tests.lib path like structure, which can be over-ridden in components. | none |
A typical tc.properties file contents look as in the figure below.
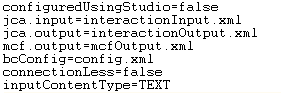
Figure 12: Sample tc.properties
Example: If the entry in the tc.properties file is output.xml, then the expected outputs should be specified in files output1.xml, output2.xml and output3.xml for configuration returning 3 output messages.
Executing a JUnit test case
To run/execute the JUnit test case, execute ant runtests from the component's folder. A folder named 'testLogs' is automatically created in the component folder. Logs of the individual test cases is present in tests folder which is under testLogs. The directory structure of testLogs folder is as in the figure below.
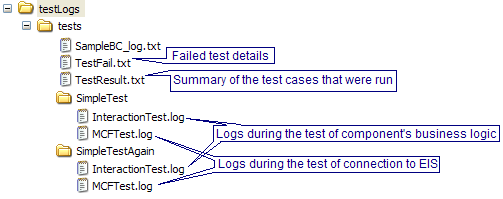
Figure 13: Directory structure of the testLogs containing the results of tests
Sometimes it is required to add classes specific to the component to classpath of the tests execution, such classes can be added in the tests.lib path in the build.xml of the component as shown in Figure 14. To perform some tasks before the tests start, add a target 'testspreprocess' to the component's build.xml (Figure 14). Similarly, to perform tasks after the tests end, add a target 'runtests' to the component's build.xml.
Below figure shows the content of a sample build file containing necessary entries to start the FMQ server before the test cases begin and to shutdown the FMQ server after the test cases end.

Figure 14: sample build.xml containing necessary entries for tests.lib, testspreprocess and runtests
Testing Asynchronous Components
Unlike synchronous components, the asynchronous components cannot be tested during the configuration time, unless the required functionality is specifically added. However, Fiorano provides a testing framework for testing asynchronous components as well. JUnit testing of asynchronous components is similar to JUnit testing of synchronous component
Configuring a JUnit test case
To write a JUnit test case, create the test hierarchy as shown in the figure below.
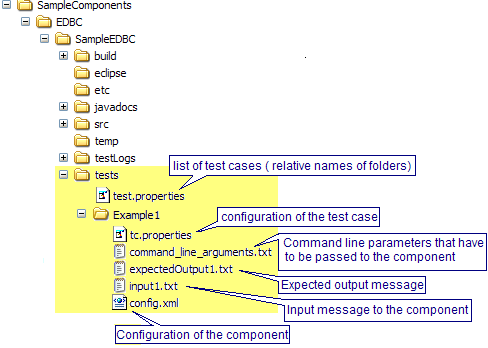
Figure 15: Structure for JUnit test cases for the component
The test.properties file is a properties file that contains the list of paths to test cases relative to the tests directory. The entry in test.properties for structure shown in Figure 15 looks as below:
![]()
Figure 16: entry in test.properties listing all the test cases
Each test should contain config.xml files
This file contains the configuration of the component. The configuration can be obtained as follows:
- Create an Event Process
- Drag and drop the asynchronous component to be tested
- Configure the component
- Save the Event Process
Extract the configuration from application's XML file, copy it in config.xml and save the config.xml file. To extract the configuration from the application's file:
- Open the application's XML file located at %FIORANO_HOME%\esb\fes\ repository\applications\<APPLICATION_NAME>
- In the XML file under the /Application/ServiceInstances node, look for ServiceInstance node of the required component
- Under the ServiceInstance node from ./RuntimeArguments/ UserDefinedPropertySheet node, copy CDATA section and save it into config.xml file
command_line_arguments.txt
This file consists of all the command line arguments that have to be passed to the component during the launch of the component. A typical command_line_arguments.txt looks as below.

Figure 17: command_line_arguments.txt for the asynchronous component
tc.properties file contains the configuration of the test case. The configuration of a test case includes input ports and output ports that have to be created and location of the files containing input messages to be passed and output messages to be compared. The list of properties that can be specified is shown in the following table.
| Property | Description |
|---|---|
inputPortNames | Comma separated values of the input port names that the component has for this configuration |
outputPortNames | Comma separated values of the output port names that the component has for this configuration |
otherTopicNames | Any other JMS destinations that have to be created for the component's execution |
inputFiles | A list of files in which each contains a single message to be sent on the input port. Specify comma-separated list of values to be sent on to each of the input ports specified in the inputPortNames list respectively. If multiple inputs have to be sent to the input port, then specify colon-separated list in each of the comma-separated value. Example: |
outputFiles | A list of files which have to be populated with the output messages when the test is executed. This should be a comma-separated list, each mapping to a corresponding output port in the outputPortsNames list. These files can be empty or non-existent. |
expectedOutputFiles | A list of files in which each contains an expected output message that should be received on the output ports of the component. This should be a comma-separated list, each mapping to a corresponding output port in outputPortsNames list. |
A typical tc.properties file looks as in the figure below.
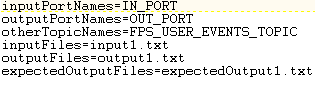
Figure 18: Sample tc.properties
Executing a JUnit test case
Before executing the test case, an Event Process with the newly created custom component should be launched and the same details have to be given in command_line_arguments.txt file as explained above. To run/execute the JUnit test case, execute ant runtests from the component's folder. A folder named testLogs is automatically created in the component folder. The directory structure of testLogs folder is as below.
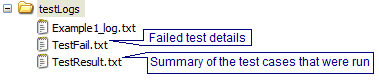
Figure 19: Directory structure of the testLogs containing the results of tests
Sometimes it is required to add classes specific to the component to classpath of the tests execution, such classes can be added in the tests.lib path in the build.xml of the component as shown in Figure 20. To perform some tasks before the tests start add a target testspreprocess to the component's build.xml (Figure 20).
Similarly to perform tasks after the tests end, add a target 'runtests' to the component's build.xml
Below figure shows the content of a sample build file containing necessary entries to start the FMQ server before the test cases begin and to shutdown the FMQ server after the test cases end.
Figure 20: sample build.xml containing necessary entries for tests.lib, testspreprocess and runtests