This section discusses the security policies and service-governance features supported by the Fiorano Platform. The Fiorano Platform security policy interface gives you the necessary control to administer and manage groups and users on the entire Fiorano Network as well as the ability to control process deployment to QA, Staging and Production environments.
User/Permission Management
Authentication
The Fiorano Platform users and groups can operate from all available nodes in the Fiorano Network. The Fiorano ESB Dashboard can be used to configure and manage user authentication. A group is identified by a unique name and contains a list of users who inherit all rights assigned to a group. Each user is assigned a unique user name, password, and a group membership. Information pertaining to users and groups are utilized while authenticating and enables to determine the resources of a user or a group that is allowed to access.
The Fiorano ESB Dashboard allows you to manage all principals in a Fiorano Network. To manage principals, you need to view the list of principals in the right pane of Fiorano ESB Dashboard. To view the list of principals, click the Groups node in the left pane. The figure below illustrates the principal list.
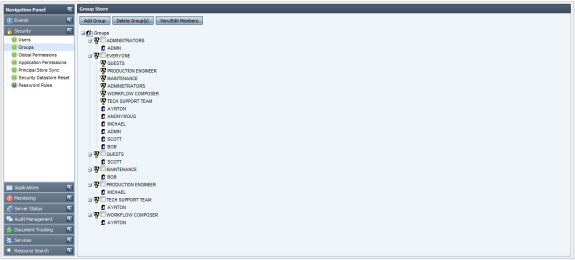
Figure 1: Users List
You can perform the following management tasks:
- Creating user accounts
- Deleting user accounts
- Changing the password of a user
Similarly the Groups node allows the administrator to club users into specific groups and provide appropriate levels of authorization.
Authorization
The ESB Dashboard allows you to assign rights to users and groups, rights may be understood as rules associated with the Fiorano Network granted to users and groups. Rules allow users and groups to perform specific tasks on a Fiorano Network. The Fiorano Platform has a well-defined security policy to protect your network against data loss or corruption due to malicious or accidental access. This policy is implemented by assigning the appropriate permissions to groups as well as their users.
When you select Global Permissions shown in the left panel, a list of all available permissions are displayed in the right panel.
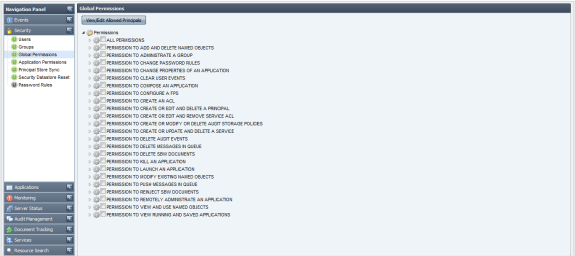
Figure 2: Access Right Assignment
To set permission for any user and group, select a permission entry and click on View/Edit Allowed Principals to configure. Figure above illustrates the Permission to Create an ACL is restricted to Administrators. Other users and groups can be authorized to perform this operation by adding to the Assigned To list.
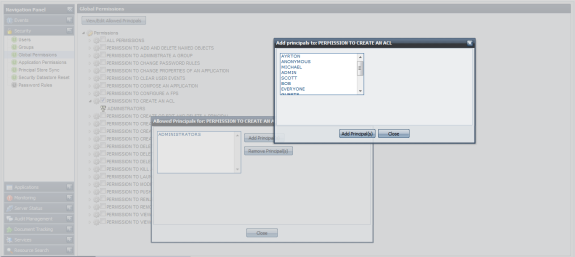
Figure 3: Permission to Create an ACL
Password Rules
For security purpose, Fiorano Enterprise Server provides feature to define the password validity and strength check rules for accepting password while adding a new user or changing the password of existing user.
Password Strength
Strength of a password is defined on a logical scale and suggests the user that how secure is the password provided by him. Password Strength can be categorized into one of the following categories:
- VERY WEAK
- WEAK
- AVERAGE
- ABOVE AVERAGE
- STRONG
- VERY STRONG
Password Validation
Whereas Password Strength Check defines guidelines for choosing a good password, Password Validation checks put restrictions on which passwords are valid and which ones are invalid. Invalid passwords will not be accepted by the system and the user will be prompted to provide a new password.
Password strength and validation rules are defined per profile basis, that is, the rules can be changed per Enterprise Server profile.
Custom Password Rule Implementation
Fiorano Enterprise Server provides the user the flexibility to override the default implementation of password rules and write his own custom implementation, that is, the user can write his own Java Class for checking both password strength and validity.
Steps to define custom implementation for checking password strength and validity. Users who wish to override the default implementation and provide their own custom implementation should implement the following interface:
- "IStrengthChecker.java" for password strength check
- "IValidationChecker.java" for password validation check
Both of these interfaces are defined in package "fiorano.tifosi.dmi.rule.passwd.api". For more information please refer to the javadoc of these APIs in $FioranoHome/javadoc/esb/dmi/fiorano/tifosi/dmi/rule/passwd/api/
After defining your own custom implementation for one or both of password strength and validation check, please follow the below mentioned steps to configure Enterprise Server for overriding the default implementation with your custom implementation:
- Compile the custom class/classes and create a jar of them. Refer link http://java.sun.com/docs/books/tutorial/deployment/jar/build.html to see how jar files are created.
- Include the jar in classpath of Enterprise Server by adding the full path of jar in server.conf or fes.conf (depending on you are using server.bat/server.sh or fes.bat/fes.sh for starting Enterprise Server) under the tag <java.classpath> in conf file.
- Start nStudio, and open FES profile by navigating to Profile Management > Fiorano10 > <EnterpriseServerProfile> > fes.
- In FES profile, navigate to Fiorano > ESB > Security > User > UserSecurityManager as shown in figure below:
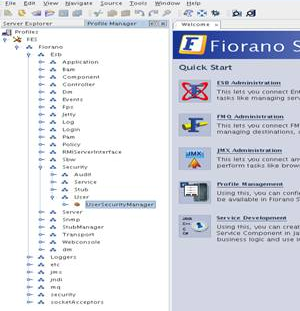
Figure 4: UserSecurityManager option - Click the ellipsis button of "PasswdStrengthImpl" in the Properties of UserSecurityManager panel on the right hand side of Studio as shown in figure below, provide the fully qualified classname (<package_name>.<class_name>) of the custom password strength check class. Similarly for password validity check, click on the ellipsis of "PasswdValidityImpl" and provide the fully qualified classname of the custom password validity check class.
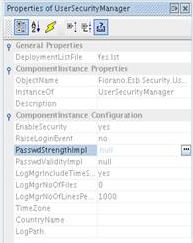
Figure 5: PasswdValidityImpl - Save the profile as shown in the figure below:
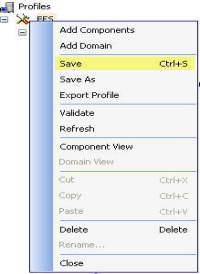
Figure 6: Saving the profile
Now, the enterprise server will use your custom classes for checking password strength and validity
Deployment Manager
The Management and Governance of the distributed applications is a challenging task. The On-demand business requirements mean that new services have to be frequently added to existing business processes. The administrator needs to ensure that the service components being added are tested thoroughly and do not compromise the stability and performance of the system. To satisfy this requirement, the administrator needs to implement reliable configuration management and governance policies to prevent unstable components from being added to the system.
Deployment Manager is a powerful rule engine that simplifies configuration management and governance in the Fiorano network. The Deployment Manager uses the concept of Labels and Rules to achieve the above mentioned goals.
Labels
The Fiorano Platform enables users to label the various components of their distributed architecture. All the Service Components, Event Processes, and nodes (peer servers) can be labeled.
The labels currently supported by the tool are:
- Development
- QA
- Staging
- Production
You can use a combination of labels and other identifiers (GUIDs, version numbers, and node names) to create comprehensive and powerful rules to control the deployment of processes. For example, when a new process has been developed, then it can be marked with a Development label. After appropriate levels of testing, it can then be upgraded to Staging. The labeling support at the service component level provides similar functionality at a much more fine grained level.
Rules
A rule in the Fiorano Platform context is a conditional statement that controls the launch of Business Components. The rules have two important aspects; identifiers and precedence.
The identifiers are values assigned to the various configurable elements of the Fiorano Network. The configurable elements are the fixed elements of the Fiorano Network, such as Event Processes, Business Components, and Peer Servers. The rules are constructed by combining identifiers of the various Fiorano Platform elements. The Deployment Manager has been configured with the following identifiers:
- GUID
- Version
- Label
The identifiers allow you to control the ambit and complexity of a rule. The fewer the identifiers, the simpler the rule and the greater its ambit. For example, a simple rule can be created to disallow all instances of a particular Business Component from being launched. This rule will typically contain one identifier, the GUID of the Business Component. Despite being a simple rule, it applies to all Business Components in the Fiorano Network. A complex rule, on the other hand, can be created to prevent a particular Business Component from being launched on a Peer Server when it is part of a particular Event Process. This rule will contain at least three identifiers, the GUIDs of the Event Process, the Business Component, and the label of the Peer Server. The Version identifier is present only for components and event processes and not for the Peer Server.
Precedence: All rules are processed in the order in which they are stored by the Deployment Manager. By default, rules are stored in the order in which they were created. As a result, you will have to ensure that one rule does not interfere with the other. You can alter the precedence of the rules by using the controls provided in the tool.
The syntax of a rule is illustrated in the figure below.
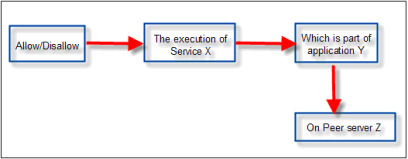
Figure 7: Rule syntax
Figure below illustrates a sample rule that disallows deployment of any non-production event process on a peer with the Production Label.
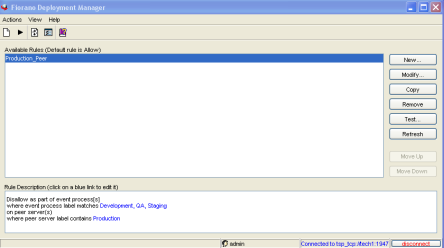
Figure 8: Sample Rule
The complex business rules can be tested and verified before implementing them in your environment. The Deployment Manager provides the ability to test the rules at design time.
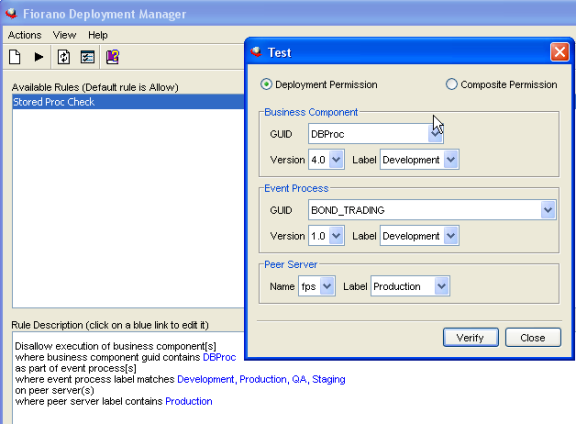
Figure 9: Verifying Rule
Event Process Security
This feature enables administrator to define the permissions created for the destinations used by the Event Process. This allows administrators to control the set of users allowed to access destinations created/used by the components within an Event Process, ensuring that unauthorized users do not get access to these destinations.
How ACLs Work
All major actions taken by the users on an Event Process are mapped with one or more permission which determines whether the user has the permission to take that particular action or not. If the user is not allowed to take the action, the server throws a Security Exception. For an Event Process, the following ACLs control user-actions on the process.
- Application Level Permission
- Global/System Level Permission(s)
Application Level Permission
Each Event Process can be assigned an ACL that determines the set of users and actions allowed for that Event Process. These permissions, if set, over-ride the permission set at the system level.
| Permission | Description |
|---|---|
| PERMISSION TO COMPOSE AN APPLICATION | This permission controls whether a user is allowed to compose/update/delete an Event Process from the Server repository. |
| PERMISSION TO CHANGE PROPERTIES OF AN APPLICATION | This permission controls whether a user is allowed to change the following properties of a running Event Process:
This permission thus controls run-time changes in the above properties. |
| PERMISSION TO LAUNCH AN APPLICATION | This permission controls whether a user is allowed to launch and/or synchronize the Event Process. |
| PERMISSION TO KILL AN APPLICATION | This permission controls whether a user is allowed to kill the Event Process. |
| PERMISSION TO VIEW RUNNING AND SAVED APPLICATIONS | This permission controls whether a user is allowed to view the application from the server repository. If a user tries to view an application without the appropriate permission, a Security Exception is thrown and the user is denied access to the information. |
| PERMISSION TO REMOTELY ADMINISTRATE AN APPLICATION | This permission controls the set of users who can use service instances from this Event Process as a remote service instance in their own Event Processes. By default, all users are allowed to remotely access the service instances of all Event Processes. This behavior can be controlled by the same permission when set at system level (as described in the Global/System Level Permission(s) section). |
Global/System Level Permission(s)
The permissions set at system level control the overall behavior of the system. For permissions related to an Event Process, if Event Process Level permissions are not set, Global/System Level permissions govern the set of actions allowed for a user. As explained earlier, the default behavior of the Event Processes is governed by Global/System Level permissions only. The following permissions are available at this level.
| Permission | Description |
|---|---|
| ALL PERMISSIONS | This permission over-rides all other permissions set at system level. If this particular permission is granted the user/grout will be allowed to perform all actions unless the Application Level Permission specifically denies the action. |
| PERMISSION TO COMPOSE AN APPLICATION | This permission serves the same purpose as at the Application Level (see previous section) except that it applies to all Event Processes. |
| PERMISSION TO CHANGE PROPERTIES OF AN APPLICATION | This permission serves the same purpose as at the Application Level (see previous section) except that it applies to all Event Processes. |
| PERMISSION TO LAUNCH AN APPLICATION | This permission serves the same purpose as at the Application Level (see previous section) except that it applies to all Event Processes. |
| PERMISSION TO KILL AN APPLICATION | This permission serves the same purpose as at the Application Level (see previous section) except that it applies to all Event Processes. |
| PERMISSION TO VIEW RUNNING AND SAVED APPLICATIONS | This permission serves the same purpose as at the Application Level (see previous section) except that it applies to all Event Processes. |
| PERMISSION TO CREATE OR EDIT AND REMOVE SERVICE ACL | This permission has been deprecated as it is no longer used within the system. |
| PERMISSION TO CREATE OR UPDATE AND DELETE A SERVICE | This permission controls whether a user is allowed to make modifications in a particular service e.g. adding/removing a resource to/from a service, changing icon, adding/removing service dependencies, etc. |
| PERMISSION TO CREATE AN ACL | This permission controls whether a user is allowed to create/change a System Level or Application Level permission. |
| PERMISSION TO CREATE OR EDIT AND DELETE A PRINCIPAL | This permission controls whether a user is allowed to create/delete a user/group on the system. The permission also determines whether a user is allowed to change the password for an existing user. |
| PERMISSION TO CONFIGURE A FPS | This permission has been deprecated as it is no longer used within the system. |
| PERMISSION TO REMOTELY ADMINISTRATE AN APPLICATION | This permission serves the same purpose as at the Application Level (see previous section) except it applies to all Event Processes. |
| PERMISSION TO DELETE MESSAGES IN QUEUE | This permission has been deprecated as it is no longer used within the system. |
| PERMISSION TO CLEAR USER EVENTS | This permission has been deprecated as it is no longer used within the system. |
| PERMISSION TO PUSH MESSAGES IN QUEUE | This permission has been deprecated as it is no longer used within the system. |
| PERMISSION TO ADMINISTRATE A GROUP | This permission controls whether a user is allowed to add/remove members from an existing group. |
Default Allowed Set Of Users
When an Event Process is launched, ACLs will be created for all the default (i.e. system-created) destinations such that the following users can publish/subscribe/send/receive the information on these destinations.
- User launching the Application
- The set of users allowed by the permission named PERMISSION TO REMOTELY ADMINISTRATE AN APPLICATION.
All components launched as a result of an Event Process launch/synchronize action will use the credentials of the user performing the launch/synchronize operation to create all connections with the Peer Server. Similarly, all connection(s) created by routes within the Event Process to remote Peer Server(s) will be created using the credentials of the user launching/synchronizing the Event Process.
These parameters can be configured by opening the profile in Studio and navigating to Fiorano > etc > FMQConfigLoader as illustrated in the figure below. These parameters are as described below:
- CreateDefaultACL – This parameter decides whether a default ACL should be created for a newly created destination or not. The default ACL is to allow or disallow Everyone (based on the value of All Permissions parameter defined below) from accessing the destination.
- AllPermissions – This parameter determines whether the default permission created should be positive or negative.
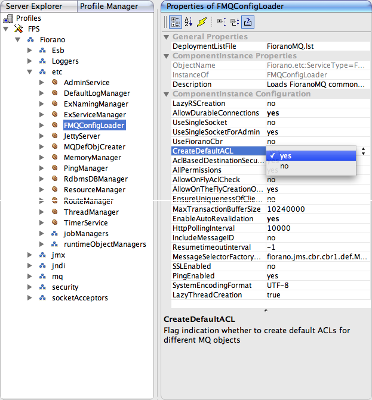
Figure 10: Option to create Default ACL
Changing Default Permissions
Default permissions at Application Level and System Level can be changed such that only a chosen set of users are allowed to perform the desired actions on desired set of Event Processes. These changes can be made via the Fiorano Web dashboard interface which provides an interactive UI to change these ACLs.
Changing Global Permissions
All available global permissions are listed under the Security > Global Permissions component of the Web interface. Each of these permissions when expanded displays a list of principals that are allowed to perform the action specified by that permission (as shown in figure below).
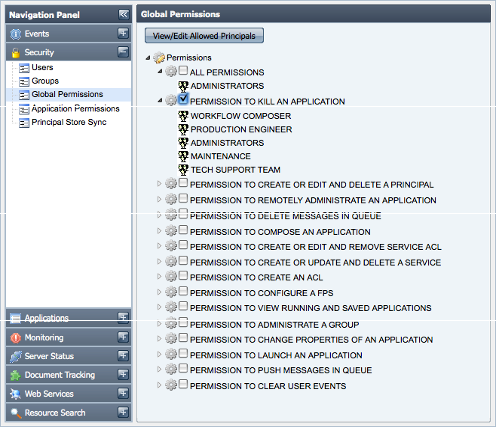
Figure 11: Global Permissions section
This list of allowed principals can be modified by selecting the appropriate checkbox and clicking the View/Edit Allowed Principals button. This pops-up another window showing the list of allowed users. You can also remove selected users from the permission by clicking the Remove Principal(s) button or add new users to the permission by clicking the Add Principal(s) button as shown in the figure below.
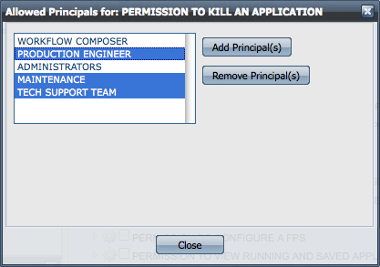
Figure 12: Dialog box to set permission to Kill an Application
Changing Application Level Permissions
Application Level Permissions can be viewed and modified by navigating to the Security > Application Permissions panel of the Web interface. Selecting a principal and Event Process name in this view displays the set of positive and negative permissions assigned to that principal for the selected Event Process. The figure below shows that the user BOB has 3 positive and 3 negative permissions for the Event Process named BOND_TRADING.
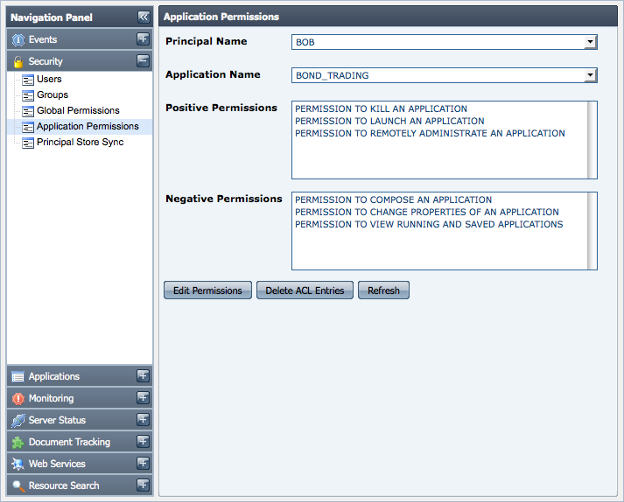
Figure 13: Panel to set Application Permissions
The set of positive and negative permissions can be modified by clicking on the Edit Permissions button. For example, to change the type of one or more negative permissions shown in figure above to positive permissions, first select the desired negative permissions from the set of Available Permissions; then choose GRANT option and click the Modify button. The selected principal would then be granted the permission to perform the actions represented by those permissions as shown in the figure below.
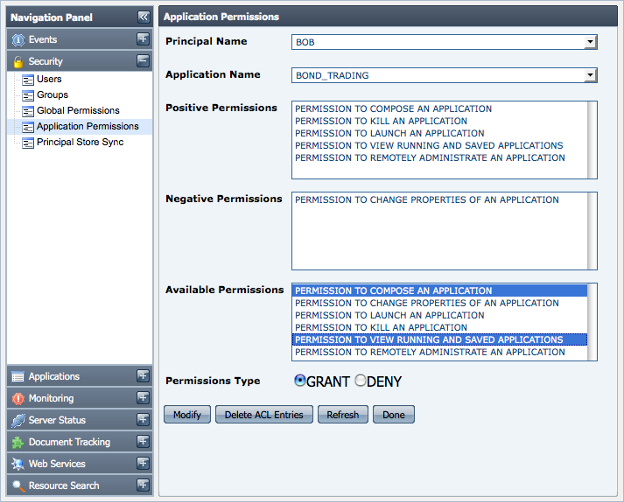
Figure 14: Selected Permission Types under Available Permissions
Principal Store Synchronization
Event Processes are entities that reside in the Enterprise Server repository while destinations used by the components are created on the Peer Server(s). To ensure that a user who has permission to launch an Event Process from the Enterprise Server also has the permission to publish/subscribe/send/receive messages onto destinations on the Peer Server, the username must be present in security data store of both the Enterprise Server and the Peer Server. This is achieved by ensuring that the User & Group Store (collectively called as Principal Store) of both the Enterprise Server and all connected Peer Servers are always in sync with each other. Any change in Principal Store of Enterprise Server is propagated to all connected Peer Servers . Whenever a new Peer Server becomes available on the Fiorano network, a complete one-way synchronization of the Principal Store of that Peer Server and the Enterprise Server will happen, where the Principal Store of Enterprise Server replaces the Principal Store of the Peer Server. The Enterprise Server is responsible for maintaining the status of synchronization with each connected Peer Server. The status of synchronization with each Peer Server can be viewed by navigating to the Security > Principal Store Sync component of Web interface as illustrated in the figure below.
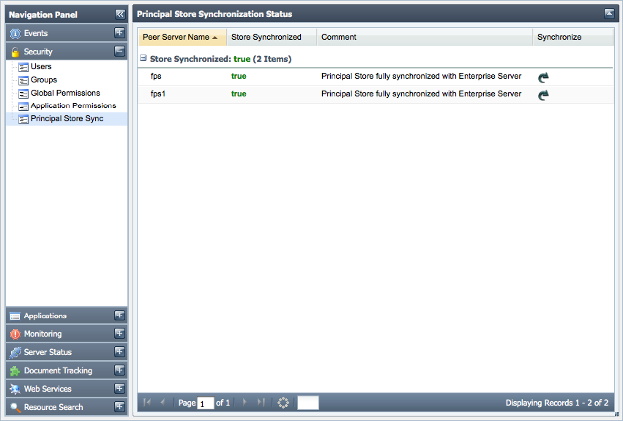
Figure 15: Principal Store Synchronization status
Modifying the Principal Store of Peer Server by directly creating a connection with Peer Server is disabled. An exception will be thrown whenever a user tries to perform such an operation. Any modifications in the Principal Store of Peer Server can only be performed via the Enterprise Server connection. The figure below shows the result of an operation when a user tries to modify Principal Store of Peer Server by logging into Peer Server via Studio.
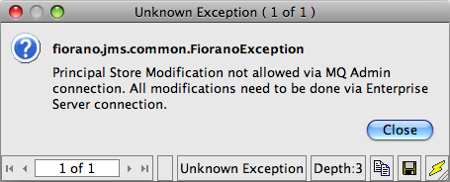
Figure 17: Exception pop-up
Custom Encryption of Passwords used in Event Processes
To know how to use your own keys and algorithms to encrypt passwords, please refer Custom Encryption of Passwords section in Common Configurations page.
Changing Security Database Implementation
Security related information (user, groups and ACLs) is by default stored in file based data store inside runtimedata directory of the server. Using Fiorano Studio Profile Manager, the implementation can be changed before starting the server to LDAP, RDBMS or XML type storage. This section explains the configuration steps required to change the implementation.
Security Related MBeans
Security related components are found in default ESB profiles in Fiorano > Security domain. Object Names for these components are:
- Fiorano.security:ServiceType=RealmManager,Name=SecuritySubSystem
- Fiorano.security.AclManager:ServiceType=AclManager,Impl=FILE,Name=NativeFileBasedAclManager
- Fiorano.security.PrincipalManager:ServiceType=PrincipalManager,Impl=FILE,Name=NativeFilePrincipalManager
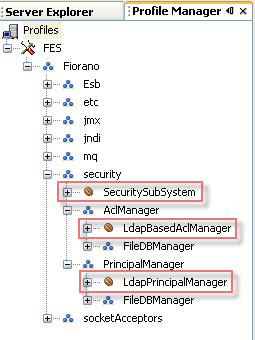
Figure 18: Security related components
The figure above shows the position of these components in the component tree as seen from an off-line configuration tool (the Profile Manager).
Modifying ACLManager Implementation
- Open the profile for off-line editing through the Profile Manager
- Browse the tree to reach the node Fiorano > security > AclManager. Click on the current ACL Manager MBean.
- In the properties panel, click on the value of the Implementation property and choose the desired value from the drop-down menu.
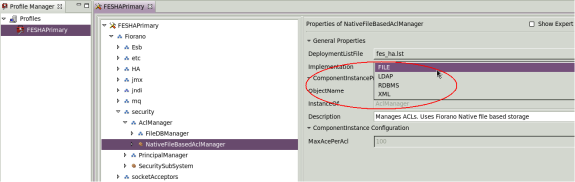
Figure 19: Implementation property to modify ACLManager implementation - Right-click the FES node and select Save from the pop-up menu.
Modifying Principal Manager Implementation
- Open the desired profile for off-line editing through the Profile Manager.
- Browse the tree to reach Fiorano > security > PrincipalManager and click on the current Principal Manager Mbean as shown in the figure below.
- In the property panel click on the value of the Implementation property and choose a desired value from the drop-down list.
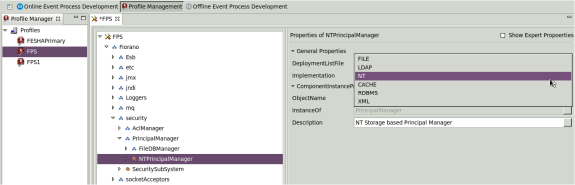
Figure 20: Implementation property to modify Principal Manager implementation - Right-click on the FES node and select Save from the pop-up menu
Editing Destination Level Security through ACLs
The administrator can grant users access permissions to work on different destinations (Topics and queues). Permissions to users and groups can be edited by executing the following steps:
- Launch Studio and click on the Server Explorer pane. Right-click on the desired server and select Login from the pop-up menu.
- Navigate to the required destination through Destinations > Topics/Queues.
- Right-click the required topic/queue and select the EditACL option to open EditACL dialog box.
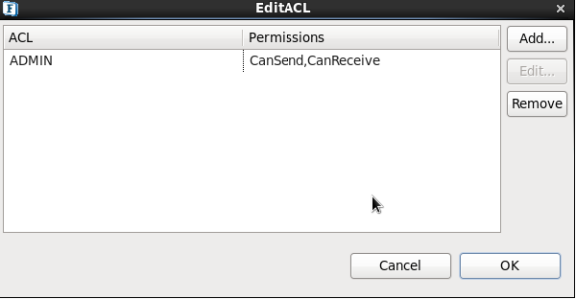
Figure 21: EditACL dialog box to edit Destination Level Security- You can add permissions for a new principal by clicking on the Add button.
- An existing entry for a principal can be removed by clicking on the Remove button.
- Select the ACL entry (for any principal) in this dialog box and click the Edit button to open the Edit Permissions dialog box.
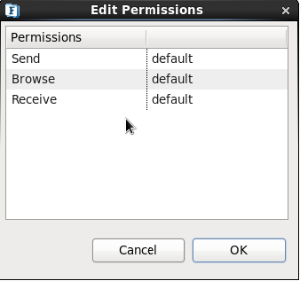
Figure 22: Edit Permissions dialog box to edit an ACL - Modify the permissions for the various actions like Publish, Subscribe, Unsubscribe, and Durable Subscribe as desired and click the OK button.
RDBMS Realm
Setting up
- Open the profile for off-line editing through the Profile Manager
- Modify Principal Manager [see section 7.4 Modifying Principal Manager Implementation of FioranoMQ Handbook] and ACL Manager implementation [see section 7.5 Modifying ACLManager Implementation of FioranoMQ Handbook] to RDBMS
- Configure these components as per the desired database. Sample configuration for some common databases is provided in later sections.
- RDMS-based ACL manager depends on Timer Service. Specify the instance of TimerService as specified in figure below:
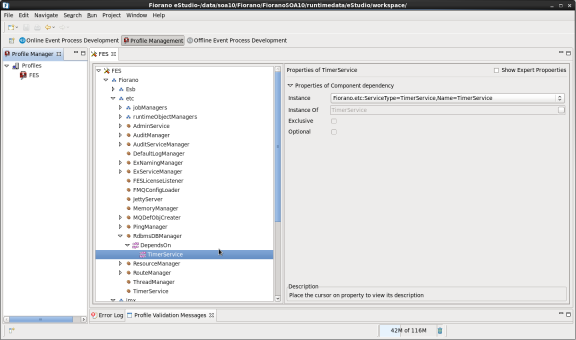
Figure 23: Instance property under TimeService for RDBMS Realm - Right-click on the FES/FPS node and select Save from the pop-up menu.
Additional Configuration
The database driver has to be added to the Container classpath. To force the Fiorano FES/FPS servers to create default destinations and users again over the newly configured RDBMS Server even if the server has already been started using any other configuration option, clear the existing database (run folder of profile) and then restart the server.
Sample Configurations
The list below provides sample configuration for various databases. These parameters can be specified for both ACLManager as well as PrincipalManager.
| Database | URL | Database Driver | Username | Password |
|---|---|---|---|---|
Oracle | jdbc:oracle:thin:@164.164.128.113:1521:orcl | oracle.jdbc.driver.OracleDriver | scott | tiger |
MySQL | jdbc:mysql://localhost/mysql | com.mysql.jdbc.Driver | <user name> | <password> |
HSQL | jdbc:hsqldb:d:\FMQDB | org.hsqldb.jdbcDriver | sa | <password> |
MSSQL | jdbc:microsoft:sqlserver://qalab01:1433 | com.microsoft.jdbc.sqlserver.SQLServerDriver | sa | <password> |
DB2 | jdbc:db2://localhost:7777/sample | COM.ibm.db7.6.jdbc.net.DB2Driver | user | passwd |
The parameter named PropertiesFile should point to principalsqlstatements properties when configuring PrincipalManager and aclsqlstatements properties when configuring ACLManager. These files can be found in the conf folder of the desired profile.
Verifying
Use any Query tool provided by your database vendor, such as SQLWorksheet for Oracle, and verify the creation of the following tables with default values:
Principal Manager
TableName - users (stores all users related information)
TableName - groupmembers (stores all Group related information)
ACL Manager
TableName - aclentries (stores ACL Entries for all users)
The following is a sample SQL query executed on SQLWorksheet:
- SQLWKS> select * from users;
- SQLWKS> select * from aclentries;
LDAP Security Realm
LDAP (Lightweight Directory Access Protocol) is an application protocol for querying and modifying attributes in directory service providers like Active Directory, which supports LDAP.
Active Directory is a database-based system that provides authentication, directory, policy, and other services in a Windows environment.
This section explains about the Access and Layout information pertaining to the directory server, which is required to authenticate and authorize users using LDAP Directory Server.
Setting up
The basic set up is done in the eStudio application. To set up LDAP security, perform the following actions:
- Open the profile for off-line editing through the Profile Manager using eStudio by clicking on the Profile Manager pane.
Modify the Implementation property of ACL Manager and Principal Manager and to LDAP.
- Configure the Principal Manager as per the desired Directory Server. Sample configuration for Netscape Directory Server is as shown in the figure below in section LDAP Provider DN.
- LDAP-based ACL manager depends on Timer Service. Specify the Instance of TimerService.
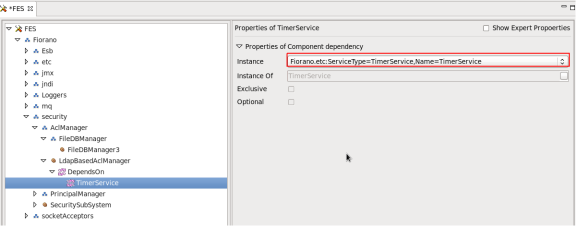
Figure 24: Instance property under TimeService for LDAPSecurity Realm
5. Right-click on the FES/FPS node and select Save from the pop-up menu.
Sample Configuration – ApacheDS1.5.4
Apache Directory Studio is a complete directory tooling platform intended to be used with any LDAP server however it is particularly designed for use with ApacheDS. Hence, the steps mentioned here require the installation of Apache Directory Studio.
Setting up the Directory Service
Setting up Apacheds1.5.4 involves two steps—Starting ApacheDS server and Creating the LDAPConnection.
Starting Apacheds1.5.4 Server
The server can be started in two ways
- From Apacheds1.5.4
- From Apache Directory Studio
From Apacheds1.5.4
This method needs Apacheds1.5.4 to be installed and configured. Once you have this ready, perform the following actions:
- Stop any running instance of apacheds.
Take backup of server.xml
Modify server.xml as follows, add the following line within the tag </partitions> ... </partitions>
Run apacheds using the following command:
From Apache Directory Studio
- Login through Apache Directory Studio.
- User ID: uid=admin,ou=system (Default)
- Password: secret (Default)
- For creating a new Server Instance, navigate to File > New > LDAPServer
- Under Servers browser window double click on the above created server to see a window with the tile server.xml
- Configure default LDAP port as 10389 under General category in server.xml
- Navigate to Partitions category in server.xml using 'Add'.
- Set following partition parameters
- ID: fiorano
- Cache Size: 100
- Suffix: o=fiorano,c=US
- Select the options: Enable Optimizer, Synchronization on write
- Save (File > Save) the server configuration.
Creating LDAP Connection
An LDAP Connection is required to bind to an LDAP server and perform the tasks. This section explains how to create a connection to your LDAP directory using Apache Directory Studio.
To create a connection to your LDAP Directory, perform the following actions:
- Login through Apache Directory Studio.
- User ID: uid=admin,ou=system (Default)
- Password: secret (Default)
Import the following LDIF content using Apache Directory Studio. (LDAP > New LDIF File)
- Save the file in any local directory.
- Create a new LDAP connection by navigating to File > New > LDAPConnection
- Enter the details of running server.
- Right-click on the created connection and navigate through Import > LDIF Import.
- Browse and select the LDIF file created in the Step 2.
Once the file in imported, the added entries can be found in LDAP Browser window > DIT > Root DSE > o=fiorano,c=US
Re-login through Apache Directory Studio to see the added children.
Setting up the profile to use with ApacheDS1.5.4
Now set up a profile to use with ApacheDS1.5.4 by performing the following actions:
- Open the profile for off-line editing through the Profile Manager using Studio by clicking on the Profile Manager pane
- Make sure that all the properties except the LdapProviderUrl are reset to their original value.
- In the LDAP Provider URL, the port number has to be 10389 and the ip address has to be that of the server that is running ApacheDS.
Sample Configuration – Active Directory LDAP
As a directory service; an Active Directory instance consists of a database and corresponding executable code responsible for servicing requests and maintaining the database. Active Directory makes use of LDAP version 2 and 3. This section illustrates the Active Directory LDAP configuration.
Setting up the Directory Service
Setting up ActiveDirectory involves two steps starting ADLDS(Active Directory Light weight Directory Service) instance and creating the LDAPConnection.
Starting ADLDS Instance
Install Windows update for running ADLDS instance and follow the below steps for configuring the ADLDS startup:
- Create an ADLDS instance by navigating through Run > Active Directory Light Weight Directory Service Setup wizard. Specify the instance name for ADLDS
- Configure the LDAP and SSL port numbers and create a new Partition “O=Fiorano,C=US”
- Use Network Service Account for starting the instance.
- Import the LDIF files Ms-InetOrgPerson.LDF and Ms-User.LDF, which are necessary. Other ldf files can also be included if needed.
Once created, you can see the instance with the specified name running in services.msc (CTRL+R)
Creating LDAPConnection
To create LDAP connection, perform the following actions:
- Open ADSI Edit Studio.
- Right-click ADSI Edit and select connect to
- Enter name of the ADLDS instance under Name
- Provide the partition name “O=Fiorano,C=US” for Distinguished Name which is under ConnectionPoint.
- Computer credentials will be localhost:389, if instance is running in localmachine with Tcp port 389.
- Finally provide 'Ok' to connect to the ADLDS Instance.
Creating Admin Credentials to Access LDAP server
After creating the connection, create admin credentials to access LDAP server by performing the following actions:
- In ADSI Edit, navigate to ADSI Edit > ADLDS instance > “O=Fiorano,C=US”, some default Objects will be already created.
- Add FMQRoot object as user type, under “O=Fiorano,C=US”.
- Right-click on FMQRoot and reset the password as secret
- Under CN=Roles,O=Fiorano,C=US, Right-click on CN= Administrators > Properties add FMQRoot user under member of CN=Administrators.
- For using LDAP in Fiorano, Active Directory should be preloaded with java schema (Refer: http://docs.oracle.com/javase/tutorial/jndi/software/content.html#SCHEMA )
- Enable Schema Permissions for FMQRoot
- Open Active Directory Schema
- Right-click on Active Directory Schema > Change Active Directory Domain Controller and specify <LDAP Server Ip>:<LDAP Port>
- Right-click on Active Directory Schema > Permissions
- Give all permissions for Authenticated user
Get the java file from the link http://docs.oracle.com/javase/tutorial/jndi/software/config/CreateJavaSchema.java.
Compile and run the java file with the following command which will add the required java schema to Active Directory instance:- Add following objects as container type, under O=Fiorano,C=US
FMQServerConfigFiles, FioranoMQUsers, FioranoMQGroups, ACL - Now specify the user credentials to access the LDAP server, which can be configured from Fiorano Studio(Figure 4.1).
Sample Configuration – Netscape Directory Server
This directory server is yet another robust, scalable server designed to manage an enterprise-wide directory of users and resources. This section illustrates the Netscape LDAP configuration.
Setting the Name
This name has to be the admin of the LDAP server, as you have to start the Initial Context with the Admin.
PRINCIPAL = uid=admin, ou=Administrators, ou=TopologyManagement, o=NetscapeRoot
Setting the password
Enter the password of the Admin of the LDAP Server to whom you want to connect as shown in the Figure below
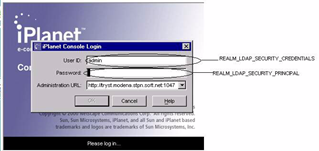
Figure 25: iPlanet Console Login Dialog Box
LDAP Initial Context Factory
The Initial Context Factory to be used, corresponding to the directory server.
LdapInitialCtxFactory = com.sun.jndi.ldap.LdapCtxFactory
LDAP Provider URL
This can be set according to the directory server being used.
LdapProviderUrl = ldap://ldapserver:389
LDAP Provider DN
This variable needs to be set to the suffix variable that you have set up while installing the LDAP Server as shown in the figure:
LdapProviderDn = dc=modena, dc=stpn, dc=soft, dc=net
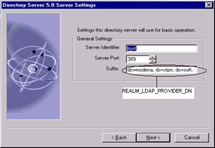
Figure 26: Directory Server Settings
LDAP security authentication
Set this variable to:
LdapSecurityAuthentication = Simple LDAP User and Group Object classes
XML Security Realm
- Open the desired profile for off-line editing through the Profile Manager using Studio
- Modify the Implementation property of Principal Manager and ACL Manager to XML. For more information on how to modify ACL Manager and Principal Manager refer to section 7.4 Modifying ACL Manager Implementation and section 7.5 Modifying Principal Manager Implementation of FioranoMQ Handbook.
- Configure Principal Manager and ACL Manager.
- Right-click the FES/FPS node and select Save from the pop-up menu.
Configuring Principal Manager
UserFileName: The name and path of the xml file containing user information. Default is user.xml.
GroupFileName: The name and path of the xml file containing group information. Default is group.xml.
Path: The absolute or relative path where user and group files are stored. On specifying a absolute path, user and group files are saved to that location, while specifying a relative path saves user and group files to [FIORANO_DB_PATH]
[relative path entered], which in default cases for FES are %FIORANO_HOME%\runtimedata%selectedProfile%\FES\run\realm\principal.
Configuring ACL Manager
FileName: The name and path of the xml file containing user information. Default is acl.xml.
MaxAcePerACL: Maximum number of entries that an ACL can store. Default is 100.
Path: The absolute or relative path where the xml files are stored. On specifying an absolute path, user and group files are saved to that location, while specifying a relative path saves user and group files to [FIORANO_DB_PATH]
[relative path entered], which in default cases are %FIORANO_HOME%\runtimedata%selectedProfile%\FES\run\realm\principal.
Sample XML files
User.xml
Where:
- <UserManager> Root element of the UserManager.
- <User> The UserManager may consist of one or more users.
- <Name> The name of the user. This is used to identify the user entry and is used in the ACLS and Groups.
- <Password> The password of the user. This is stored in encrypted form. Hence, it cannot be specified from outside the system.
Group.xml
Where:
- <GroupManager> Root element of the GroupManager.
- <Group> The GroupManager may consist of one or more groups.
- <Name> The name of the group. This is used to identify the group entry and is used in the ACL table.
- <Member> A group can consist of one or more members. These members must exist in the user table.
acl.xml
where:
- <AclManager> Root element of the ACL dtd.
- <ACL> The AclManager consists of one or more ACLs, which consists of all the information about ACL.
- <Name> It specifies the name of the ACL.
- <AclEntry> An ACL consists of one or more AclEntry, which can be negative (NEG) or positive (POS).
- <Principal> An AclEntry consists of a Principal, which can be a user or a group.
- <Permission> An AclEntry consists of 0 or 1 permission to perform certain tasks