If Document Tracking is enabled, there are two ways of re-injecting a failed document back into the flow.
- Directly from document list
- After searching from search results page
Both the above ways are explained below with the help of an example.
The figure below shows a sample flow, Event Process1, which has Document Tracking enabled on various ports.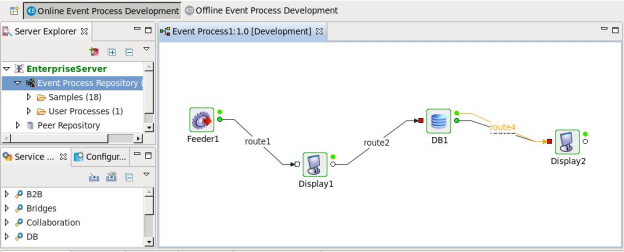
Figure 1: Example Event Process1
As per the above figure, the following ports have Document Tracking enabled:
- Feeder1 OUT_PORT
- Feeder1 EXCEPTION_PORT
- Display1 EXCEPTION_PORT
- DB1 IN_PORT
- DB1 OUT_PORT
- DB1 EXCEPTION_PORT
- Display2 IN_PORT
- Display2 EXCEPTION_PORT
Following events happen in sequence:
- A message that is sent from Feeder1 will be sent through Display1 to DB1.
- DB1 will process the message and send the result to Display2.
- If DB1 fails to process this message the message will be sent to EXCEPTION_PORT of DB1 which will send the exception message to Display2.
- Every successful message will be registered as completed in the Dashboard > Document Tracking > Application Documents tab.
The figure below shows the first message sent for which processing is successfully completed.
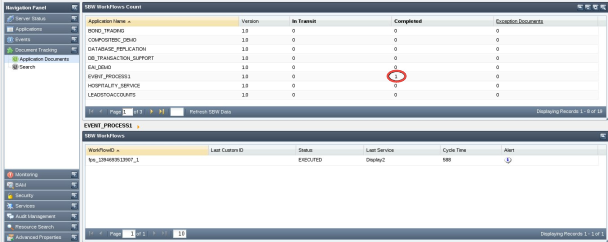
Figure 2: Successful document processing
Every failed document gets added to the exception documents count under the same tab. Figure 3 shows the failed document adding to the exception count.

Figure 3. Failed document processing
There are two ways in which this document can be re-injected
Re-injection through the regular document listing
As per the example specified in the section above, the second document failed to get processed. So, from the listing of the documents for Event_Process1, select the second document as shown in Figure 4.
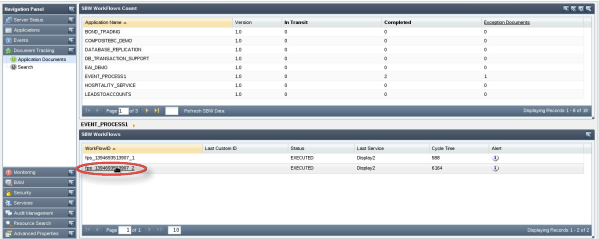
Figure 4: Selecting Failed document
On selection of the second document, it lists the places where the document was tracked as well as the message content at these points. As per the example, the document will be tracked at four places and hence four listings will be seen for the document.
Follow the steps below to successfully re-inject the document:
Locate the EXCEPTION_PORT document. This is the error document that was tracked at the EXCEPTION_PORT.
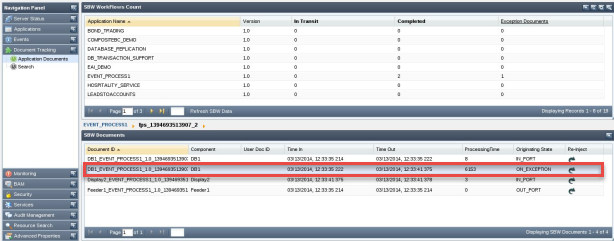
Figure 5: Exception document
The Component where the document failed can be identified from this document. Next step is to locate the correct point of re-injection. Go back to the flow and refer to all the ports that have Document Tracking enabled.
Going backwards in the flow, the first port which is tracked before the EXCEPTION_PORT at which the exception document was received is the best point to re-inject. In the current example, since the IN_PORT of the DB component is the port that is document tracked right before the EXCEPTION_PORT, this is the best place to re-inject the document (refer Figure 1 for the flow diagram).
From this point, there are two ways to re-inject the document.
Choose from This Document
Steps below indicate the first method to re-inject the document:
- Select the re-inject icon of the document with DB as component and Originating State as IN_PORT and select This Document option. (Figure 6)
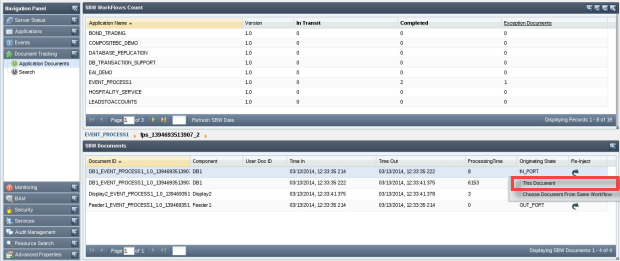
Figure 6: Re-injecting document directly - Click the Re-inject button on the pop-up after making the required changes to the document (if any)
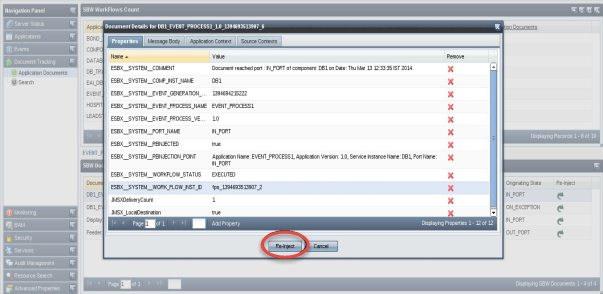
Figure 7. Document content display during re-inject - In the JMS Configuration screen, change the configurations as per the installation and click the Publish button; this will re-inject the document for reprocessing. In the example, the message will be resent to the DB Component to reprocess.
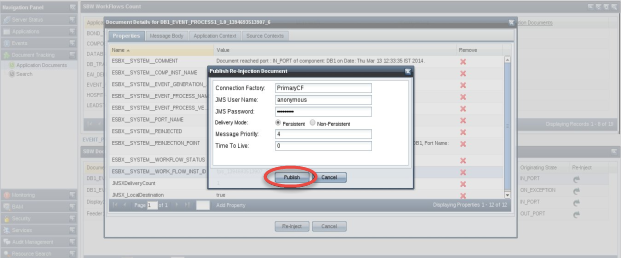
Figure 8. JMS Configuration screen
Choose From Workflow
- Select the Chose Document from Same Workflow option after selecting Re-inject on the failed document.
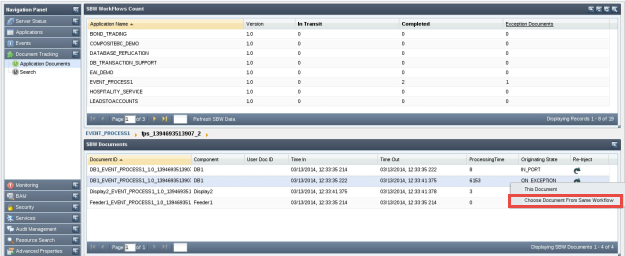
Figure 9. Choose Document from Same Workflow - A list of places at which the failed document was tracked appears.
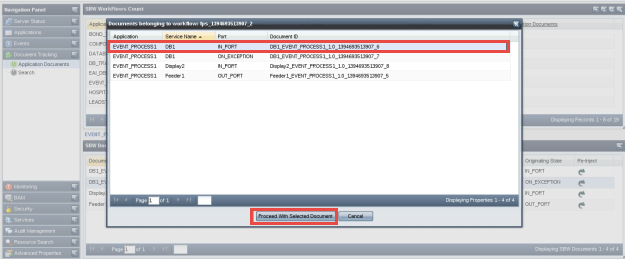
Figure 10: List of place at which the failed document was tracked - Now select the document to be re-injected and click the Proceed with Selected Document button
- This will open the document that was tracked at the IN_PORT in a pop-up. Follow the same Steps 2-3 as mentioned above after this.
Re-injecting Document from the Search tab
Follow the steps below to re-inject the document from the Search tab.
- From the application documents listing, copy the Workflow ID of the failed document.
- Go to Dashboard > Document Tracking > Search and click the Filter SBW Documents button present at the upper-right part of the screen..
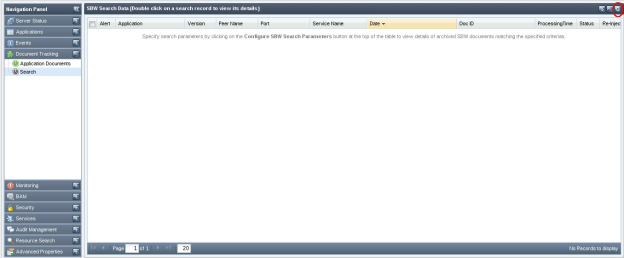
Figure 11: Search Filter - This will pop up a search parameters window. Please fill in the Workflow ID copied above in the Workflow Instance ID field and click Search.
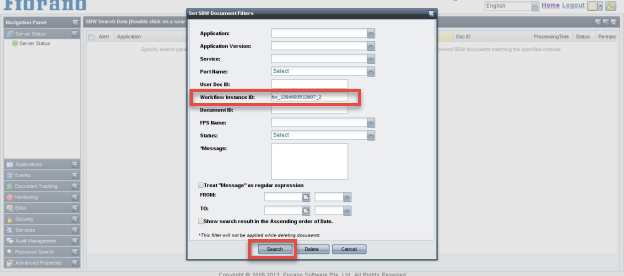
Figure 12: Search with Workflow ID - This will list all the places at which the document was tracked.
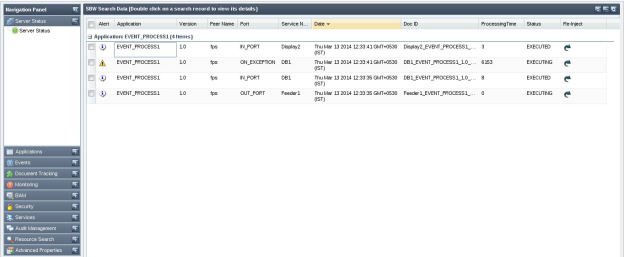
Figure 13: Search Result - List of tracking points for the document - Now click the re-inject button of the document to be re-injected and follow steps similar to that in direct re-injection to re-inject the document at the correct point.