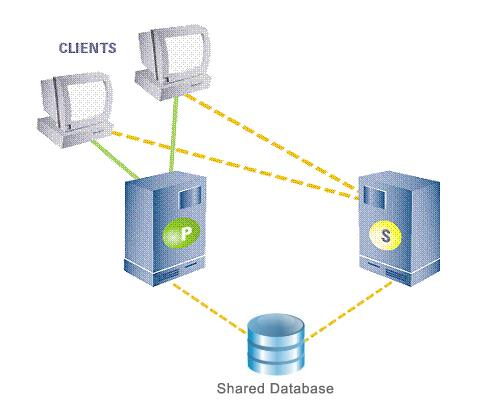
In this mode of High availability, the primary-secondary broker pair shares a common database and do not replicate data over the network. If the primary fails, all Fiorano applications fail over from the primary and reconnect to the designated secondary backup broker. The primary and secondary broker-pair use the network channel between them to routinely seek the heartbeat of the other and watch for any break in connection to switch states. A locking mechanism (as explained in the Setting up the LockFile section) is also employed to determine the state of the servers. The database which is common to both the servers is referred to as the shared database.
Shared HA Precondition
The shared database is critical for the servers to function, as the servers store all data in it. It is mandatory for the Shared Database to be always accessible to the servers. Unavailability of the shared database could lead to data loss and data corruption.
Server States
A server at any point of time can be in the following states:
- Active
- Passive
- Activating – The server switches to this state as soon as it acquires the lock. Once all its services are activated, it switches to Active State.
The following diagram explains the transition to various states:
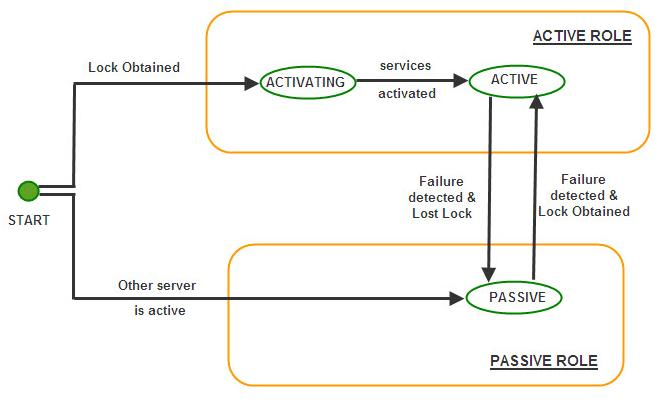
When the server starts up, the server tries to acquire a lock on the lock file. If it acquires the lock successfully, it switches to the ACTIVATING state. It then switches to ACTIVE state once all its services have been activated. Unlike in replicated HA, where the servers wait for each other to come up (that is, in WAITING state), a server in shared mode does not need to wait for its backup server to come up because they share a common database and no database synchronization is required which is the case for servers working in replicated mode.
After switching to ACTIVE state, the server keeps trying to connect to its backup server. If the backup server starts up, the backup server switches to PASSIVE state.
At this point, if there is a failure of the ACTIVE server, the Hot Standby PASSIVE Server is ready to move into the ACTIVE state and starts accepting requests from the clients.
Configuring Fiorano 10 High Availability Servers
The Fiorano 10 installer comes with a prebuilt profile for shared mode which is preconfigured and ready to run on a single machine.
Table 1: The default profile to be used for Primary and Secondary Servers
Server | Location of Profile |
Fiorano Enterprise Server HA Primary | $Fiorano_home/esb/server/profiles |
Fiorano Enterprise Server HA Secondary | $Fiorano_home/esb/server/profiles |
Fiorano Peer Server HA Primary | $Fiorano_home/esb/server/profiles |
Fiorano Peer Server HA Secondary | $Fiorano_home/esb/server/profiles |
To launch the server on one of these profiles, the user can use the script server.bat/sh in $Fiorano_home/esb/server/bin.
Since the shared HA pair use a common database, the location of the database has to specified while starting up each server.
The -dbPath command line option is used for specifying the location of the shared database.
Examples:
To launch the primary server of Fiorano Enterprise shared -HA-profile
To launch the secondary server of Fiorano Peer shared-HA –profile
Configuration Steps
- Setting up the lock file
- Setting up the shared database
- Configuring the profile
- Changing the location of log files.
Setting up the Lock File
For more information, refer to Setting up the LockFile section.
Setting up the shared database
A directory is shared on a third machine with read/write permissions using the NFS protocol. If the operating system supports NFS - version 4, then we recommend that the shared database be shared using NFS version 4 else it should be shared using NFS –version 3.
For more information on how to share a directory using NFS v4, refer to http://www.brennan.id.au/19-Network_File_System.html#nfs4.
For sharing a directory on Windows OS using NFS, the user has to download and install Windows Services for Unix / Subsystem for UNIX-based Applications provided by Microsoft on the machine. The Client for NFS and Server for NFS packages must be installed. Some Microsoft Operating Systems have these packages by default like Windows Server 2003 R2 and Windows Vista Enterprise and Ultimate Editions.
Following are the steps to share the directory using NFS v3 on Windows OS:
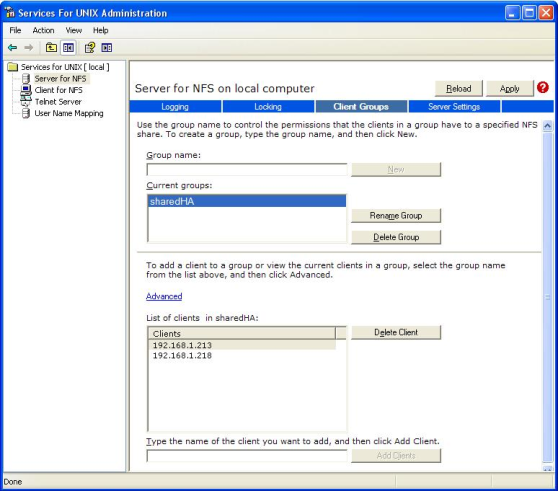
- Create a Group of hosts that can access the share:
- Open Services for Unix Administration. Click on Server For NFS node. The Client Groups tab appears. Click on it and you get options to add/remove/rename groups. Add a group and add clients (IP Addresses) to the group. Click Apply. The screen shot below shows a group sharedHA having two hosts in it.
- Create a user – mapping:
Let us assume that the name of the windows user to be John S. To modify a nfs share, the uid(s) of the user sharing the directory and the uid of the user accessing the share need to be the same. Now, say that the server is running on a UNIX OS, since Windows users have no uid, we need to create a mapping between the Unix user and Windows User, that is, the user John S has to be mapped to the Unix user.
Following are the steps to create the mapping:
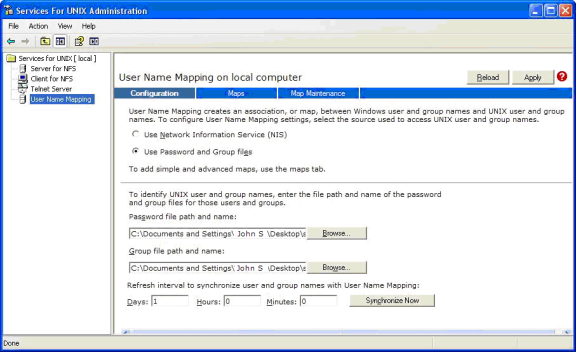
- Open Services for Unix Administration. Click on User Mapping node and then click on the Configuration node
- The user can configure the service either using NIS or by using the password/ group files.
- If the user chooses to create a mapping by using the password and group files, the files /etc/group and /etc/passwd on the Unix Machine should be copied to the windows machine and their paths should be given in the corresponding boxes and the changes should be applied.
The figure below illustrates the Configuration Window.
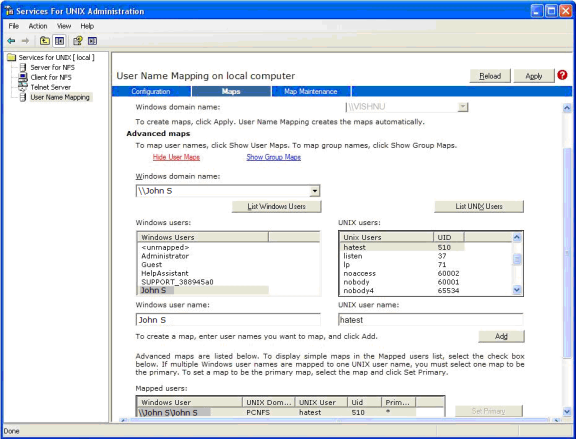
- Now click on the Maps node. A user can choose to create simple or advanced maps. In an advanced mapping, the user can list the Windows and UNIX users and create a mapping. The figure below illustrates the User Mapping Window having an advanced map between the Windows user John S and a UNIX user having uid 510 and name 'hatest'. By doing so, users having uid equal to 510 on machines which belong to the access group of a share will be given read/write access to the share.
- Share the directory using the 'nfsshare' command:
- Open a command prompt and type the following command
- Mounting the shared database on the Machine hosting the server:
The nfs share can be accessed on UNIX/Solaris OS by mounting it. The mount command is used for this purpose. On Windows, the nfs share can be accessed by adding it as a network drive.
Examples:
- If the shared database is on Windows & the HA server is on UNIX:
The path on the local machine where the shared database is mounted should given as the value for the '-dbPath' command line option while starting the server.
To start up the FES shared HA Primary profile, we now type the command:
If the shared database is on UNIX & the HA server is on UNIX:
The path on the local machine where the shared database is mounted should given as the value for the -dbPath command line option while starting the server.
To start up the FPS shared HA Primary profile, we now type the command:
If the shared database is on UNIX/Windows and the HA server is on Windows:
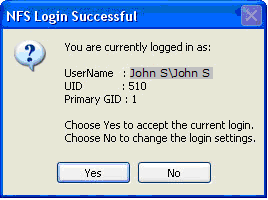
Suppose the uid of the user sharing the database is 510, a mapping should be created between the windows user & the UNIX user using the Services for Windows Administration software. Once, the mapping is created the user should map the shared directory to a network drive. On adding a network drive, a Confirmation dialog box appears as shown in the figure below to display the mapping used for accessing the nfs share.
The added network drive path should given as the value for the -dbPath command line option while starting the server.
If the shared database is mapped to a network drive letter say Z:, and we want to start up FES shared HA Primary profile, we now type the command:
Configuring the FES/FPS HA Profile
Fiorano 10 gives the ability to configure the HA through Fiorano Studio to simplify your configuration in offline mode.
To configure FES/FPS HA, perform the following steps:
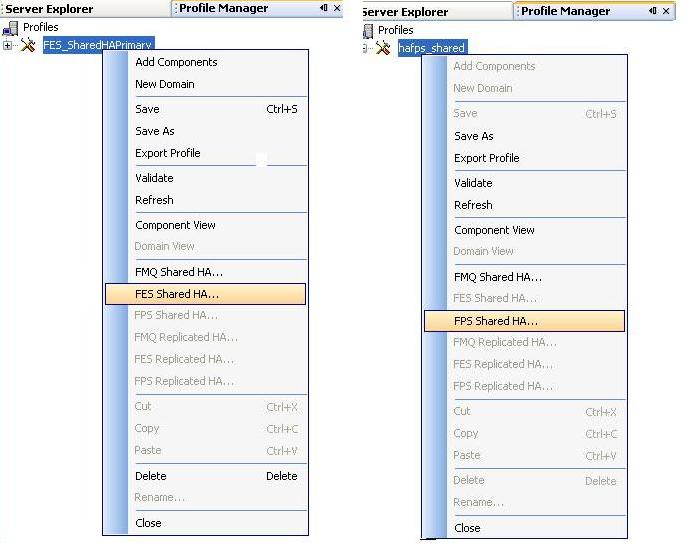
- Open the HA profile (shared)
- Right-click the profile and select FES/FPS Shared HA from pop-up menu.
- The FES/FPS Shared HA dialog box appears. You can now configure the various parameters that appear in the dialog box. These parameters are same as the parameters specified for a profile in replicated mode. The user can also configure both profiles in a single dialog. Please refer to Configuring High Availability Servers section for the description of each parameter and how to configure both profiles in a single dialog box.
- Save the profile.
Changing the location of log files
The log files for the servers running in replicated mode are created in their respective databases. Since, the servers running in shared mode share a common database, the log files by default are also shared by both servers. This configuration has to be changed for the primary & secondary server before startup.
This can be done by modifying the file 'Configs.xml' which is located under the 'conf' directory of the profile location. i.e. $Fiorano_Home/esb/server/profiles/<profile_name>/<profile_type>/<server_type>/conf
Where
- <profile_name> is the name of the profile.
- <profile_type> is the type of the profile, that is, primary or secondary.
- <server_type> is the type of the server, that is, FES or FPS.
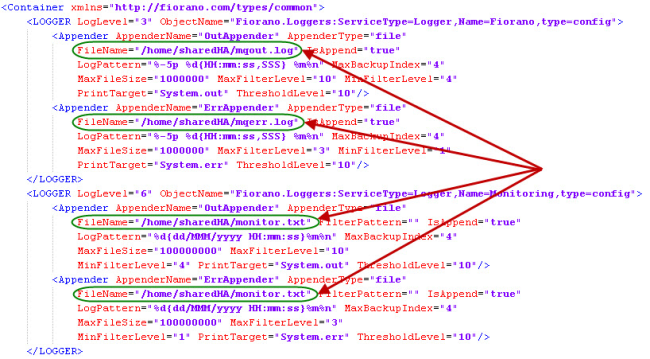
Given below is a screen shot of the file Configs.xml. The value of the attribute FileName of the child nodes Appender in the file (which have been circled in the below screenshot) decides the location of the log file.
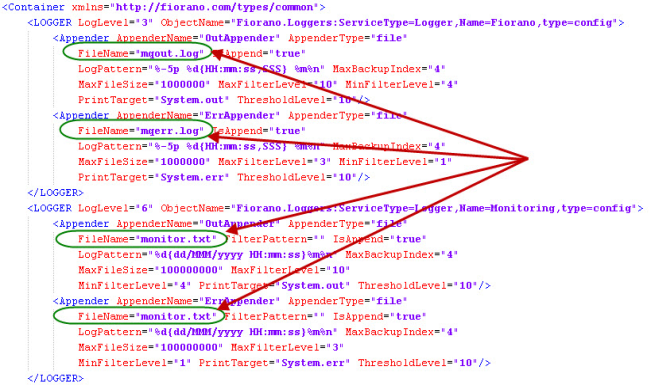
We recommend that the server should have its log files on the same machine as the server. Set the value of the attribute FileName to the path of the log file on the local machine.
The screenshot below shows the modified Configs.xml where the log files are located at /home/sharedHA.
Save the file and you are ready to start the server.
Verifying HA Setup
On starting the Fiorano 10 Server that is part of an HA pair, the server prints debug information about its own state (ACTIVE, PASSIVE, and ACTIVATING). It also prints information about its backup server's state whenever it detects a change.
Example Statements on console:
The Console includes statements as shown below:
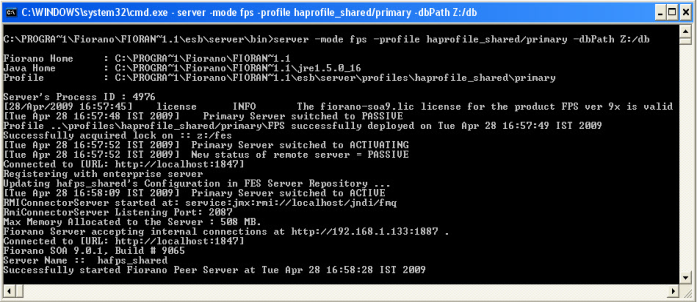
Primary Server switched to ACTIVE or Secondary Server switched to PASSIVE, which indicate that the pair has successfully connected. Also, a statement gets printed when the lock is successfully acquired over the lockfile on the active server's console.
Example: Successfully acquired lock on: Z:\lock.txt.
The figure below illustrates a successfully started Fiorano HA Peer Server in shared mode:
Shutting down the HA Server
For details on how to shutdown the servers, please refer to sections Shutting Down ESB Server and Shutting Down the Peer Server.
Troubleshooting Steps
SocketBindException saying that the HA Port is already bound:
This exception means that some other program running on the HA port or the last instance of the server is not properly killed. You can choose to stop or kill the application which is holding up the port and start the server again or choose a different HA port. But changing this means that there needs to be a change in the Backup Servers' configuration for its Backup Server port.
Both servers go to Active state in shared mode respectively if the network link between them is broken. This can happen if the servers do not refer to the same LockFile
The server throws 'log4j: ERROR Failed to flush writer, java.io.IOException: Stale NFS file handle'. This can occur if the log files are present on machine hosting the shared database and they have rolled over. Rolling over of log files sometimes results in having stale file handles (invalid file handles). To avoid this, refer to section Changing the location of log files.