
Figure 1: Replication of servers
The central concept of backchannel replication is that the Active Server (the server which is in the Active State) replicates its data store and state to the Passive Server, thus keeping both servers in sync. This replication channel is supported on a private network dedicated to the synchronization of the broker state and messaging data.
The secondary server accepts no client connection while in its hot-standby (passive) role, but is prepared to immediately transition to the Active role as soon as it detects that the Active Server is unavailable. If the primary fails, all Fiorano applications fail over from the primary and reconnect to the designated secondary backup broker.
The primary and secondary broker-pair use the replication channel to routinely seek the heartbeat of the other and watch for any interruption in the data flow or connection to switch states. A locking mechanism (explained below) is also employed to determine the state of the servers.
This Hot-failover process is immediate and is completely transparent to all client applications. The Secondary Server in the active role is sensitive to re-establishment of the replication channel. This reconnection may come from a recovery of the Primary Server or from a replacement Primary Server. Once the primary comes up again, it assumes the role of the Secondary Server (since the original Secondary Server is now the Primary Server).
Important: If servers are running in Replicated HA mode, it becomes essential to have a reliable network for database synchronization calls.
HA Locking Mechanism
HA locking mechanism is employed by the servers in replicated mode to determine the server state in case, a server of the pair is unavailable or if the network fails. A read and write permissions file is shared on a machine this file is referred as the LockFile. The machine hosting the LockFile is referred to as the gateway machine. A server can switch to Active only if it holds a lock over the LockFile.
In HA implementation prior to the locking mechanism, a network link failure between the servers could have led to both servers switching to Standalone state. Since the lock can be held by only one server at a time, it prevents both servers from switching to Active/Standalone state.
The locking mechanism makes the state switching of a HA server more deterministic.
Server States
A server at any point of time can be in the following states:
- Active
- Passive
- Standalone - Same as active. Indicates that the backup server is down/not present in network.
- Dead - Indicates that the server is down/not present in network.
- Active - Sync/Active Transition
- Passive - Sync/Passive Transition
- Waiting - Same as passive. Indicates that the databases of the Active and Passive Servers need to be synchronized.
The following diagram explains the transition to various states: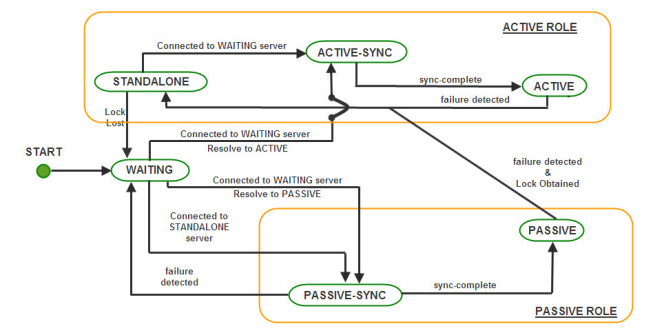
Figure 2: Transition to various states
- On startup, the Server enters into WAITING state. In this state, the server is waiting for its backup server to connect to it. This is the initial synchronization state, which is required to sync up the primary server with the secondary to avoid any message loss. This server will change state if one of the following occurs.
- Switch to PASSIVE SYNC state: If the HA channel is established and the other server is in STANDALONE state.
- Switch to PASSIVE(STANDBY) SYNC or ACTIVE SYNC state: If the HA channel is established and the other server is also in WAITING state, then the servers assumes themselves as being in Active or Passive roles depending on the Repository Timestamps (whichever server has the latest timestamp is assumed to be the primary).
If the repository does not have Timestamps (the server-store is cleaned up), then the server which is configured as primary turns to ACTIVE SYNC.
- When the Server is actively serving clients and its backup server is not running or if the HA transport channel is broken and it has the lock over the lockfile, the state of the server is STANDALONE. If the server in STANDALONE state establishes the HA channel and the other server is in WAITING state, then the STANDALONE server shifts to ACTIVE SYNC state. A passive (standby) server can switch to STANDALONE if the other server is not running or if the transport channel is broken and it acquires the lock over the LockFile.
- When the Server is in ACTIVE SYNC state, the server starts synchronizing its data with the backup server which is in PASSIVE SYNC. The Server in ACTIVE SYNC continues to serve its clients. Completion of the Runtime Synchronization Protocol causes a transition of the backup server to the ACTIVE state and the server in PASSIVE SYNC state moves to PASSIVE state.
- Once the Primary Server completes the synchronization, it enters into the ACTIVE state and begins actively transmitting state information and Call Replications onto the PASSIVE Server. At this point, if there is a failure of the ACTIVE server, the Hot Standby PASSIVE Server is ready to move into the STANDLONE state and starts accepting requests from the clients.
- An active server can switch to WAITING if the transport channel is broken and it loses the lock over the LockFile. A STANDALONE server can switch to WAITING if it loses the lock over the lock file.
- Whenever there is a change in the server state, it broadcasts the present and previous state to the Backup Server. The Servers transition is a function of its own state, the present and previous state of the Backup Server and whether or not it holds the lock over the LockFile.
Configuring Fiorano 10 High Availability Servers
The Fiorano 10 installer comes with prebuilt profiles for replicated mode which are preconfigured and ready to run on a single machine.
Table 1: The default profiles to be used for Primary and Secondary Servers
| Server | Location |
|---|---|
Fiorano Enterprise Server HA Primary | $Fiorano_home/esb/server/profiles/haprofile1/primary/FES |
Fiorano Enterprise Server HA Secondary | $Fiorano_home/esb/server/profiles/haprofile1/secondary/FES |
Fiorano Peer Server HA Primary | $Fiorano_home/esb/server/profiles/haprofile1/primary/FPS |
Fiorano Peer Server HA Secondary | $Fiorano_home/esb/server/profiles/haprofile1/secondary/FPS |
Fiorano Peer Server1 HA Primary | $Fiorano_home/esb/server/profiles/haprofile2/ primary/FPS |
Fiorano Peer Server1 HA Secondary | $Fiorano_home/esb/server/profiles/haprofile2/secondary/FPS |
To launch the server on one of these profiles, the user can use the script server.bat/sh in $Fiorano_home/esb/server/bin.
Configuration Steps
- Setting up the lockfile
- Configuring the profile
Setting up the LockFile
A file is created and the directory containing it is shared with read/write permissions. The lock file, if present on a machine having UNIX/Solaris operating system should be shared by using the NFS protocol - version 4. If the lock file is present on Windows it should be shared using the Samba Protocol. (The lock file can be shared on Windows using NFS – version 4, if it supports it.)
The table below gives some of the possible combinations of operating systems in the HA Setup:
OS hosting the Lock File & Protocol Used | OS hosting the servers |
|---|---|
Windows - Samba | Windows / Linux |
Linux - NFSv4 | Linux / Solaris 8,9,10, 11 |
Solaris - NFSv4 | Linux / Solaris 8,9,10, 11 |
On Windows Operating System, the directory on the gateway machine containing the LockFile should be mapped to a network drive.
Example:
If the directory containing the lock file on Windows, is shared using the samba protocol, this directory should be mapped to a network drive on the Windows machine hosting the server. Let us say the shared directory is mapped to a drive letter 'C:/' and the lock file is lock.lck , the lock file path now becomes 'C:/lock.lck'.
This path should be used to set the LockFile parameter while configuring the profile via Fiorano Studio.
On non Windows Operating System, the directory on the gateway machine containing the LockFile should be mounted on the machine hosting the server.
Example:
If the lock file is present in a windows samba share & is mounted at /home/user/db on the machine hosting the server then the lock file path on the machine hosting the server would be /home/user/db/lock.lck. This absolute path should be used to set the LockFile parameter while configuring the profile via Fiorano Studio.
Example Mount Command:
'mount -t cifs –o rw //<gatewayIP>/<sharename> <path on local machine where the directory has to be mounted.>'
If the lock file 'lock.lck' is shared using NFS v4 and the directory db is mounted at /home/user/db on the machine hosting the server then the lock file path on the machine hosting the server would be /home/user/db/lock.lck. This absolute path should be used to set the LockFile parameter while configuring the profile via Fiorano Studio.
Example Mount Command:
'mount -t nfs4 -o rw <gatewayIP>:/ <path on local machine where the directory has to be mounted.>'
File Sharing
Configuring and Mapping Network Drives
Between Unix based Machines [ Solaris and Linux, Linux and Linux, Solaris and Solaris]
Description: Between Machine A and Machine B where A and B can be Linux or Solaris.
Shared DB in Machine A
- Create directory dirA which you want to be shared and Login as root.
See status of Network File System server.
If it hasn't been started yet, start it.
Open NFS Server Configuration.
Add path of directory to be shared, permissions, host(s).
Shared DB in Machine B
- Create directory dirB where you want contents of MachineA:<path_of_dirA> to be stored.
Login as root and open the File Systems Table.
Add entry in this format
ExampleRun mount command.
Shared DB in third Machine
In the case where DB is stored in a third machine, instead of either the primary or secondary, two machines have to be allowed to access this shared resource. Then while adding the hosts to the NFS server configuration, add the corresponding netmask.
Example: if Machine B (HA Primary) and Machine C (HA Secondary) have to access Machine A.
- Say Machine A's IP is 192.168.1.209 and Machine B's IP is 192.168.1.45
- Type 192.168.1.0/24 to the hosts’ field.
- Repeat the steps mentioned for Machine B for C as well.
- NFS Configuration is now complete.
Windows and UNIX based Machines
Sharing from Windows Machine: Create directory that needs to be shared. In the sharing and security menu, change permissions to “Allow network users to change my files”. Give a name to the shared directory, say, winshare.
Mounting on UNIX based Machine:
- Create the directory where you want the contents of the Windows shared directory to be available.
Run following mount command.
- Then when you are prompted for the password type; the Windows password.
Required directory has been mounted.
Sharing from UNIX based Machine:
Create directory that needs to be shared and login as root.
Edit the samba configuration file. i.e. Open /etc/samba/smb.conf to edit. Now add the sharing details at end of the file. Template is provided here, followed by example:
- Template: [<Profiles, shared name you want to give for the shared directory>]
- path = <path of shared directory>
- browseable = yes
- writable = yes
- guest ok = yes
Example:
Say our UNIX machine has IP: 192.168.1.22. Now,
If the shared directory is : “/home/fmq/Desktop/share”. Then one can give the profiles name as “share”, which will appear while mounting on windows system. So, following lines can be added:
[share]
- path = /home/fmq/Desktop/share
- browseable = yes
- writable = yes
- guest ok = yes
Save the above file and restart the samba service. i.e.: Execute command “/etc/init.d/smb restart”, if samba server was already running.
Or Execute “/etc/init.d/smb start”, if you are starting the samba server for first time.
Mounting on Windows based Machine:
- Open My Computer > Tools > Map Network Drive, the Map Network Drive dialog box appears.
- Specify the drive name in the Drive field.
- In the Folder field, type, \\UNIX_machine_IP\profilename
For our example, this would be: \\192.168.1.22\share - Make sure Reconnect at Logon is checked.
- Browse for the location where you want to store the database files and click the Finish button.
- Now you can see the mapped drive in My Computer.
Between Windows machines:
Windows Machine A:
Create directory that needs to be shared. In the sharing and security menu, change permissions to “Allow network users to change my files”. Give a name to the shared directory, say, winshare.
Windows Machine B:
- Open My Computer > Tools > Map Network Drive, the Map Network Drive dialog box appears.
- Specify the drive name in the Drive field.
- In the Folder field, type in \\MachineA_IP\winshare.
- Make sure Reconnect at Logon is checked.
- Browse for the location where you want to store the database files and click the Finish button.
- Now you can see the mapped drive in My Computer.
Configuring the FES HA Profile
Fiorano 10 gives the ability to configure the HA through Fiorano Studio to simplify your configuration in offline mode. To configure FES HA, perform the following steps:
- Open the HA profile (replicated)
- Right-click the profile and select Open from pop-up menu.
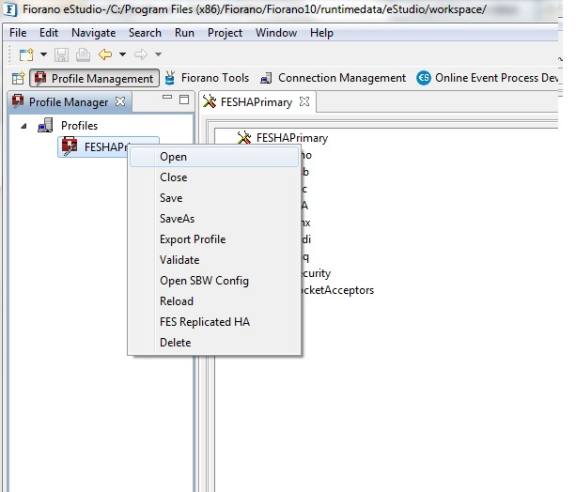
Figure 3: Selection of FES Replicated HA
- The FES Replicated HA… dialog box appears as shown in Figure 6.
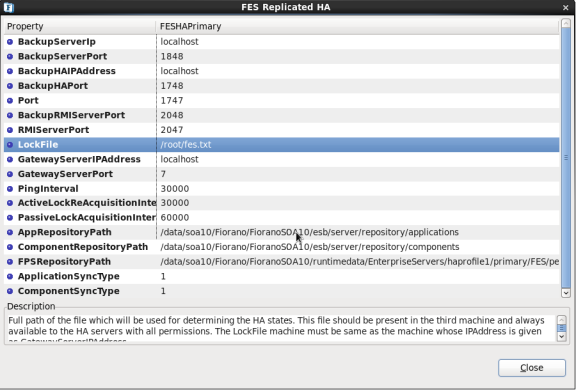
Figure 4: FES Replicated HA… dialog box
Description of Properties (refer to Figure 6)
- BackupServerIp - Specifies the Backup Server IP. This IP is configured in backup URL for default connection factories.
- BackUpServerPort - Specifies the Backup Server port. This port is configured in backup URL for default connection factories.
This can be changed by modifying the Backup Server profile.
- Open the Backup Server profile in the Fiorano Studio Profile Manager.
- Navigate to <ProfileName> > Fiorano > socketAcceptors > port-1 > ConnectionManager > Properties of ConnectionManager and change the port parameter.
The Figure 7 illustrates the configuration of the Fiorano ConnectionManager.
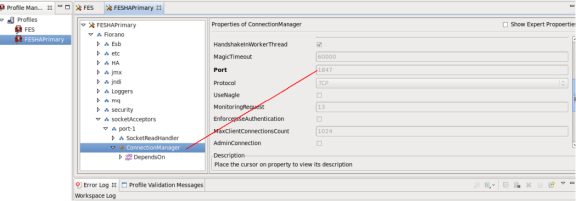
Figure 5: Configuration of the Fiorano ConnectionManager
- BackupHAIPAddress - IP Address of backup server in HA mode. This parameter is mandatory to run HA.
- BackupHAPort - Port of the Backup server on which peer is listening for status requests send by another server. [This parameter is same as the 'Port' parameter but it specifies the port used by the backup server]
- Port - This is the port on which the HA Manager is going to listen for connections from its backup server. Once the connection is established, it starts serving as the back channel for broadcasting the state of the servers to the backup server whenever there is a state transition.
- BackupRMIServerPort - Port used by backup server to bind the Mx4J RMI Connector.
- RMIServerPort – Port used by the server to bind the Mx4j Rmi Connector.
- LockFile - Full path of the file which will be used for determining the HA states. This file should be present in the third machine and always available to the HA servers with all permissions. This parameter is mandatory to run HA. [Also, See 'GatewayServerIPAddress' parameter while configuring.]
- GatewayServerIPAddress -IP address of Gateway machine. This is used to detect network failures. It is recommended that the IP specified should be of a machine that is always available on the network. It is mandatory to specify this parameter. This parameter should always be the IP Address of the machine hosting the LockFile.
- GatewayServerPort - In Replication HA mode, network failure is detected by using the gateway server machine. Specifies the port on which gateWay machine is listening for incoming requests
- PingInterval - Time interval (in ms) after which the remote server is pinged in Replication HA mode.
- ActiveLockReAcquistionInterval - This parameter indicates the wait Interval between each attempt to acquire the lock for active server. This value should be in multiples of pingInterval/2 otherwise server may try to acquire the lock on the next multiple of pingInterval/2.
- PassiveLockAcquistionInterval - This parameter indicates the wait Interval for the passive server to acquire the lock when the link between active and passive server is down. This value should be greater than '2*ActiveLockReacquisitionInterval', otherwise an exception will be thrown. Server won't start if this value is not set properly.
- AppRepositoryPath - Path of the enterprise server application repository. FES stores event process information in this directory. Bydefault its value is $FIORANO_INSTALL_DIR/server/repository/applications.
- Component RepositoryPath - Specifies the Component Repository Path. FES stores services' information in this directory. By default its value is $FIORANO_ INSTALL_DIR/server/repository/components
- FPSRepositoryPath - Path of the Fiorano Peer server Configurations repository. FES stores peer server configurations in this directory.By default its value is $FIORANO_INSTALL_DIR/runtimedata/EnterpriseServers/<ProfileName>/FES/peers.
- ApplicationSyncType - Sync Type for Application Repository 0 - FULL SYNC - The Active Application Repository is replaced on the Passive Application Repository 1 - PARTIAL_SYNC - Only the new Applications in the Active Application Repository is updated on the Passive Application Repository 2 - NO_SYNC - No Synchronization will happen between the Active and Passive Repository. Assumes that there is no Application Edited/Removed/Added.
- ComponentSyncType - Sync Type for Component Repository 0 - FULL SYNC - The Active Component Repository is replaced on the Passive Component Repository 1 - PARTIAL_SYNC - Only the new Components in the Active Component Repository is updated on the Passive Component Repository 2 - NO_SYNC - No Synchronization will happen between the Active and Passive Repository. Assumes that there is no Component Edited/Removed/Added.The user can configure both Primary and Secondary FES from a single screen.
You can also configure both Primary and Secondary FES from a single screen. For this, perform the following actions:
- Open both the profiles and select both of them and from popup select FES Replicated HA as shown in the Figure below.
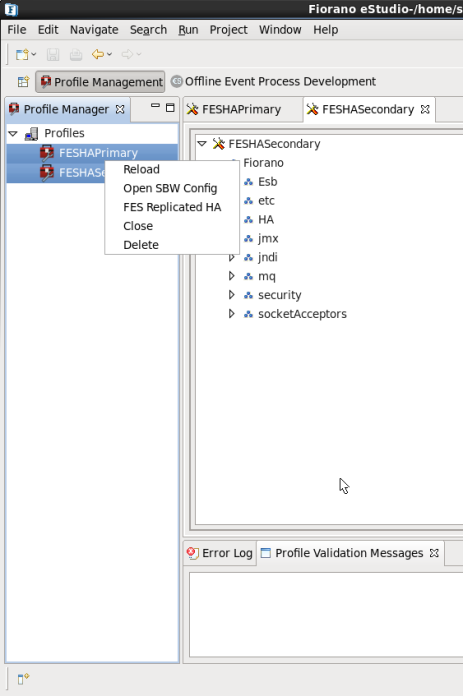
Figure 6: FES Replicated HA option
- The dialog opened contains column for both FES HA Primary and FES HA Secondary as shown in Figure 9.
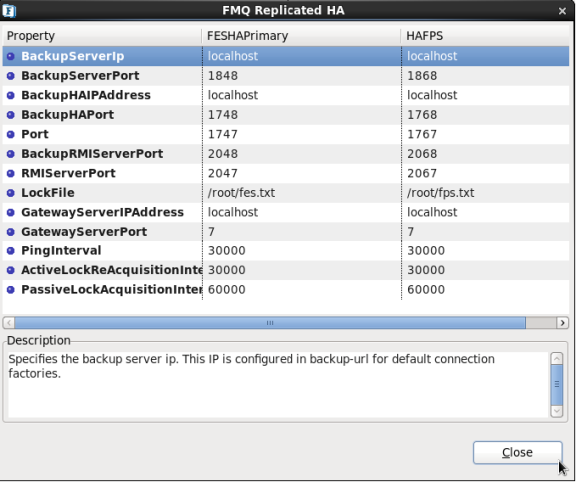
Figure 7: FES Replicated HA dialog box
- Save the profile and we are ready to start the server.
To configure FPS HA, perform the following steps:
- Open the HA profile (replicated)
- Right-click the profile and select FPS Replicated HA.. from the pop-up menu. The FPS Replicated HA.. dialog appears as shown in the figure below.
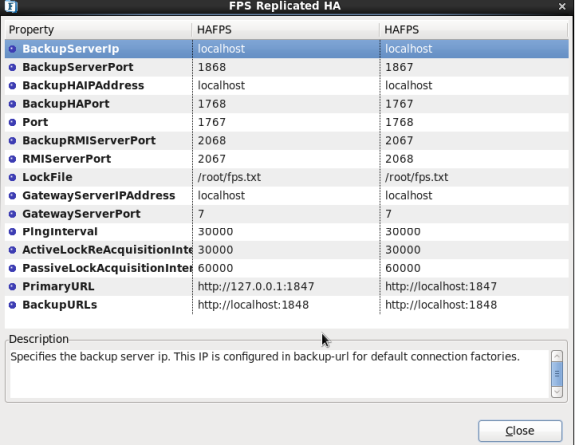
Figure 8: FPS Replicated HA dialog box
- Save the profile and we are ready to start the server
Description of FPS Replicated HA Properties
- BackupServerIp - Specifies the backup server ip. This IP is configured in backup-url for default connection factories.
- BackUpServerPort - Specifies the backup server port. This port is configured in backup-url for default connection factories.This can be changed by modifying the backup server profile.
Open the Backup Server profile in the Fiorano Studio Profile Manager. Navigate to <ProfileName> > Fiorano > socketAcceptors > port-1 > ConnectionManager > Properties of ConnectionManager and change the port parameter.
- BackupHAIPAddress - IP Address of backup peer server in HA .
- BackupHAPort - Port of the Backup Peer server on which peer is listening for status requests send by another server. This parameter is same as the 'Port' parameter but it specifies the port used by the backup server
- Port - This is the port on which the HA Manager is going to listen for connections from its backup server. Once the connection is established, it starts serving as the back channel for broadcasting the state of the servers to the backup server whenever there is a state transition.
- BackupRMIServerPort - Port used by backup server to bind the Mx4J RMI Connector.
- RMIServerPort – Port used by the server to bind the Mx4j Rmi Connector.
- LockFile - Full path of the file which will be used for determining the HA states. This file should be present in the third machine and always available to the HA servers with all permissions. This parameter is mandatory to run HA. [Also, See GatewayServerIPAddress parameter while configuring.]
- GatewayServerIPAddress - IP address of Gateway machine. This is used to detect network failures. It is recommended that the IP specified should be of a machine that is always available on the network. It is mandatory to specify this parameter. This parameter should always be the IP Address of the machine hosting the LockFile.
- GatewayServerPort - In Replication HA mode, network failure is detected by using the gateway server machine. Specifies the port on which gateWay machine is listening for incoming requests
- ActiveLockReAcquistionInterval - This parameter indicates the wait Interval between each attempt to acquire the lock for active server. This value should be in multiples of pingInterval/2 otherwise server may try to acquire the lock on the next multiple of pingInterval/2.
- PassiveLockAcquistionInterval - This parameter indicates the wait Interval for the passive server to acquire the lock when the link between active and passive server is down. This value should be greater than '2*ActiveLockReacquisitionInterval', otherwise an exception will be thrown. Server won't start if this value is not set properly.
- PingInterval - Time interval (in ms) after which the remote server is pinged in Replication HA mode.
- PrimaryURL – The primary URL of MQ server [i.e the FES] from which configuration should be loaded
- BackupURL(s) – The backup URL(s) of MQ server [i.e the FES] from which configuration should be loaded.
Verifying HA Setup
On starting the Fiorano 10 Server that is part of an HA pair, the server prints debug information about its own state (ACTIVE, PASSIVE, and WAITING). It also prints information about its backup server's state whenever it detects a change.
Example Statements on console:
The Console includes statements as shown below:
'Primary Server switched to ACTIVE' or 'Secondary Server switched to PASSIVE', which indicate that the pair has successfully connected. Also, a statement gets printed when the lock is successfully acquired over the lockfile on the active servers console.
Example: Successfully acquired lock on:C:\lock.txt.
The figure below illustrates a successfully started Fiorano HA Peer Server:
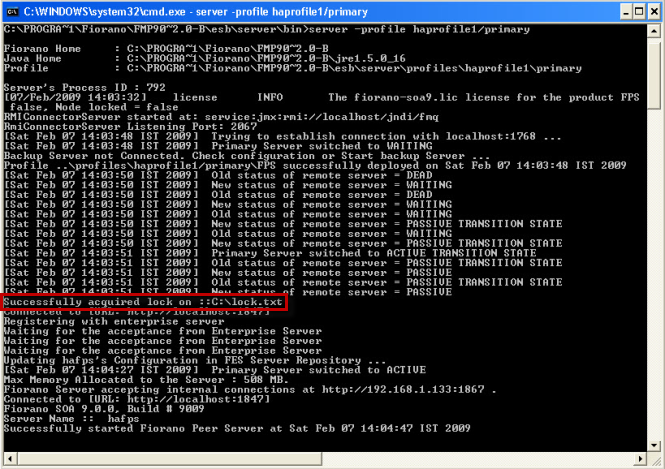
Figure 9: Fiorano HA Peer Server
Shutting down the HA Server
For details on how to shutdown the servers, please refer to sections Shutting Down ESB Server and Shutting Down the Peer Server.