The HL7 Sender component is used to send the HL7 data on to a port specified on a particular IP address in a specified format. The component receives the response (acknowledgement) generated and sends it to the output port.
HL7 Sender allows sending HL7 messages onto different HL7 Receivers. A set of input and output ports is generated for each configuration.
Configuration and Testing
The component can be configured using the properties in the Custom Property Sheet (CPS) shown in Figure 1.
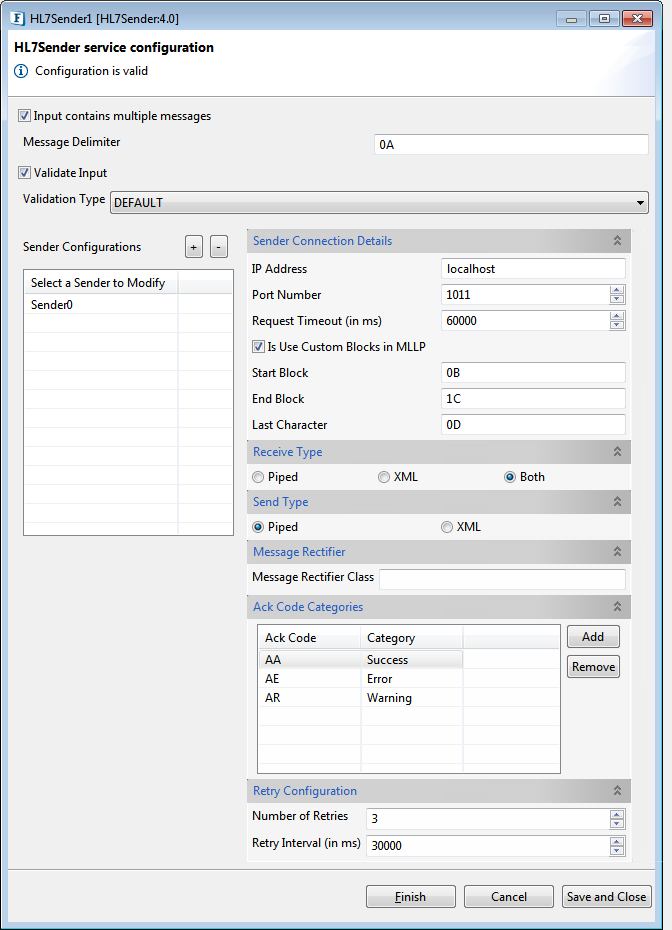
Figure 1: Custom Property Sheet (CPS)
Input Contains Multiple Messages
Select this checkbox if input contains multiple HL7 messages delimited by a character.
Validate Input
This checkbox enable the validation on input message.
Validation Type
- DEFAULT: Messages will be validated with standard HL7 message rules.
- CONFORMANCE_PROFILE: Message will be validated with the conformance profile file configured for its type. Default validation is performed if conformance profile is not configured for a specific type.
Sender Configurations
Select a Sender to Modify
Add the sender which is used in the creation of component input and output ports. By default the component has no ports. Depending on the names provided in the property sheet, a set of input and output ports gets generated.
Sender Connection Details
IP Address
The IP address on which HL7 Receiver service is running.
Port Number
Port number on which HL7 Receiver is listening.
Request Time Out (in ms)
Request Time Out is the time out of the HL7 message in milliseconds. The HL7 Sender waits for the response till the timeout happens and throws an exception, if it do not receive any response.
Is Use custom blocks in MLLP
Select this checkbox to define custom blocks to be used in MLLP. Specify valid hexadecimal representation of characters in Start Block, End Block and Last Character fields. The default values populated are standard blocks used in MLLP.
- Start Block: Start Block character (1 byte). Default value is 0B (0x0B).
- End Block: End Block character (1 byte). Default value is 1C (0x1C).
- Last Character: Usually Carriage Return is used as last character (1 byte). Default value 0D (0x0D).
Receive Type
The type of message expected on component's input port.
- Piped: Piped message is expected on input port.
- XML: XML message is expected on input port.
- Both: Message received on input port can be of any type (piped or XML).
Send Type
Type of the Acknowledgement message which is sent on to the component's output port.
- Piped – Piped message is expected on input port.
- XML – XML message is expected on input port.
Message Rectifier
Message Rectifier class
Message Rectifier class is a class whose instance will be delegated the responsibility of rectifying or correcting HL7 message every time a retry is attempted. If value is not provided here then message rectification will not be done and retry is attempted with same message.
Message Rectifier should implement com.fiorano.services.hl7sender.engine.IMessageRectifier and should have a default constructor.

Figure 2: Message Rectifier class
Ack Code Categories
Each Ack Code [AA, AR, AE …. ] the sender is expected to receive can be categorized as success or error or warning as shown in Figure 1. In case, the ack code returned to sender is configured as success or warning, the ack message is simply sent onto the output port of the component. If the received ack code is configured as warning, then a retry is attempted.
Retry Configuration
When ack code returned to sender is categorized as warning, the number of times retry is to be attempted and interval after which retry is to be attempted can be configured.
Functional Demonstration
Figure 3 illustrates the event process where HL7Sender accepts ADT and ORU messages and sends out the corresponding acknowledgements.
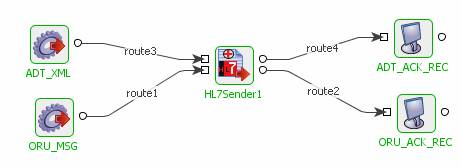
Figure 3: Sample Event process using HL7Sender
Figure 4 illustrates the event process where HL7Receiver listens to the messages from HL7Sender.
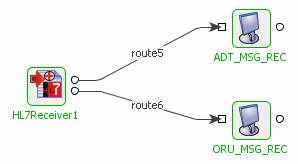
Figure 4: Sample Event process using HL7Receiver
Scenario 1: Sending an ADT A01 message
Configure the HL7Sender as shown in Figure 1.
When a sample ADT A01 message (shown in Figure 5) is sent from the Feeder ADT_XML, HL7Sender sends this message to HL7Receiver.
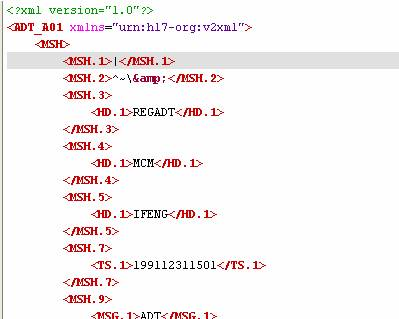
Figure 5: Sample ADT A01 message
When the message receipt is acknowledged by HL7Receiver, HL7Sender receives it (shown in Figure 6) and sends it to the Display ADT_ACK_REC.
![]()
Figure 6: Acknowledgment received by HL7Sender
Scenario 2: Sending an ORU R01 message
Configure HL7Sender as shown in Figure 1.
When a sample ORU A01 message (shown in Figure 7) is sent from the Feeder ORU_MSG, HL7Sender sends this message to HL7Receiver.
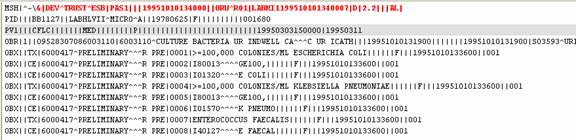
Figure 7: Sample ORU R01 message
When the message receipt is acknowledged by HL7Receiver, HL7Sender receives it (shown in Figure 8) and sends it to the Display ORU_MSG_REC.

Figure 8: Acknowledgement received by HL7Sender