In addition to XSLT component, transformations can also be defined on routes having schema mismatch. In the example shown below, there is a schema mismatch between Feeder output port and CBR input port and hence the route is shown as dotted line.
A route transformation can be defined in any one of the following ways:
- Defining a Mapper Project
- Providing a Custom XSL
- Using a Named Configuration
- Import from a Zip file
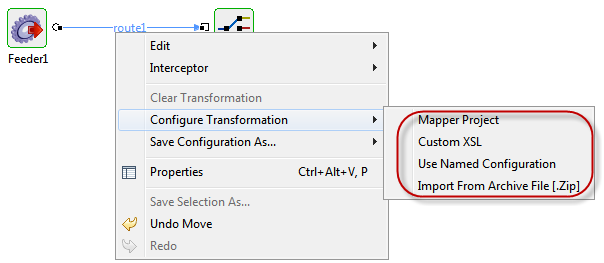
Figure 1: Adding an Event Process
Defining a Mapper Project
It allows the user to define mappings between the source and target port schema using Fiorano eMapper.
To define the transformation using eMapper, perform the following steps
- Right-click on the route and select Mapper Project option in Configure Transformation sub menu.
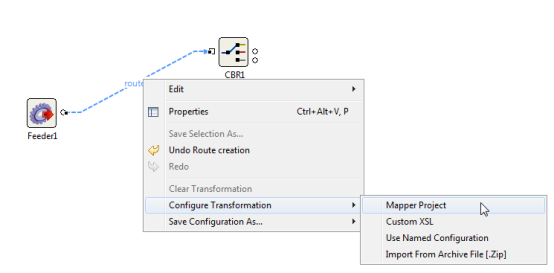
Figure 2: Route Transformation
Route transformation editor will be opened which automatically picks up the schemas on connected ports. Transformations can be defined on the schemas by connecting elements from input structure with output structure elements. Additional computations on elements can also be made by using functions present in Funclet view.
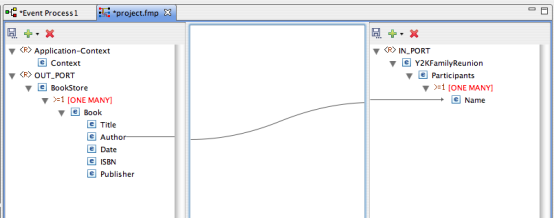
Figure 3: Route transformation editor
Once the transformation is defined and closed, transformation will be set on the route and the route is shown as bold as in the figure below.
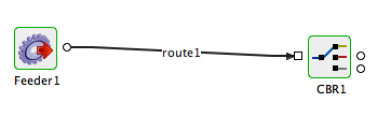
Figure 4: Route with transformation set
Providing a Custom XSL
To provide a Custom XSL, perform the following steps:
- Right-click the route and select Custom XSL from Configure Transformation menu.
- In the Custom XSL dialog-box that appears, provide the XSL in the first tab and XSL for the JMS Message (if any) in the second tab. Click OK to set the transformation on the route. The XSLT Engine to be used (Xalan / Saxon / XSLTC) can be specified from the drop-down in the top right corner.
- The XSL provided can be tested by clicking the Test button.
Example
By following the steps mentioned above, the below XSL can be set as a Route Transformation.
To test the XSL, click Test button and provide an XML in the input tab and click Transform. The output will be displayed in the Output tab.
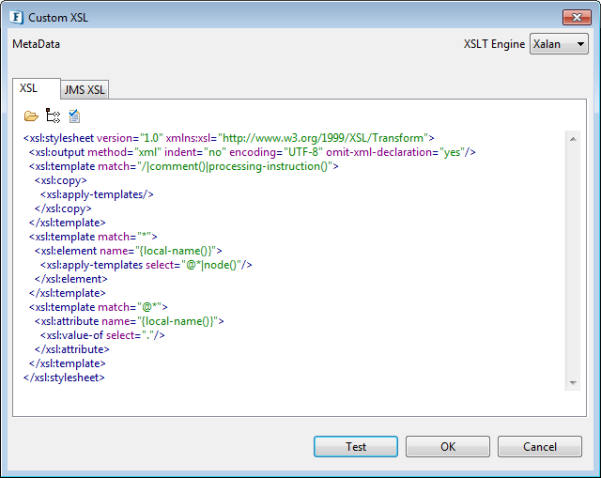
Figure 5: Custom XSL Dialog
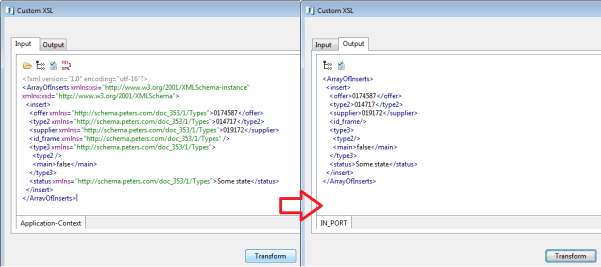
Figure 6: Transformed XML
Using a Named Configuration
Transformations can also be saved in the Configuration Repository as Named Configurations and can be used wherever needed.
To Use a Named Configuration as a route transformation, right-click on the route and select Use Named Configuration. Choose the configuration to be used from the list of available named configurations.
Importing from a Zip file
Users can also import previously exported transformations from a .Zip file by selecting the Import from Archive File [.Zip] from the Configure Transformation menu.
To save the transformation defined on a route as an archive file, right-click on the route on which the route transformation is defined and select Save Configuration as.. -> Archive File.
The transformation defined on route is executed inside the Peer server. So it is advised to not to define complex mappings (involving huge schemas and mappings) using Route Transformations since it may affect the Peer server performance. For complex transformations XSLT component can be used.
The transformation defined on route can be cleared by selecting Clear Transformation option in the right-click menu option on the route.
Route transformation can be changed on the route at both configuration time and runtime. During runtime if the transformation is changed, the changes are automatically deployed to the server. The user need not explicitly synchronize the event process for the changes to take effect.