Objective
To configure Application Context for an event process and use it to insert data into a table.
Prerequisites
- Start Fiorano Enterprise Server (FES) and Fiorano Peer Server (FPS)
- Login to eStudio application
- Understand the basic menus and perspectives (panels) in eStudio application
Scenario
- Use two databases which has one table each with the following contents respectively:
- EmployeeDetails with columns Emp_Id, Emp_Name, Dept_Id, Dept_Name and Dept_Manager
- DeptDetails with columns Dept_Id, Dept_Name and Dept_Manager.
- Create an Application Context and configure Feeder with the same schema.
- Send values 'Emp_Id', 'Emp_Name' and 'Dept_Id' as input from Feeder.
- Configure a DB component with Select query that fetches 'Dept_Name' and 'Dept_Manager' values from the DeptDetails table based on 'Dept_Id' sent from Feeder.
- Configure another DB component with Insert query which inserts a new record into 'EmployeDetails' table with 'Emp_Id', 'Emp_Name' from Application Context and 'Dept_Id', 'Dept_Name', 'Dept_Manager' values from DB component configured with Select query.
Components used
Setting up the Example
While simple data transformation from source Event Port to target ports is a necessity, there are times when a target Event Port needs information which was produced by a Business component that occurred before in the workflow. Consider a Fiorano Micro Services Platform event process representing a ten-step business process. Each step is implemented using a Business component. By using application context, you can enable a Business component representing the tenth step to use information generated by the second Business component.
Configuring Feeder
Feeder provides the input which is used to query the DeptDetails table as well as to set the Application Context. To configure Feeder, follow the below steps:
- Add an event process with name 'Application_Context_Eg'.
- Drag the Feeder component from Util category in the Micro Service Palette to the Fiorano Orchestrator.
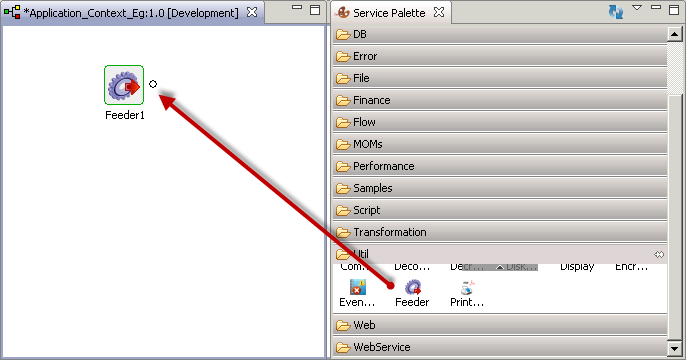
Figure 1: Adding Feeder component to Fiorano Orchestrator Double-click Feeder1 in the Orchestrator to open Configuration Property Sheet (CPS). Use the valid schema in the Schema editor in Message Type Configuration panel.
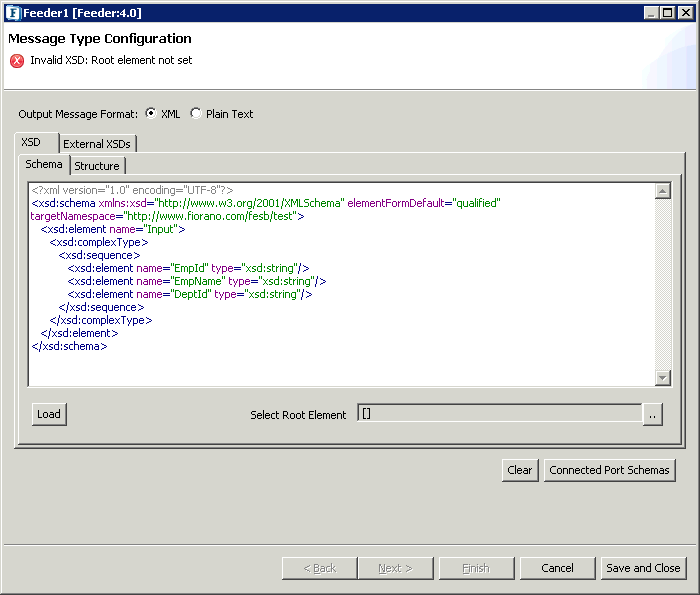
Figure 2: Copying Schema to FeederClick
 button that is present next to 'Select Root Element' below Schema editor to select the root element of the schema.
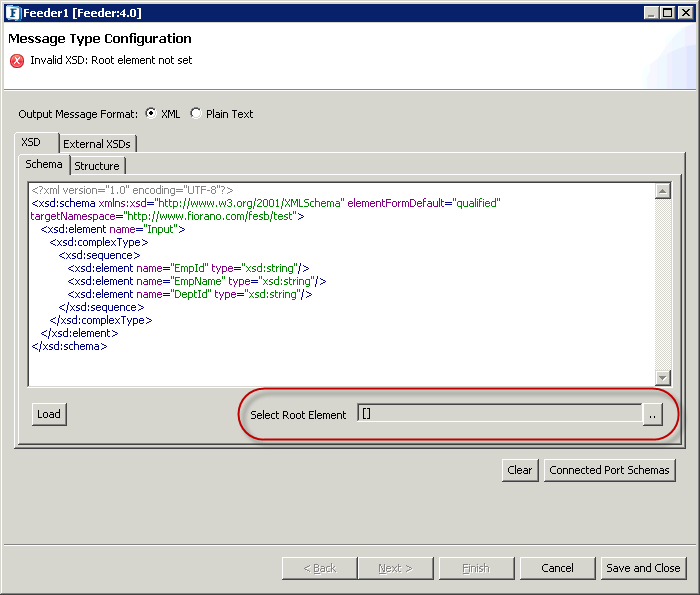
Figure 3: Clicking Select Root Element ellipsis buttonSelect Input in Root Element dialog box and click OK.
Figure 4: Selecting root element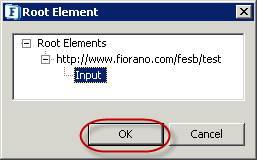
- Click Next to move to Message Details Configuration panel.

Figure 5: Navigating to Message Details Configuration Panel - In Message Details Configuration panel, click Generate Sample which will open XSD Sample Generation Dialog.
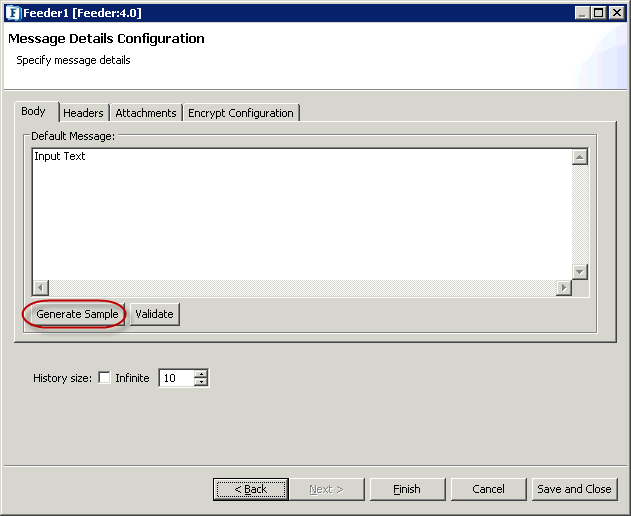
Figure 6: Clicking 'Generate Sample' in Message Details Configuration Panel - Set the max value in No. of Repeatable elements to be generated as '1' and click OK.
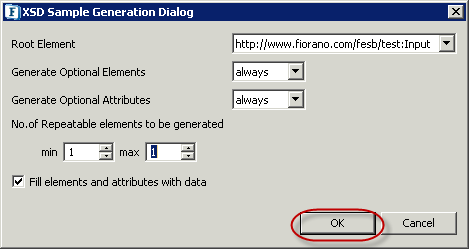
Figure 7: Setting No. of Repeatable elements to be generated - Click Finish to complete the Feeder1 component configuration.
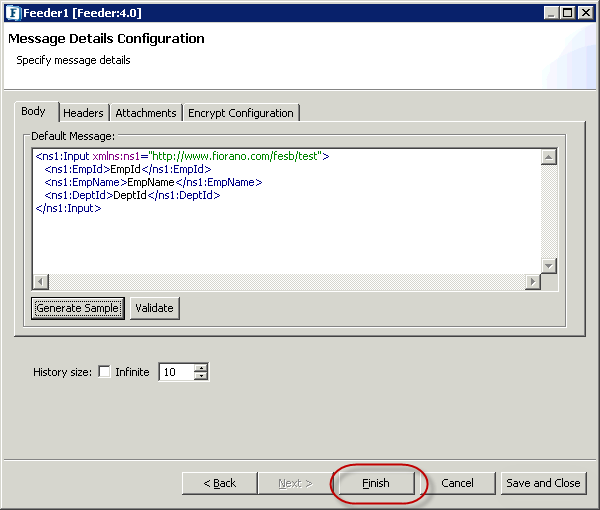
Figure 8: Clicking 'Finish' to complete Feeder1 configuration
Configuring DB component to execute Select Query
Configure a DB component to execute a Select SQL query on 'DeptDetails' table. To configure the DB component, perform the following actions:
Drag the DB component from DB category in the Service Palette to the Fiorano Orchestrator. Rename the DB component from 'DB1' to 'DBSelect'.

Figure 9: Adding DB component to Fiorano Orchestrator and renaming itConfigure select query to fetch data from 'DeptDetails' table based on 'Dept_ID'. To understand how to configure a Select query, refer DB Basics - Select and Insert Statements.
- After the query "SELECT * FROM "SYSTEM"."DEPTDETAILS" is configured in Select Query Builder, go to WHERE tab and click Add button. Select the column 'DEPT_ID' from the Column drop-down and click OK.
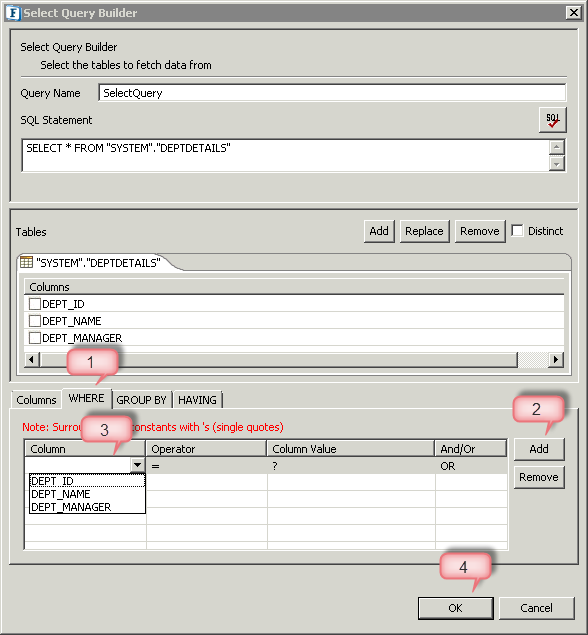
Figure 10: Adding WHERE clause to Select query - Select query details appear under SQL Statement Details.
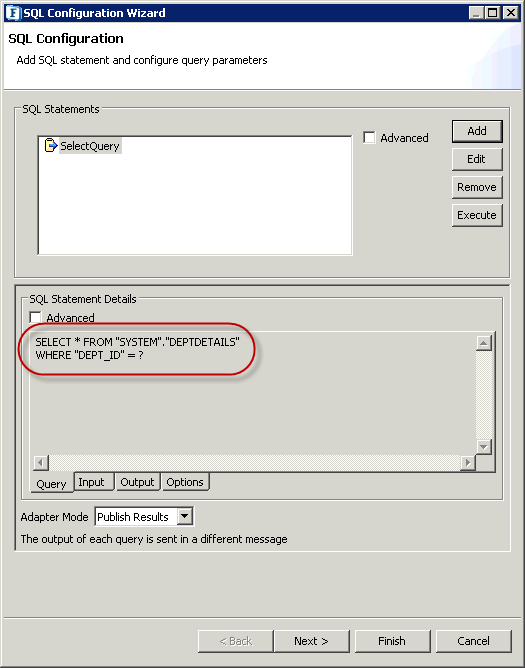
Figure 11: Select query
Configuring DB component to execute Insert Query
Configure another DB component to execute the Insert query on EmployeeDetails table to insert the details of a new employee. To configure the DB component, perform the following actions:
- Drag the DB component from DB category in the Service Palette to the Fiorano Orchestrator. Rename the DB component from 'DB1' to 'DBInsert'.

Figure 12: Adding DB component to Fiorano Orchestrator and renaming it - Configure Insert query to insert a new record into EmployeeDetails table. To understand how to configure a Select query, refer DB Basics - Select and Insert Statements.
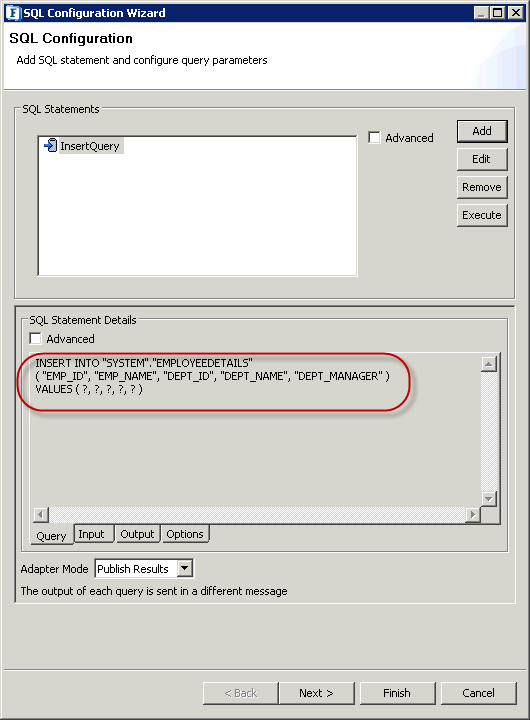
Figure 13: Insert Query
Defining Application Context on Component Port
To configure Application Context, perform the following actions:
- Click inside the Application_Context_Eg Orchestrator.
- In Properties panel, click Application Context tab. To enable Application Context, check the Application Context checkbox. In the Application Context property, select XSD option as the XML schema type.
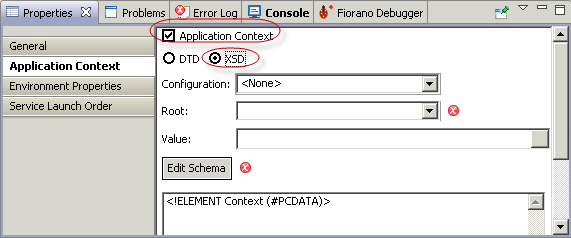
Figure 14: Selecting Application Context and its Schema Type - Click Edit Schema button, copy the schema entered in the Feeder CPS and click OK.

Figure 15: Entering the schema in Application Context window - Click Root drop-down, select the root element and click Save
 icon to save the Application Context configuration.
Figure 16: Selecting Root Element Now, the application context gets available throughout the event process. This Application Context instance can be save by providing a name in the Value text field of 'Application Context' properties.
Configure Route Transformation
Application Context is used to provide values for the columns EMP_ID and EMP_NAME and then to execute the Insert query in 'DB_Insert' to add a record in the EmployeeDetails Table. If the application context is not set, these values would be lost once the 'Feeder1' sends its message to 'DB_Select'.
To configure route transformation, perform the following actions:
- Connect output port of Feeder component to input port of DB_Select and output port of DB_Select to input port of DB_Insert.
- To configure Application Context at any of the output ports, right-click the Feeder output port, go to Configure Application Context and select Mapper Project to open Fiorano Mapper tool window.
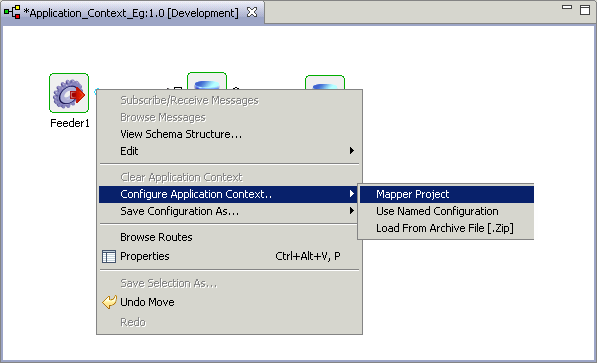
Figure 17: Opening Fiorano Mapper Tool - The Mapper window shows the output port structure and the application context structure. The data that is to be propagated from this port and is to be available all through the event process can now be configured. Configure the mapper transformation by connecting the corresponding values (EmpId, EmpName and DeptId).
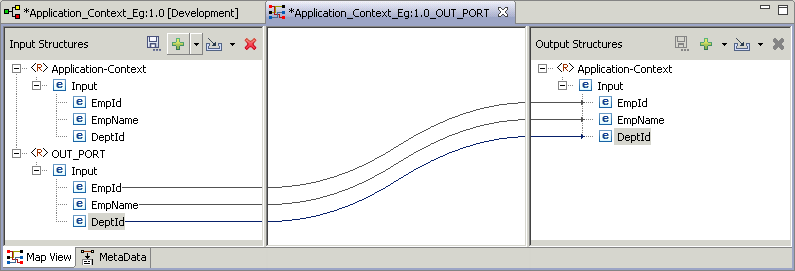
Figure 18: Configuring Mappings - DB_Select was configured to execute the Select query: SELECT * FROM "SYSTEM"."DEPTDETAILS" WHERE "DEPT_ID" = ?. The DEPT_ID value is fetched from the input given in Feeder. Right-click the route connecting Feeder and DB_Select and navigate to the Mapper editor.
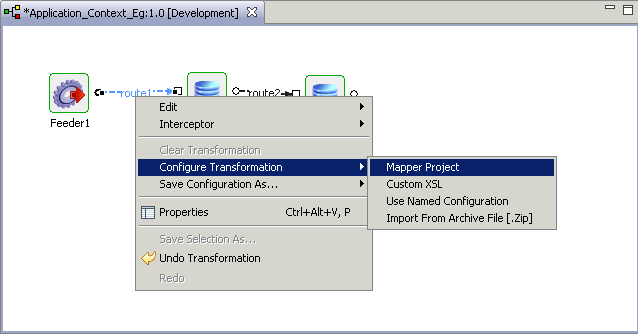
Figure 19: Opening Fiorano Mapper Tool on route connecting Feeder1 and DB_Select Configure the mapper transformation by connecting the element 'DeptId' under Input Structures panel and 'DEPT_ID' under Output Structures panel. Save and close the Mapper Tool.
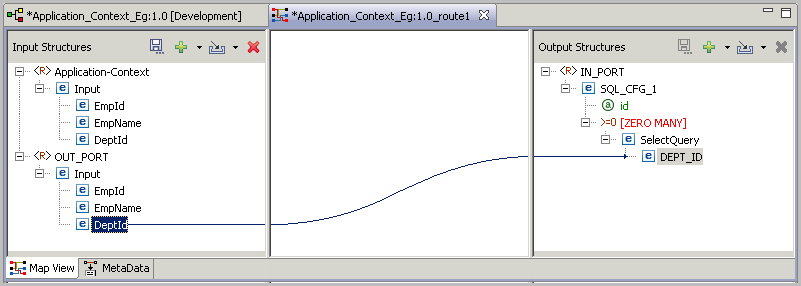
Figure 20: Configuring transformations on route connecting Feeder1 and DB_Select- DB_Insert was configured to execute the Insert query: INSERT INTO "SYSTEM"."EMPLOYEEDETAILS" ( "EMP_ID", "EMP_NAME", "DEPT_ID", "DEPT_NAME", "DEPT_MANAGER" ) VALUES ( ?, ?, ?, ?, ? ).
- Right click the route connecting DB_Select and DB_Insert and navigate to the Mapper Project window. Make the mapper transformations as shown in the below figure. The values for the columns DEPT_ID, DEPT_NAME and DEPT_MANAGER are obtained from the output of 'DB_Select' (OUT_PORT under Input Structures panel). Save the transformations and close the Mapper Tool.
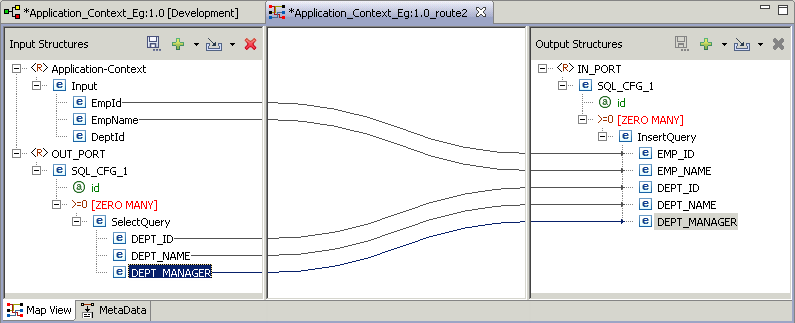
Figure 21: Configuring transformations on route connecting DB_Select and DB_Insert - Drag the Display component from Util category in the Service Palette to the Fiorano Orchestrator. Connect the output port of DB_Insert to the input port of Display component to display the final output in Display window after a record gets successfully inserted into 'EmployeeDetails' table.
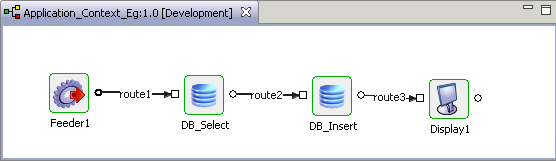
Figure 22: Connecting Display component to DB_Insert
Running the Example
Open Application_Context_Eg Event Process Orchestrator and perform the following actions:
- Click Check Resource and Connectivity
 icon (or press ALT+SHIFT+C) to check resource and connectivity.
 - Click Run Event Process
 icon (ALT+SHIFT+R) to run the event process. Feeder1 and Display1 windows get opened.
 - Add a breakpoint on the route connecting 'Feeder1' and 'DB_Select' by right-clicking the route and selecting Add Breakpoint under Interceptor .
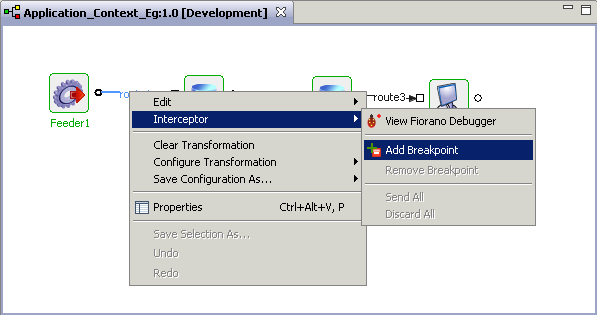
Figure 23: Adding breakpoint - In the Feeder window, provide the values for 'EmpId', 'EmpName' and 'DeptId' and click Send.

Figure 24: Sending input from Feeder - This message will be stored on the route connecting 'Feeder1' and 'DB_Select'. Click the route. Go to 'Fiorano Debugger' and select the route again. Now, click 'Application Context' tab which will display the Application Context that has been set and available throughout the event process.
- DB_Select executes Select query on DeptDetails table based on 'Dept_Id' sent from Feeder component and fetches 'Dept_Name' and 'Dept_Manager' values. Using 'Emp_Id', 'Emp_Name' values from Application Context and 'Dept_Id', 'Dept_Name', 'Dept_Manager' values from DB_Select output, a new record is inserted into 'EmployeeDetails' table.

Figure 25: Viewing created Application Context - In the Display window, UpdateCount value can be seen as '1' which indicates the successful insertion of data into the table.
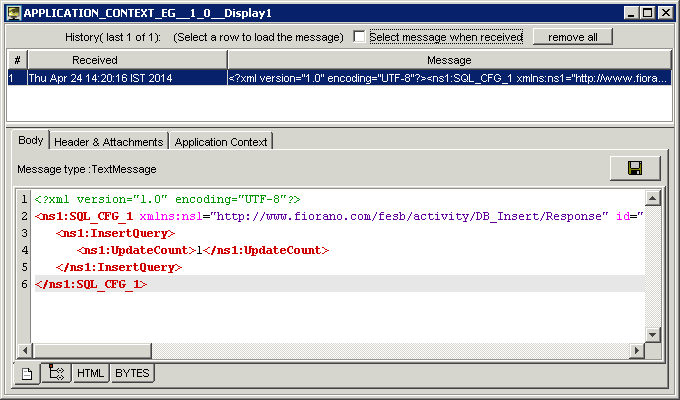
Figure 26: Display component with Insert Query result
Reference
Please note that the options used in this example are minimum, which helps you to get an overview of the application. To explore the other options present in the DB, Feeder and Display, refer sections: DB, Feeder and Display respectively.