...
- Add a new Event Process with name 'HL7Sender_Receiver_Eg'.
- Drag the HL7Sender component from Bridges category in the Service Palette to the Fiorano Orchestrator.
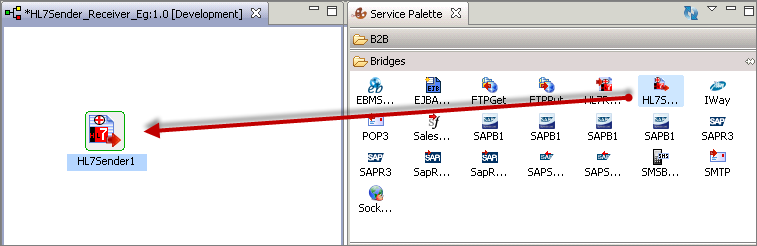
Figure 1: Adding HL7Sender component to Fiorano Orchestrator - Double-click the component in the Orchestrator to open Configuration Property Sheet (CPS).
- Click
- Add
 button to add a Sender configuration
- and provide the following values:
- Select a Sender to Modify: ORU_R01_Sender (Sender Configuration Name)
- Receive Type: Both (to accept both XML as well as HL7 acknowledge formats)
- Send Type: Piped
- Click Connection Details button and provide the following values:
- IP Address:
- localhost (retain default value)
- Port Number:
- 1011 (retain default value)
- Request Timeout (in ms):
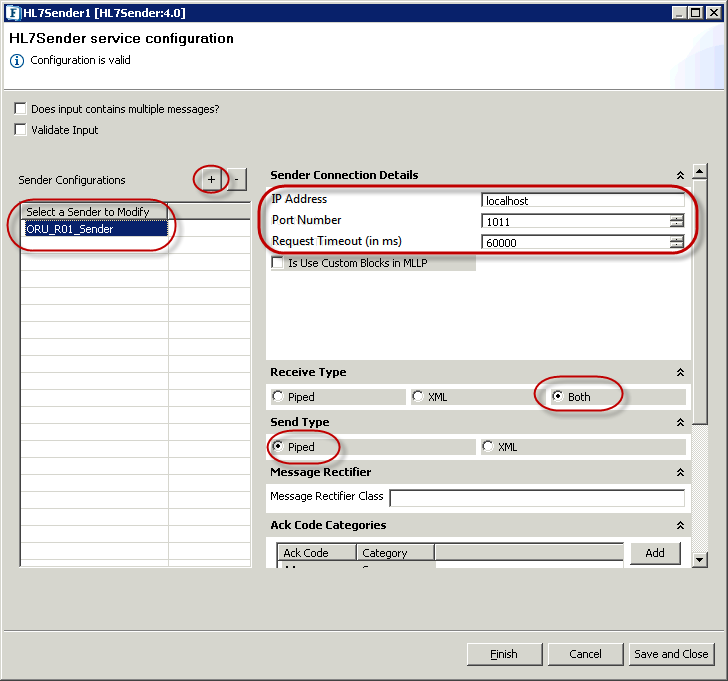
- 60000 (retain default value)
- Receive Type: Both (to accept both XML as well as HL7 acknowledge formats)

Figure 2: HL7Sender Configuration in CPS
- Click Finish and notice that the component will have input and output ports generated after the above configurations.
...
In HL7Receiver, multiple receive configurations can be configured to listen to various types of HL7 messages identified by Message Type and Trigger Event combination. For every receive configuration, an output port is generated with configuration name as port name prefix. An asterisk ![]() , that is, * symbol, can be used as wildcard character for both message formats and trigger event which listens to all message types.
, that is, * symbol, can be used as wildcard character for both message formats and trigger event which listens to all message types.
...
- Drag the HL7Receiver component from Bridges category in the Service Palette to the Fiorano Orchestrator.
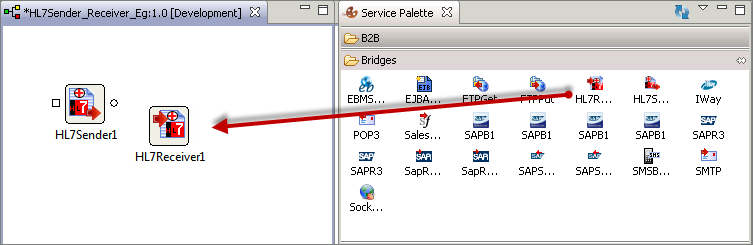
Figure 3: Adding HL7Receiver component to Fiorano Orchestrator - Double-click the component in the Orchestrator to open Configuration Property Sheet (CPS).
- Click
 button to add Receiver configuration by providing
- Select a Receiver to modify: value "ORU_R01_Receiver".
- Click Connection Details button and provide the Port Number: as "1011" (retain default value. This is same as the port number specified in HL7Sender)
- Click Add button to add an event, and provide event details and message type:
- Events
- Message Type: ORU
Trigger Event: R01
Info The Message Type value and Trigger Event value together forms an event and Hl7Receiver listens for messages matching this event. In the present example, HL7Receiver listens for ORU|R01 messages.
Note An asterisk * can be used as wild character for both message format and trigger event, where it receives all messages without filtering them.
Message Type: Both (to send the received message as-it-is without any conversion)
Info If you select 'XML', when the received message is of type 'Piped', the message is encoded as XML before sending it to output port.
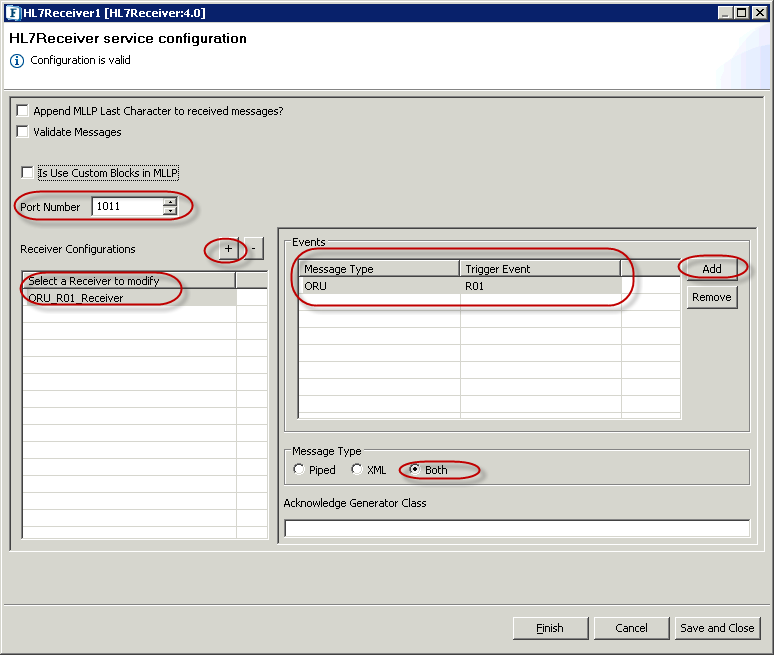

Figure 4: HL7Receiver Configuration in CPSNote An Acknowledgement Generator Class (last tab in Figure 4) can be used to delegate the responsibility of generating an ack message for HL7 message received.
If value is not provided a default ack generator is used which will generate AA if HL7 message is successfully converted to JMS Message and sent on output port and AE otherwise. Acknowledge Generator should implement com.fiorano.services.hl7receiver.engine.IAckGenerator and should have a default constructor.
Code Block title Expand for the sample Generator Class collapse true public interface IAckGenerator { /** * Generate Acceptance Ack for <code>message</code> received * @param message message received by recevier * @return ack message which will be sent back to the sender * @throws HL7Exception * @throws IOException */ Message generateAckForSuccess(Message message) throws HL7Exception, IOException; /** * Generate Error Ack for <code>message</code> received when an exception <code>e</code> happens * while proccessing the <code>message</code> * @param message message received by recevier * @param e excveption occured while processing the message * @return ack message which will be sent back to the sender * @throws HL7Exception */ Message generateAckForException(Message message, HL7Exception e) throws HL7Exception; }
- Events
- Click
- Click Finish and notice that the component will have the output port generated after the above configurations.
...
- Click Check Resource and Connectivity
 icon (or press ALT+SHIFT+C) to check resource and connectivity.
 - Click Run Event Process
 icon (ALT+SHIFT+R) to run the event process. Feeder1, Display_Sender and Display_Receiver windows get opened.
 In the Feeder1 window, replace 'Input Text' with the below sample input message and click Send.
Code Block title Expand for Sample Input Message collapse true MSH|^~\&|GDML|GDML|||20140207163234||ORU^R01|3ca92c1f-a566-4868-a704-dcb9d0c1fcd3|T|2.6|||||||EN PID|1|^^^^^|NNTV19880113^Other^Other^^Other0~NNTV88011300^CANQC^Other^^Other51~NNTV0013^Other^Other^^Other26||NNTEST13^V12TEST13||19880113|F|||13 STREETABJOU^J1K2L3||||||||||||||||||||||||||||| PRT|1|||OP^Physician|79335^ZAPHIRATOS^THOMAS^^|||||||||202 - 7200 HUTCHISONMONTRÉAL^Qc^H3N 1Z2|Work^514^4957932||^^ PRT|2|||PO^Lab||||ZAPHIRATOS, T. DR.^^^^GDML^^LLZAPHIR||||||7200 HutchisonMONTREAL^Qc^H3N 1Z2|Work^495^2555Fax^495^7932||^^ ORC|||3872090||O||||20140206163434 NTE|1|L||This requisition was edited and resaved on the2014/02/07 12:06:52 (GMT-05:00)|GR OBR|1||3872090|2054^GLUCOSE POS 1:2 H^GDML^^^^^^|R||20140206163434|||||||||||||^BIOCHEMISTRY|||||I|||| SPM||||||||||
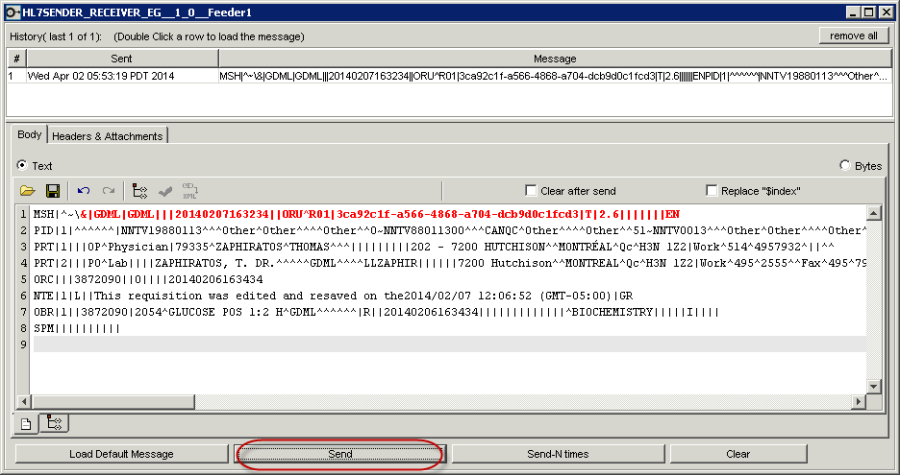

Figure 8: Sending Input from Feeder- The message received appears in Display_Receiver window.
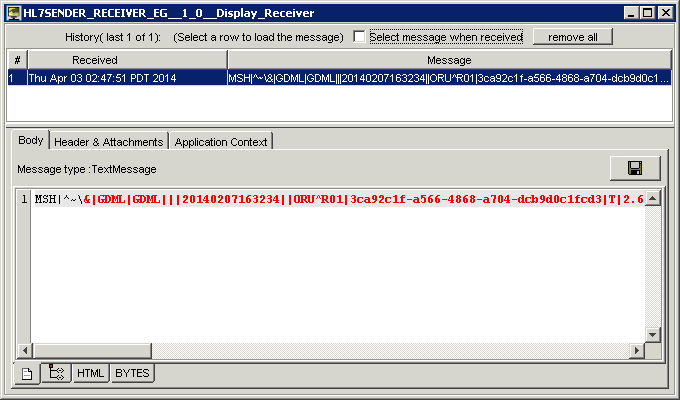

Figure 9: Display_Receiver window with Received Message - Acknowledgment message appears in Display_Sender window.


Figure 10: Display_Sender window with Acknowledgement
Reference
- Download RESTStub_Example event process and import it to the Event Process Repository in the Server Explorer in eStudio to understand the configuration used in this example and to execute the working sample.
- Please note that the component options used in this example are minimum, which helps you to get an overview of the application. To explore the other options present in the HL7Sender, HL7Receiver, Feeder, and Display components, refer: HL7Sender, HL7Receiver, Feeder and Display sections.