...
| Tip | ||
|---|---|---|
|
Driver
Driver class name that should be used to connect to the database. On selecting required database, Driver value is populated with standard value (This can be changed to required values based on driver being used).
...
- Provide a name for the query against Query Name.
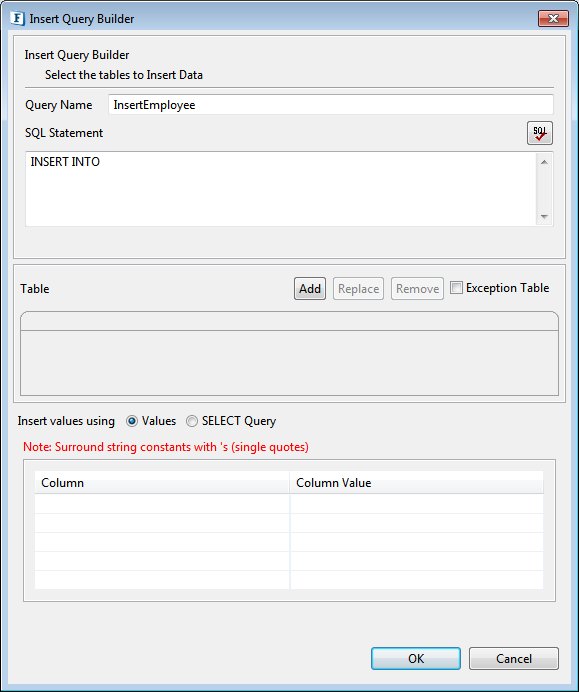
Figure 15: Insert Query Builder - Click Add button to launch Table Selection Dialog panel.
- Select required table as explained in Object Selection section. Selected table is added to the easel under Table. Primary key column, if exists, is marked with
 adjacent to column name.
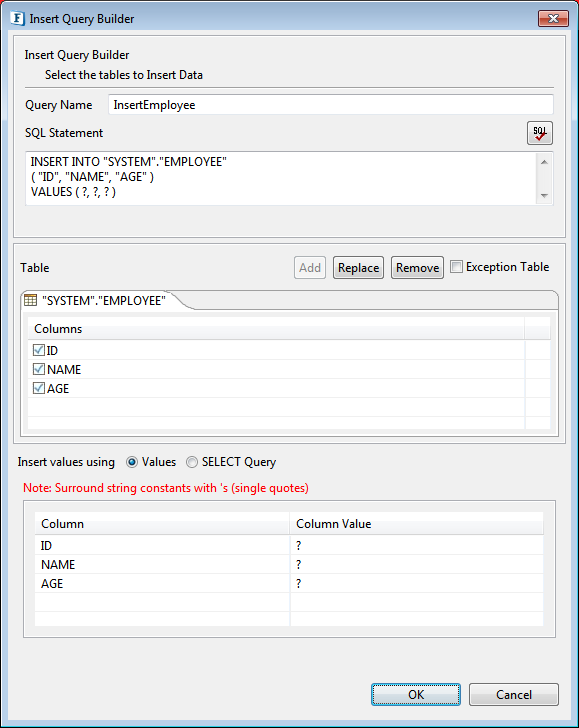
Figure 16: Selected table added to easel with all columns - Table can be changed by clicking Replace button and removed by clicking Remove button.
- If values are never to be inserted into a particular column, then that column can be unchecked (this requires column to have a default value or support null values
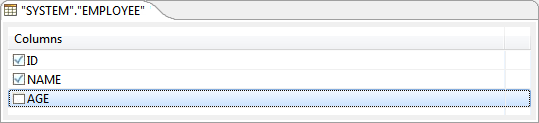
Figure 17: Ignoring column for insertion To insert a constant value for a particular column, specify the required value in the Column Value column against the required column name.
Note - If the value is a string, it should be wrapped in single quotes (' ')
- If the Column Value is left as "?", the value is taken from input or from the output of another query where possible
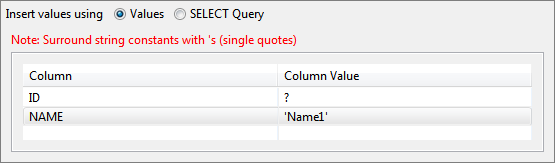
Figure 18: Inserting constant value into a tableNote Select statement is automatically generated and shown in the text editor under SQL Statement. The generated SQL Syntax can be validated by clicking the SQL
 button.
This feature only checks for invalid tokens, it does not perform a complete syntax check.

Figure 19: Generated insert queryClick OK to close the dialog box.
...
- Follow the steps from 1 to 6 as described in the Simple Insert Statement section.
- Select SELECT Query option against Insert values using and click the Select Query Wizard button to launch Select Query Builder dialog box.
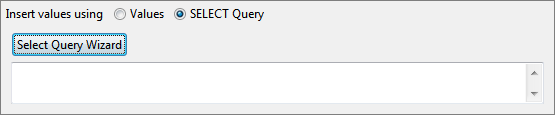
Figure 20: Option to insert values into a table using select query - Follow the steps as described in the Simple Select Statement section.
As the Select Query Builder dialog box is closed, Insert Statement is automatically generated and shown in the text editor under SQL Statement in the Insert Query Builder dialog box.
Note Select statement is automatically generated and shown in the text editor under SQL Statement. The generated SQL Syntax can be validated by clicking the SQL
button.This feature only checks for invalid tokens, it does not perform a complete syntax check.

Figure 21: Generated query to insert values using select
Click OK to close the dialog box.
...
- Follow the steps from 1 to 8 as described in the Simple Insert Statement section.
- Click the Exception Table checkbox; the checkbox turns uneditable and Query Name also becomes uneditable holding a default name. This is the table wherein the values that raised exceptions are stored.
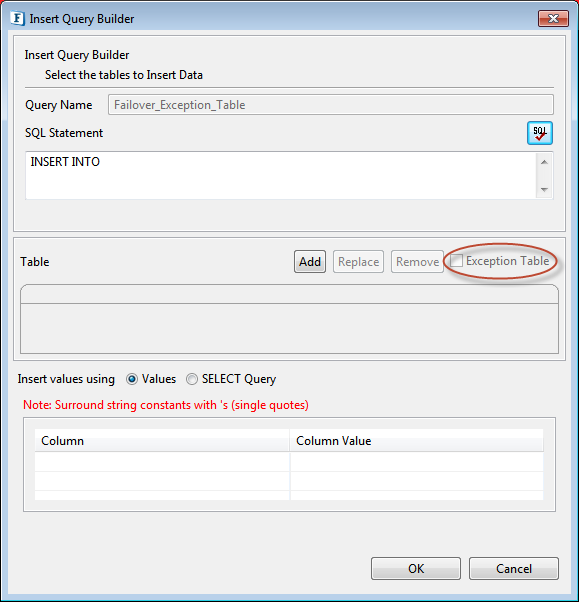
Figure 22: Exception Table Selection - Click Add and configure the exception table following steps from one of the previous Insert Statement sections based on the requirement (Clicking Cancel brings back the normal Insert Query Builder dialog box with the actual Table Name).
- Click OK to close the dialog.
...
- Provide a name for the query against Query Name.
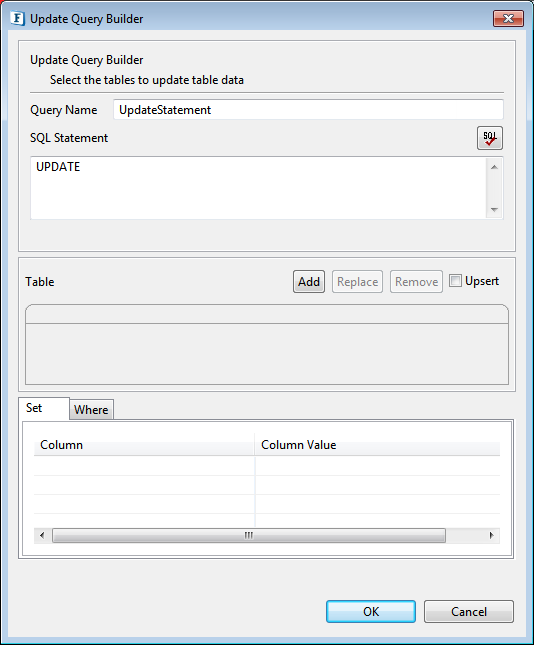
Figure 24: Update Query Builder - Click the Add button to launch Table Selection Dialog.
- Select required table as explained in the Object Selection section.
- Selected is added to the easel under Table. Primary key column, if exists, is marked with adjacent to column name.
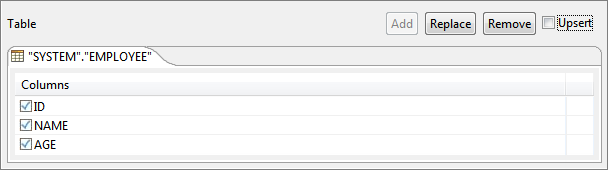
Figure 25: Selected table added to easel with all columns - Table can be changed by clicking Replace button and removed by clicking Remove button.
- Select the columns whose values have to be set (Below figure shows that NAME and AGE columns are for update).
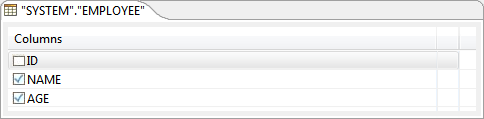
Figure 26: Ignoring column that does not need update - Selected columns automatically reflect under the SET tab.
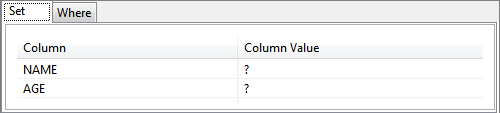
Figure 27: Columns added to SET clause - Click the WHERE tab and select a column name on which where condition has to be applied.
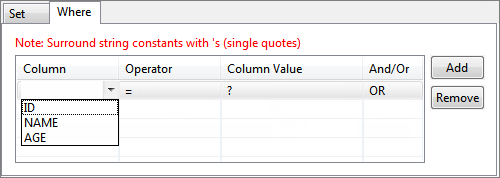
Figure 28: Adding condition on column to WHERE clause - To select multiple columns for where condition, conditions can be combined by using AND or OR under And/Or column; click Add button to add more rows.
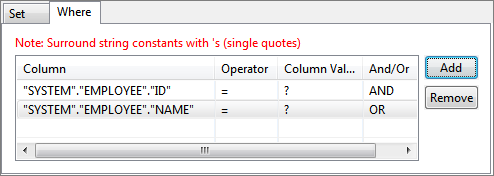
Figure 29: Specifying multiple conditions for WHERE clause - Operator of choice can be selected from the drop-down list under Operator column.
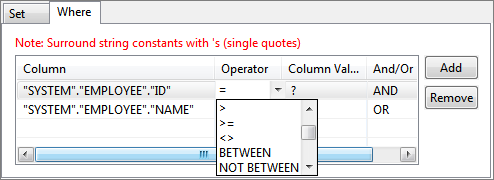
Figure 30: Selecting operator for a condition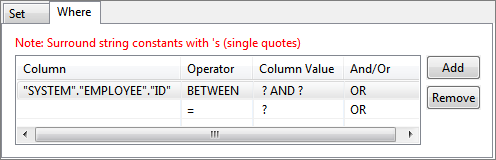
Figure 31: WHERE tab with conditions and operators selected - Constant values can be set to columns that have to be updated (under SET tab) or for values in where condition (under WHERE tab).
- To update a column with a constant value, specify the required value in the Column Value column against the required column name in SET tab.
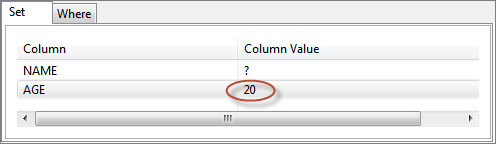
Figure 32: Specifying constant value for a column in SET clause To specify a constant value for where condition on a column, specify the required value in the Column Value column against the required column name in WHERE tab.
Note - If the value is a string, it should be wrapped in single quotes (' ')
- If the Column Value is left as "?", the value is taken from input or from the output of another query where possible
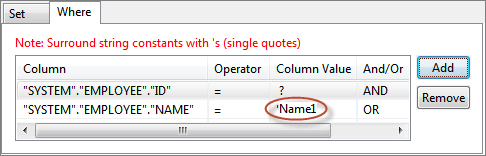
Figure 33: Specifying constant value for a column in condition for WHERE clauseTo specify where condition on a column whose value is equal to value defined in another column, select the required column from the drop-down list in the Column Value column against the required column name in WHERE tab.
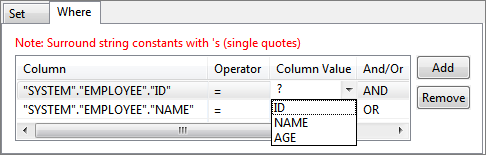
Figure 34: Specifying comparison between columns for WHERE clause condition
Note Select statement is automatically generated and shown in the text editor under SQL Statement. The generated SQL Syntax can be validated by clicking the SQL
button.This feature only checks for invalid tokens, it does not perform a complete syntax check.

Figure 35: Generated update query - To update a column with a constant value, specify the required value in the Column Value column against the required column name in SET tab.
Click OK to close the dialog.
...
- Configure Update Statement following the steps mentioned in Simple Update Statement.
- Check UPSERT check box.
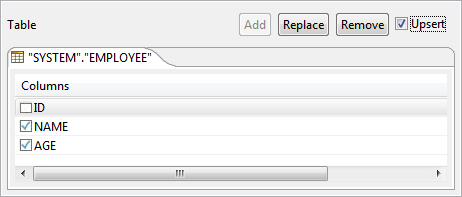
Figure 36: UPSERT Check Box
...
- Provide a name for the query against Query Name.
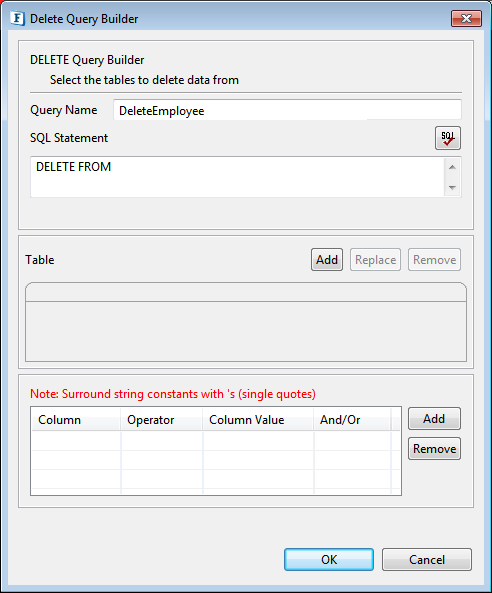
Figure 38: Delete Query Builder - Click the Add button to launch Table Selection Dialog panel.
- Select required table as explained in Object Selection section.
- Selected table is added to the easel under Table.
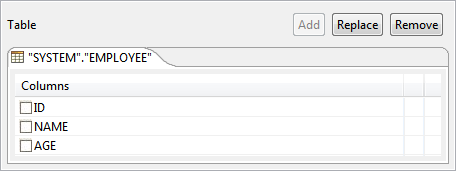
Figure 39: Selected table added to easel with all columns - Table can be changed by clicking Replace button and removed by clicking Remove button.
- Specify condition which should be satisfied for deleting a row using WHERE condition. Select a column name on which WHERE condition has to be applied.
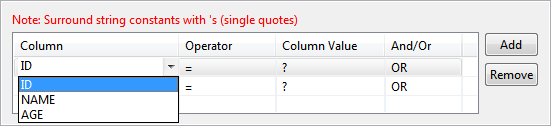
Figure 40: Adding condition on column to WHERE clause - When selecting multiple columns for where condition, conditions can be combined using AND or OR under And/Or column; click Add button to add more rows.
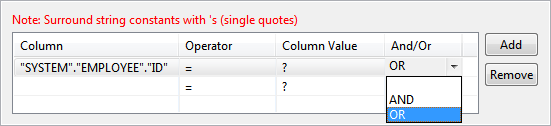
Figure 41: Specifying multiple conditions for WHERE clause - Operator of choice can be chosen from the drop down under Operator column.

Figure 42: Selecting operator for a condition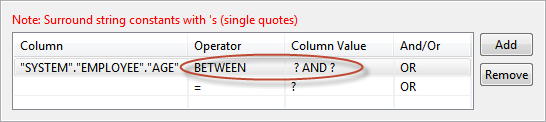
Figure 43: With conditions and operators selected To specify a constant value for where condition on a column, specify the required value in the Column Value column against the required column name.
Note - If the value is a string value, it should be wrapped in single quotes (' ').
- If the Column Value is left as "?", the value is taken from input or from the output of another query where possible.

Figure 44: Specifying constant value for a column in condition for WHERE clauseTo specify where condition on a column whose value is equal to value defined in another column, select the required column from drop down in the Column Value column against the required column name in where tab.
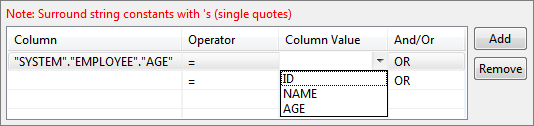
Figure 45: Specifying comparison between columns in condition for WHERE clauseNote Select statement is automatically generated and shown in the text editor under SQL Statement. The generated SQL Syntax can be validated by clicking the SQL
button.This feature only checks for invalid tokens, it does not perform a complete syntax check.
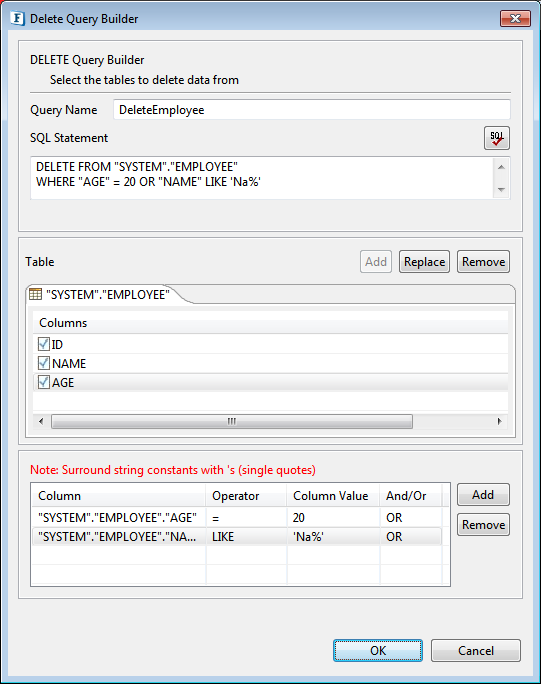
Figure 46: Generated Delete QueryClick OK to close the dialog box.
...
- Provide a name for the query against Query Name.
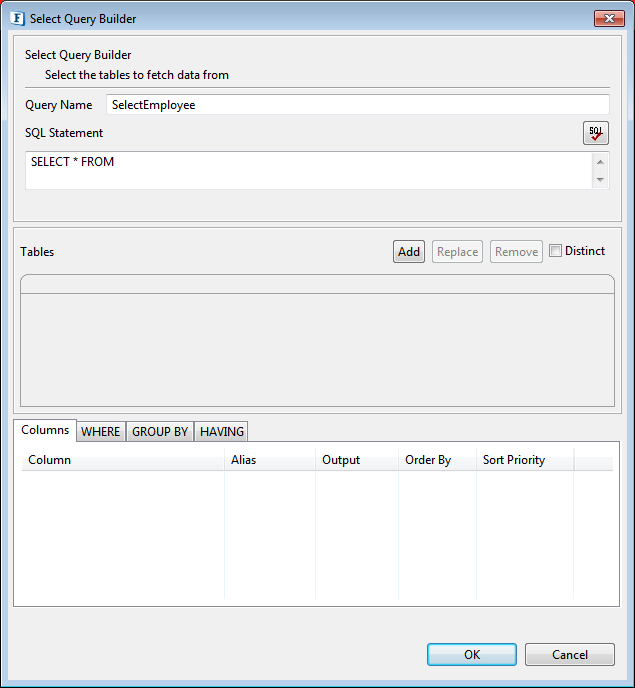
Figure 48: Select Query Builder - Click Add button to launch Table Selection Dialog.
- Select required table as explained in Object Selection section.
- Selected table is added to the easel under Table. Primary key column, if exists, is marked with adjacent to column name.
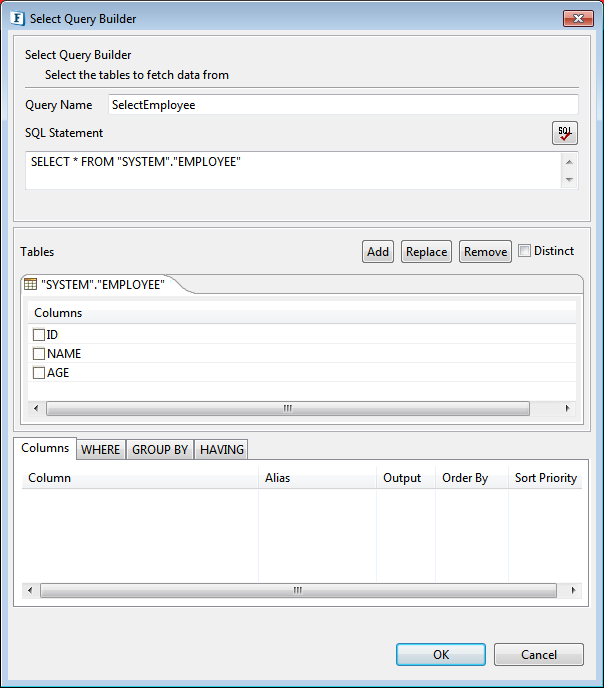
Figure 49: Selected table added to easel with all column - Table can be changed by clicking Replace button and removed by clicking Remove button.
To retrieve values from specific columns in the table, select the required checkboxes under Columns (in the Tables section, right below the table name) to build a Select Query with specific columns.
Note If no column is checked, then *SELECT ** is used. Select the columns in the order in which they should appear in select clause
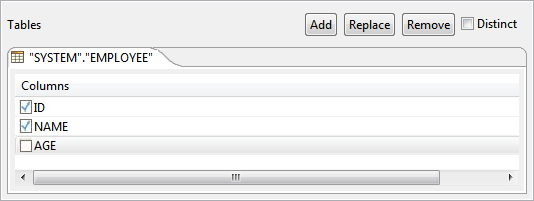
Figure 50: Ignoring column for selectionSelected columns are shown under Columns tab in the bottom part of the Select Query Builder. Check/Uncheck the check box in Output column against required column name to include/exclude the respective column in the output XML.
For example, configuration in the following image generates ID in the output XML but does not generate NAME in output XML even though values for both ID and NAME are retrieved from the table.
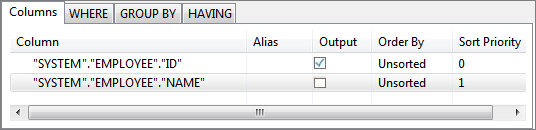
Figure 51: Selecting columns for output XMLTo define a column alias, provide the alias name under Alias column against the required column name. Aliases are useful when the column name is too long or is not intuitive. When an alias is specified, output XML contains an element with defined alias name instead of the column name.
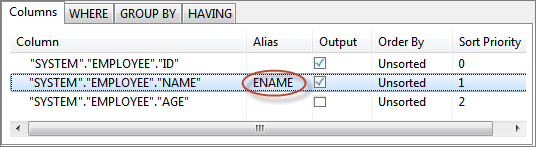
Figure 52: Defining Column AliasCheck the DISTINCT check box to return unique rows, ignoring duplicate values.
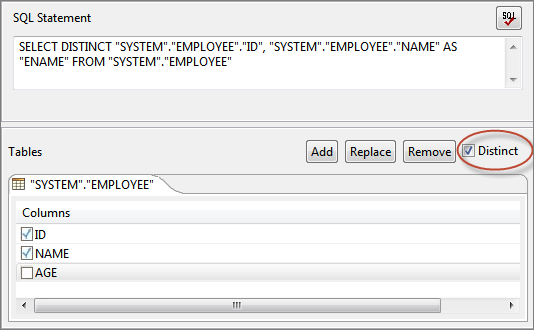
Figure 53: Distinct option to return unique valuesNote Select statement is automatically generated and shown in the text editor under SQL Statement. The generated SQL Syntax can be validated by clicking the SQL
button.This feature only checks for invalid tokens, it does not perform a complete syntax check.
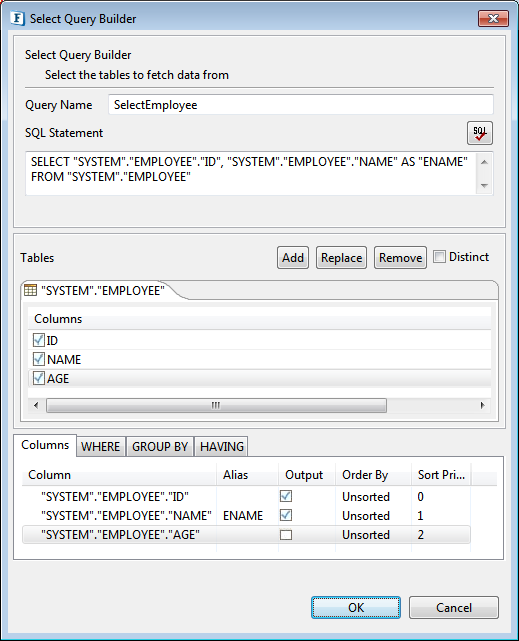
Figure 54: Generated select queryClick OK to close the dialog box.
...
- Follow the steps from 1 to 8 as described in the Simple Select Statement section.
- Click the WHERE tab, click the Add button, and then select a Column name on which WHERE condition has to be applied.
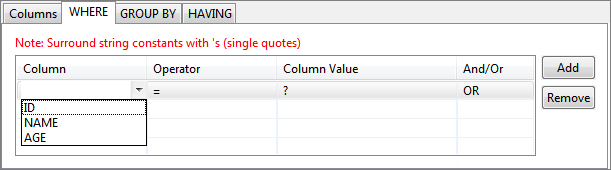
Figure 55: Adding condition on column to WHERE clause - When selecting multiple columns for WHERE condition, conditions can be combined using AND or OR under And/Or column; click Add button to add more rows.
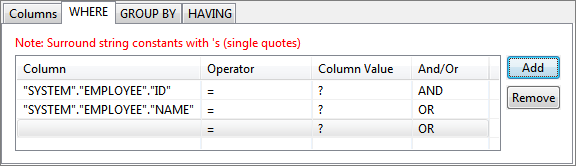
Figure 56: Specifying multiple conditions for WHERE clause - Operator of choice can be selected from the drop-down list under Operator column.
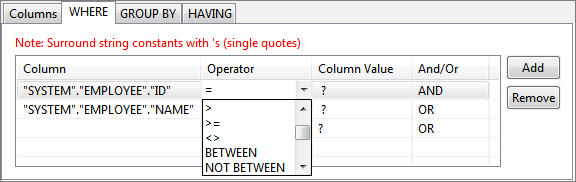
Figure 57: Selecting operator for a condition
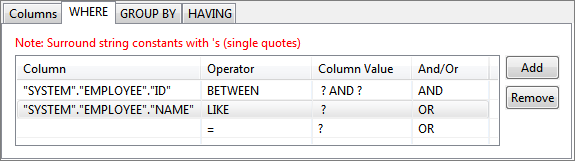
Figure 58: WHERE tab with conditions and operators selected - Constant values can also be set for values in WHERE condition (under WHERE tab).
To specify a constant value for WHERE condition on a column, specify the required value in the Column Value column against the required column name in WHERE tab.
Note - If the value is a string, it should be wrapped in single quotes (' ')
- If the Column Value is left as "?", the value is taken from input or from the output of another query where possible.
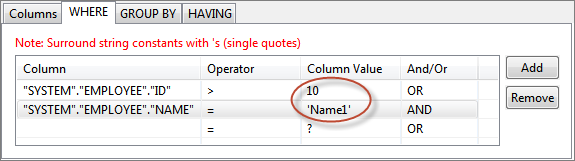
Figure 59: Specifying constant value for a column in WHERE tabTo specify WHERE condition on a Column whose value is equal to value defined in another Column, select the required Column from drop-down list in the Column Value against the required column name in WHERE tab.
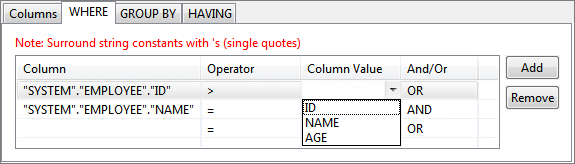
Figure 60: Specifying comparison between columns in condition for WHERENote Select statement is automatically generated and shown in the text editor under SQL Statement. The generated SQL Syntax can be validated by clicking the SQL
button.This feature only checks for invalid tokens, it does not perform a complete syntax check.
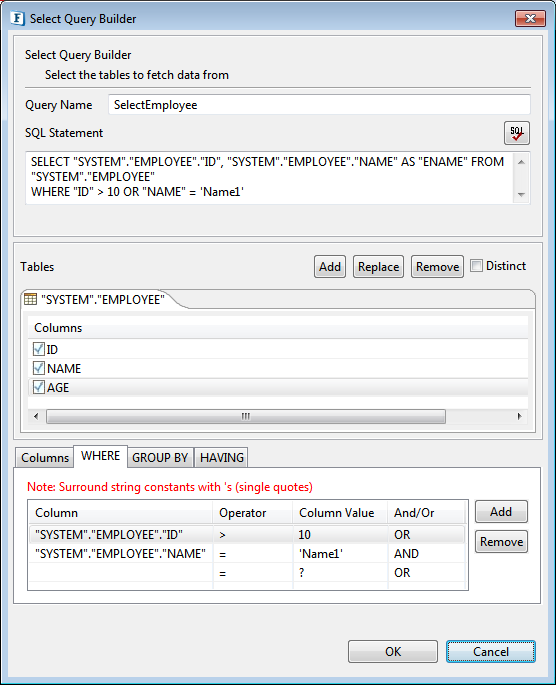
Figure 61: Generated select query with filter
Click OK to close the dialog box.
...
- Follow the steps from 1 to 5 as described in the Simple Select Statement section.
- Click on GROUP BY tab and check under Select against the columns under Group By on which group by condition should be applied.
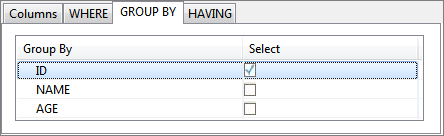
Figure 65: Selecting columns for grouping condition - To filter the results click on HAVING tab and define required conditions. HAVING tab has functionality similar to WHERE tab (described in Select Statement with filter).
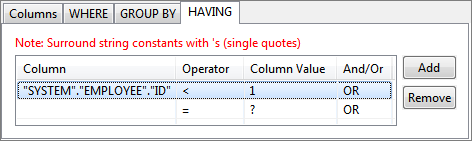
Figure 66: Adding condition to HAVING clause - Select required columns under Tables
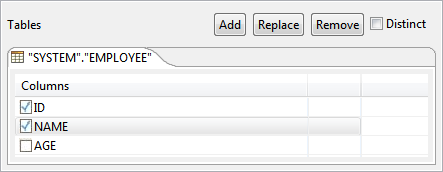
Figure 67: Selecting required columns Edit Select and HAVING clauses to apply appropriate grouping condition on selected columns.
Note Editing Select and HAVING clauses should be last action before closing the dialog.
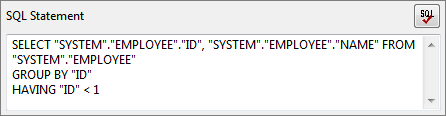
Figure 68: Generated select query with grouping- Click the Ok button to close the dialog.
...
- Follow the steps from 1 to 5 as described in the Simple Select Statement section.
To add another table, click the Add button to launch Table Selection dialog.
Note - Multiple tables can be added by repeating this step.
- Specify any conditions after selecting all required tables.
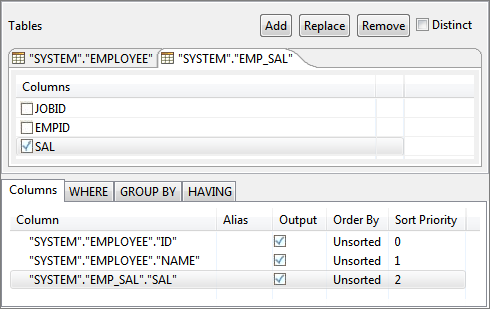
Figure 69: Selecting multiple tables- Add WHERE condition, described in Select Statement with filter section, to perform join on the tables. If no condition is specified, Cartesian product of rows in all selected tables is returned.

Figure 70: Usining WHERE condition for multiple Tables - To specify the join, in WHERE tab, select the required column from one table under Column and select the required column from another table under Column Value.

Figure 71: Generated SQL statement with join - To specify filtering, sorting or grouping conditions, refer the previous sections.
- Click the Ok button to close the dialog.
...
- Provide a name for the merge query in the Query Name text field.
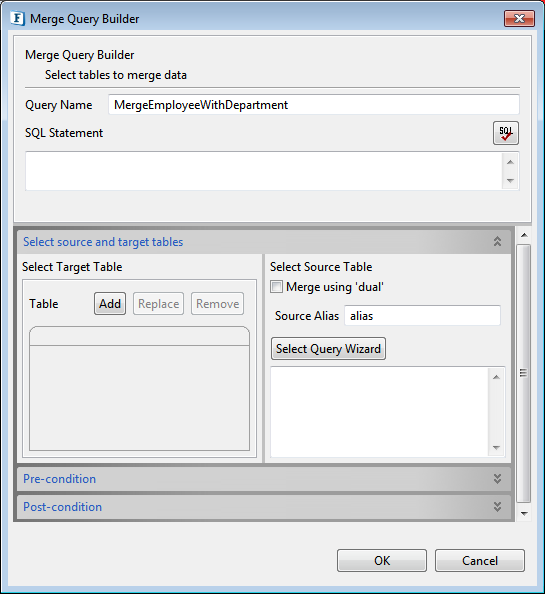
Figure 73: Adding name in Merge Query Builder Select Target Table
Select the target table using the Object Selection dialog by clicking the Add button under Select Target Table.
Note - The added table can be replaced or removed by using Replace and Remove buttons respectively.
- Columns based on which ON condition clause is created should be unchecked as shown in the figure below. These unchecked columns will not be shown in Update SET table (as shown in Figure: Configuring Post-condition)
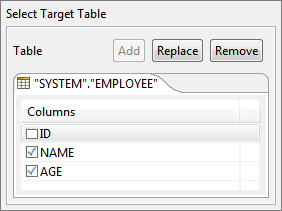
Figure 74: Select Target TableSelect Source Table
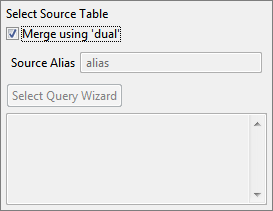
Figure 75: Select Source TableMerge using 'dual': Enabling this option manipulates data in the target table itself without a source table. Resulting MERGE statement would be like"'MERGE INTO <TargetTableName> USING DUAL ON...". Enabling this option would disable Source Alias and Select Query Wizard.
Source Alias: Specify a correlation name which is an alias for the SELECT subquery to be referenced elsewhere in the MERGE statement.
Select Query Wizard: Select the source subquery using the Select Query Wizard under Select Source Table. Configure the SELECT subquery as detailed in section Select Statement Configuration
Configure Pre-condition
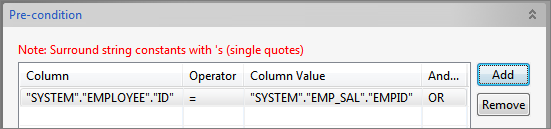
Figure 76: Configuring Pre-condition- Use the Pre-condition option (click Expand
 icon) to specify the condition upon which the MERGE operation either updates or inserts.
For each row in the target table for which the search condition is true, the component updates the row with the corresponding data from the source table. If the condition is not true for any rows, the component inserts into the target table based on the corresponding row from the source table. - The drop-down list under the Column column consists of columns from target table and that of under the Column Value column consists of columns from both target and source tables.
- Use the Pre-condition option (click Expand
Configure Post-condition
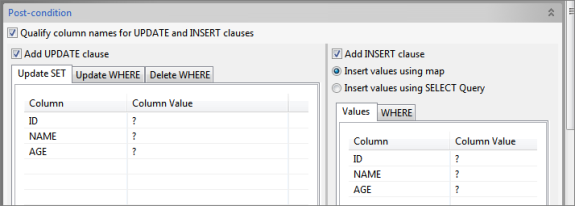
Figure 77: Configuring Post-condition
Based on whether Pre-Condition is satisfied or not for a given row in the target table, the query either updates or inserts data in the target table.- Qualify column names for UPDATE and INSERT clauses – Select this option to qualify, with the schema and table names, names of the columns in the target table.
- Add UPDATE clause – Select this option to add UPDATE clause to the MERGE statement.
- Add INSERT clause – Select this option to add INSERT clause to the MERGE statement.
Atleast one of UPDATE and INSERT clause should be added.
UPDATE
- The UPDATE clause specifies the new column values of the target table.
- Only the columns that are checked under Select Target Table will be shown here.
- The Configuration of Update SET and Update WHERE are detailed in Update Statement Configuration section.
- In the Update WHERE table, the drop-down list under the Column column consists of columns from target table and that of under the Column Value column consists of columns from both target and source tables.
DELETE
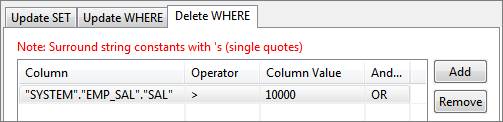
Figure 78: Configuring Delete WHERE Clause
Specify the Delete WHERE clause to clean up data in a table while populating or updating it.INSERT
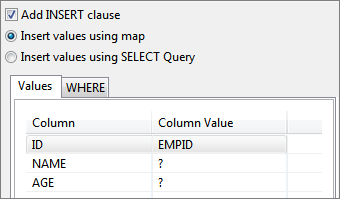
Figure 79: Configuring INSERT clause
- The INSERT clause specifies values to insert into the column of the target table if the condition of the ON clause is false.
- Configure INSERT query as detailed in Insert Statement Configuration Section
...
- After configuring the MERGE query using the UI, edit the sql SQL statement and add a semi-colon (:;) at the end of the query. Do not make any changes in the UI after adding the semi-colon.
- DELETE clause is not supported.
- Un-check the 'Qualify column names for UPDATE and INSERT clauses' option.
...
- Click the Add button and selectStored Procedure option to launch Stored Procedure Query Builder.
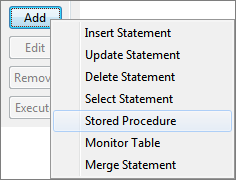
Figure 80: Adding Store Procedure - Provide a name against Query Name.
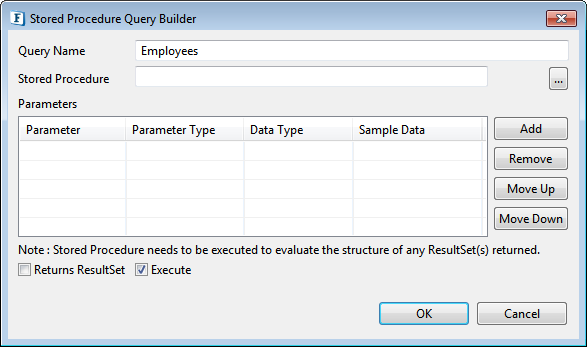
Figure 81: Adding Query name for Stored Procedure - Click Stored Procedure Ellipsis
 button.
 - Select required procedure as described in Object Selection section.

Figure 82: Stored procedure details Parameters and their configurations are automatically populated.
Note Stored Procedures feature does not support User-defined Data Types presently.
Column
Description
Parameter
Name of the parameter for named parameters; blank otherwise.
Parameter Type
Type of parameter – IN, OUT, INOUT, UNKOWN, RETURN, RESULT
Values of type OUT, INOUT, RETURN, RESULT form output structure.Data Type
SQL data type of the parameter.
Sample Data
NA
Before closing the Stored Procedure dialog, select Execute checkbox (as in the above figure) to execute the stored procedure to create output structure under the Output tab.
Note If not selected, the output structure will not be defined and has to be manually defined.
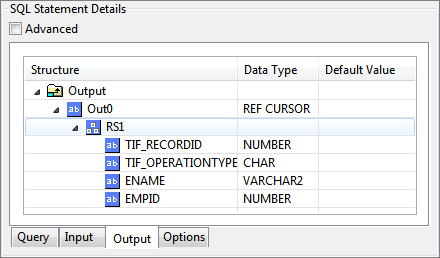
Figure 83: Output structure generated for selected stored procedure- Click OK to close the dialog box.
...
- Click Monitor Table Ellipsis button and choose the table to monitor (refer to Object Selection section).
- Select actions which have to be monitored by choosing the options as below:
- Insert: Notifies when a row is added to monitored table.
- Delete: Notifies when a row is deleted from monitored table.
- Update Of Selected Columns: Notifies when a selected column is updated to new value. Column selection panel appears on the right side when this checkbox is selected.
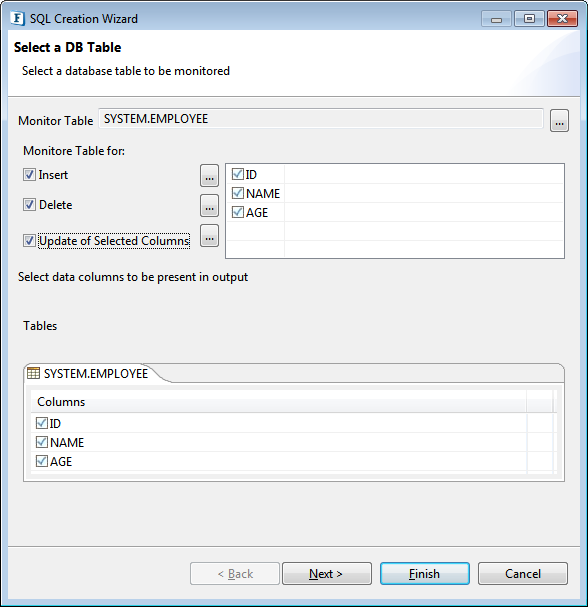
Figure 86: Selecting table for monitoring
- For each action which has to be monitored, specify conditions which filter changes to be notified, click the Ellipsis button for the respective option to configure expression to filter inserted records.
In the Insert Trigger Expression dialog box, define condition on required columns in the same way as in WHERE tab (refer Select Statement with Filter section). Below figure shows configuring a condition – send notification if a row is inserted with ID > 500.
Note Do not leave column value as "?" as possible in WHERE tab.
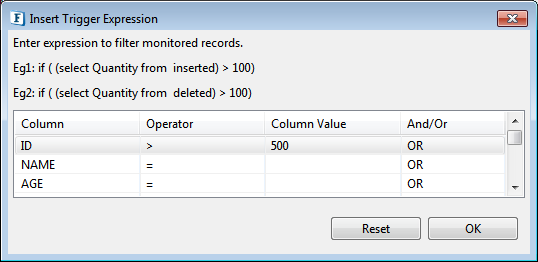
Figure 87: Specifying filter condition for monitoring- Click OK and then click Next.
...
- Select a configured stored procedure under SQL Statements.
- Click Edit to launch Query Builder for Stored Procedure and follow steps in Stored Procedure Configuration section.
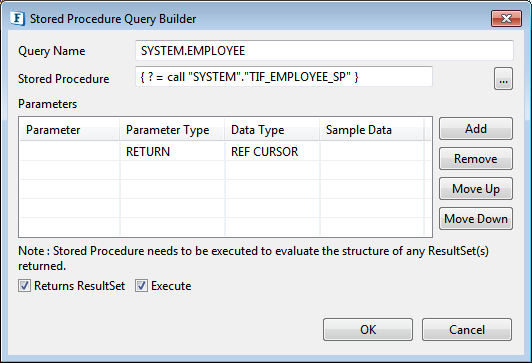
Figure 101: Editing stored procedure - Check Execute check box (as in the above figure) before closing Query Builder if the structure of result set returned by stored procedure is changed and Output tab in SQL Statement Details Configuration have to be regenerated.
- Click OK to close the dialog box.
...
Configure the DB component as described in the Configuration and Testing section and use feeder and display component to send sample input and check the response respectively.
...