...
Business logic configuration details are configured in the second panel, Interaction Configurations. Figure 4 illustrates the panel with expert properties Expert Properties view enabled.
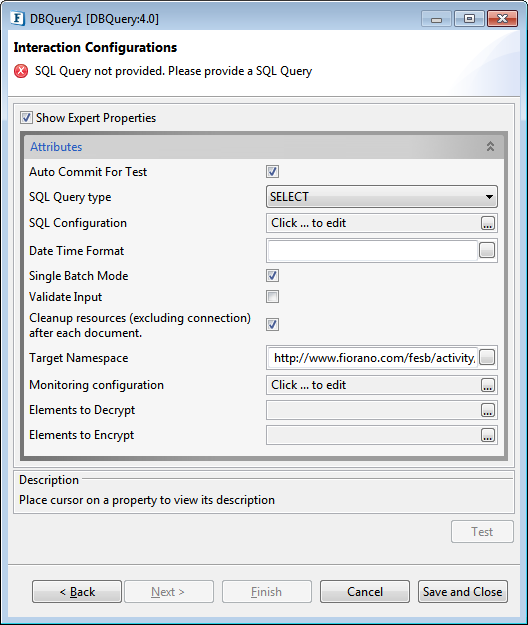

Figure 4: Business in Interaction panel logic configuration properties
| Anchor | ||||
|---|---|---|---|---|
|
...
This property will override the value provided for property Auto Commit (Y/N) in the MCF panel.
Pre Processing XSL Configuration
Pre Processing XSL configuration can be used to transform request message before processing it. Click the ellipses button against the property to configure the properties.
Refer to the Pre/Post Processing XSL Configuration section under the Common Configurations page for details regarding Pre Processing XSL configuration and Post Processing XSL configuration (below).
Post Processing XSL Configuration
Post Processing XSL configuration can be used to transform the response message before sending it to the output port.
Process Message Based on Property
The property helps components to skip certain messages from processing.
Refer to the Process Message Based On a Property section under the Common Configurations page.
SQL Query type
This property determines SQL query type to be executed. The user can select one of the SQL query types from SELCET, UPDATE, INSERT and DELETE.
Explanation for types of queries is given in the following table:
Type of query | Explanation |
|---|---|
INSERT | Inserts/adds data into database table |
UPDATE | Modifies existing data in database table |
DELETE | Deletes data from database table |
SELECT | Retrieves data from database table |
SQL Configuration
Click the SQL Configuration ellipsis button  button to launch the SQL Configuration wizard which allows configuring queries that have to be executed.
Table Selection Dialog
Configuring queries requires selecting database object Tables on which actions have to be taken. The Table Selection Dialog does the required thing. This panel is shown in Figure 5.
...
- Click Add button to launch Table Selection Dialog dialog box.
- Select required table as explained in Table Selection Dialog section. Selected table is added to the easel under Table. Primary key column, if exists, is marked with
 adjacent to column the column name.
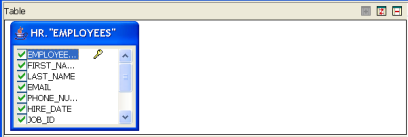
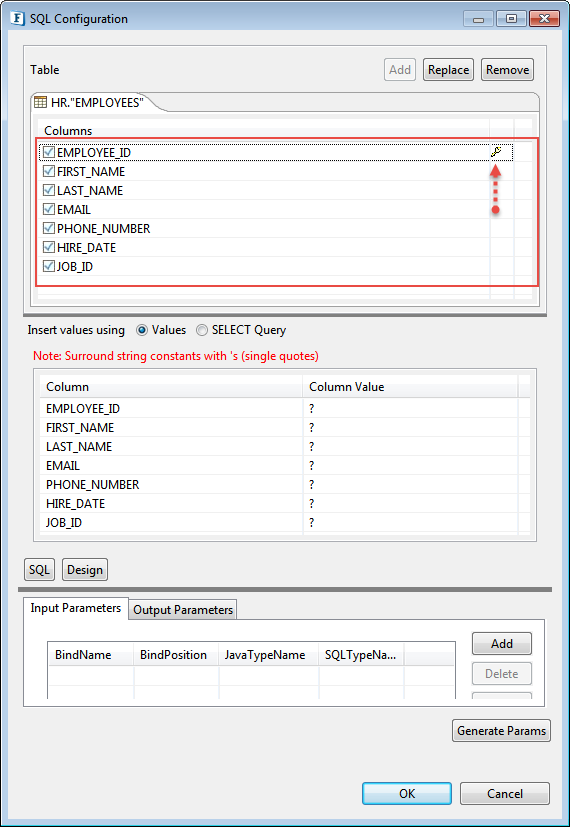
Figure 7: Selected table added to easel - Table can be changed by clicking
 replace selected table button the Replace button and removed by clicking
  remove database table the Remove button.
 - If values are never to be inserted into a particular column, then that column can be unchecked (this requires column has a default value or supports null values) as shown in Figure 8.
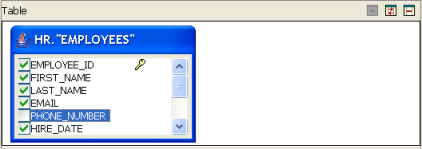
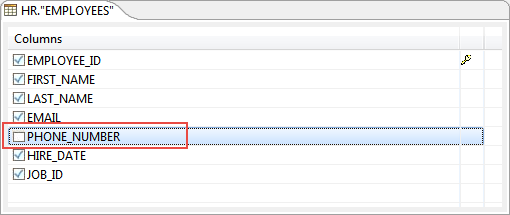
Figure 8: Ignoring column for insertion To insert a constant value for a particular column, specify the required value in the Column Value column against the required column name.
Note - If the value is a string value it should be wrapped in single quotes (' ')
- ? indicates value will be taken from input or from the output of another query where possible
Click the SQL button (see Figure 7) to generate the Insert statement is automatically generated and shown get displayed in the text editor under SQL Statement editor in the SQL tabConfiguration panel. The generated SQL can be validated by pressing the
 (check syntax) button.
Note This feature only checks for invalid tokens, ; it does not perform a complete syntax check.
EnableReconfiguration: Select the check box against this option to reconfigure the query, if it is not selected, then the Design tab (which is used to configure the query) will not be visible.
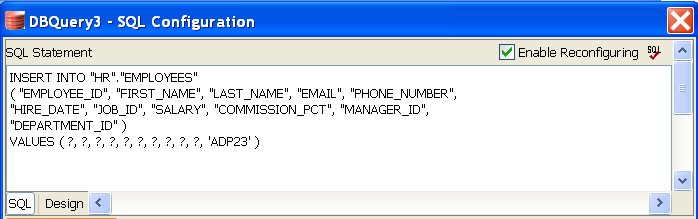
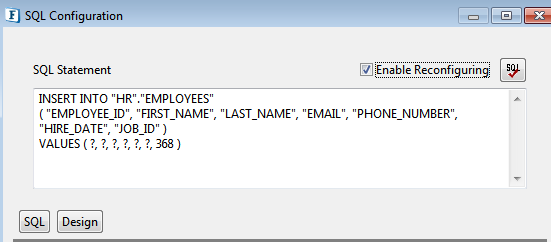
Figure 9: Generated insert query- Once the query is configured, the user has to generate the input and output parameters by clicking the Generate ParametersParams button.
- If the query contains any value which should be taken from input XML, then the generated parameters are used to define the input and output port schemas.
- The Add and Delete buttons are used to add and delete particular parameters from the list. Delete All button is used to delete all the parameters from the list.
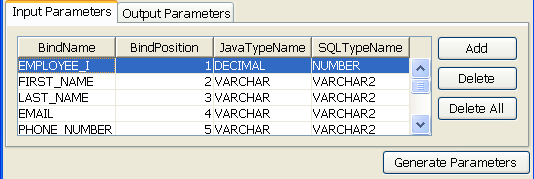
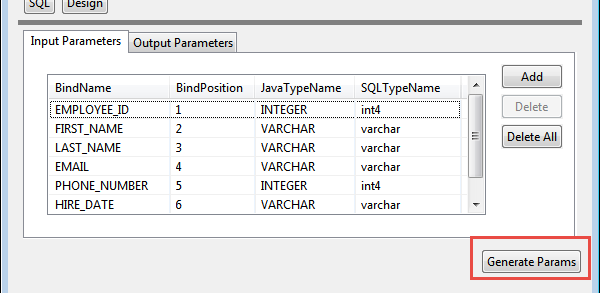
Figure 10: Generated Input/Output ParametersEach of the columns is explained below.
Column Name
Description
BindName
This value is used to generate the schema for the query. In the Figure 10 value for EMPLOYEE_ID (field name) is changed to EMPLOYEE_I. So the schema generated would contain EMPLOYEE_I as the first element instead of default populated value, EMPLOYEE_ID.
Bind Position
The position in the query where this value is bound to.
Warning Do not change this value.
Java TypeName
JDBC type which maps to Data Type.
SQL TypeName
This defines the data type of this column in the database table. This should be correctly defined.
- Click Ok to close the dialog.
Insert Statement with select
Insert rows in the configured table by selecting rows from another table.
- Follow the steps from 1 to 4 as described in section Simple Insert Statement.
- Select the SELECT Query option against Insert values using as shown in Figure 11.
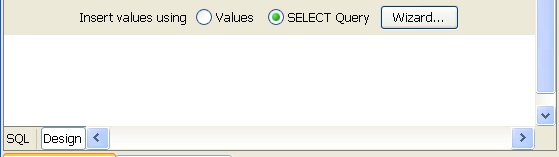
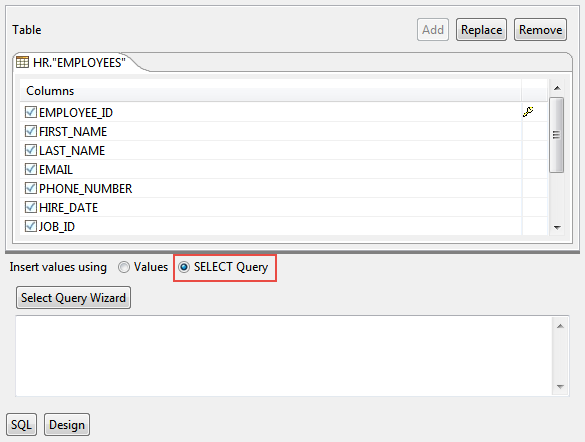
Figure 11: Option to insert values into a table using select query - Click Wizard… Select Query Wizard button to launch Query Builder to specify the Select query.
- Follow the steps as described in section Select Statement Configuration.
- The select query is automatically generated and shown in the text editor under Insert values using in Design tab as shown in Figure 12.
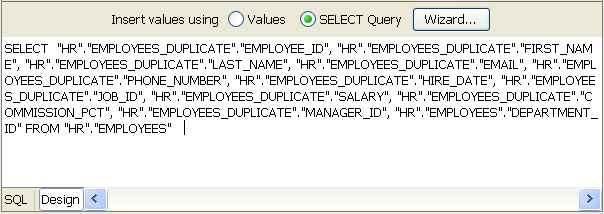
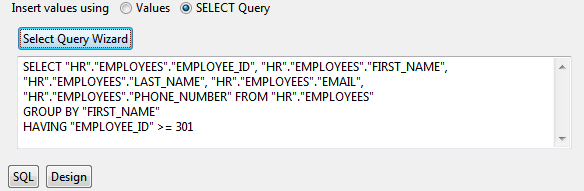
Figure 12: Generated Select query which is used in Insert Query - Insert statement is automatically generated and shown in the text editor under SQL Statement in SQL tab. The generated SQL can be validated by pressing (check syntax) button.
Enable reconfiguration: Select the check box against this option to reconfigure the query, if the option is not selected then the Design tab (which is used to configure the query) will not be visible. When a query is reconfigured Generate Parameters button should be clicked to generate parameters for the modified query.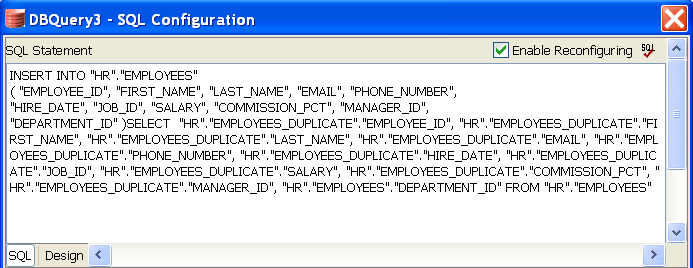
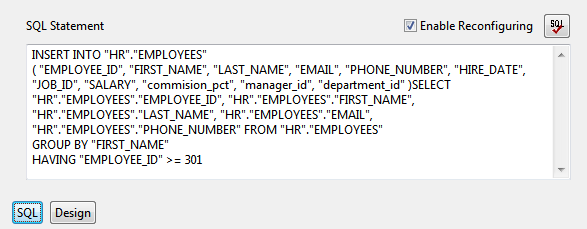
Figure 13: Generated Insert Query - Follow the steps from 7 and 8 as described in section Simple Insert Statement to complete the query configuration.
...
Click ellipsis button ![]() next to SQL configuration property after selecting SQL Query Type as DELETE will launch the SQL Configuration Wizard which will useful be useful to configure Insert statement.
next to SQL configuration property after selecting SQL Query Type as DELETE will launch the SQL Configuration Wizard which will useful be useful to configure Insert statement.
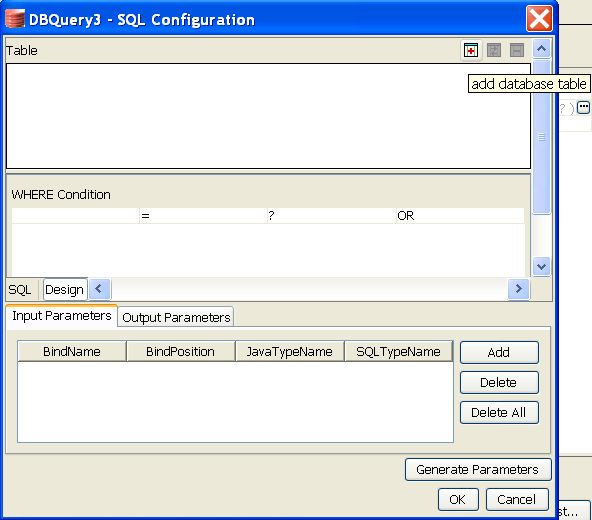
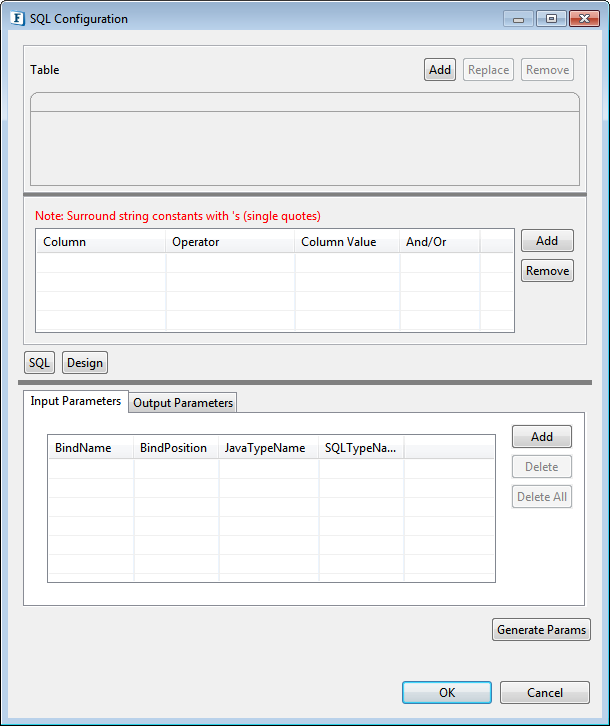
Figure 14: Sql Configuration Dialog for Delete Query
Simple Delete Statement
Delete rows satisfying defined condition in configured table, with column values taken from input XML or with constant values.
- Click
 add database table the Add button to launch Table Selection Dialog dialog box.
 - Select required table as explained in Table Selection Dialog section. Selected table is added to the easel under Table
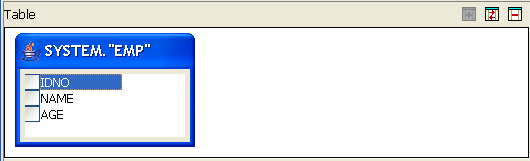
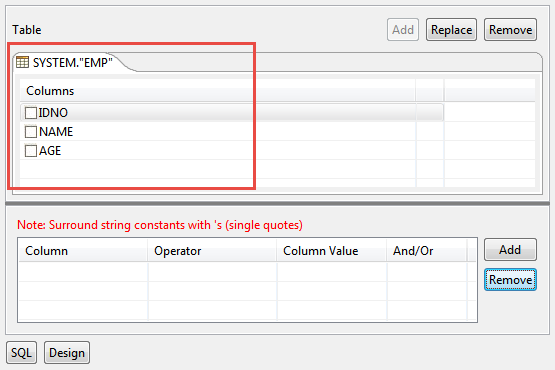
Figure 15: Selected table added to easel - Table can be changed by clicking replace selected table the Replace button and removed by clicking remove database table the Remove button.
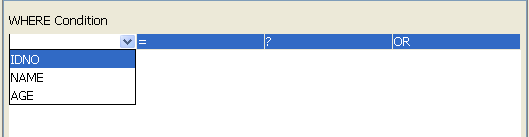
Figure 16: Adding condition on column to WHERE clause - Specify condition which should be satisfied for deleting row under WHERE condition. Select a Click Add to add a new row and select a column name in the first column on which WHERE condition has to be applied.
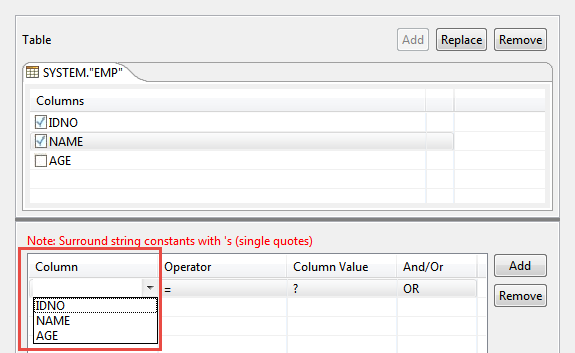
Figure 16: Adding condition on column to WHERE clause - When selecting multiple columns for where condition, conditions can be combined using AND or OR under fourth column
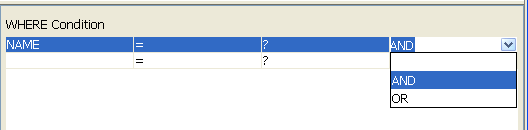
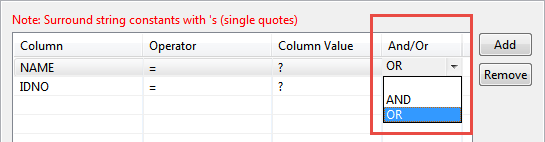
Figure 17: Combining multiple conditions for WHERE clause - Operator of choice can be chosen from the drop-down under second column.
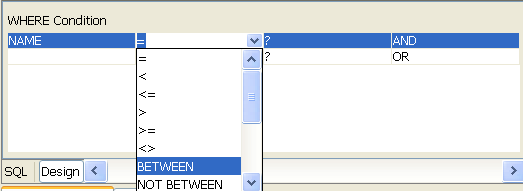
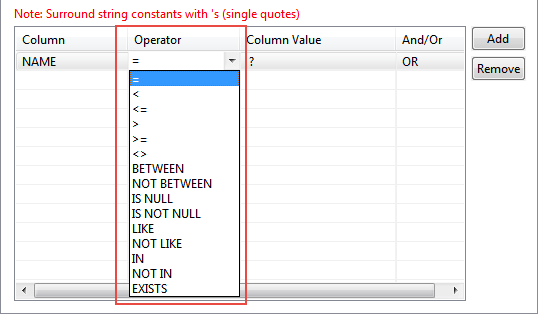
Figure 18: Selecting operator for a condition - To specify a constant value for WHERE condition on a column, specify the required value in the third column against the required column name in where tab.
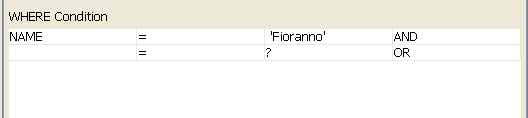

Figure 19: Specifying constant value for a column in condition for WHERE clause - To specify WHERE condition on a column whose value is equal to value defined in another column, select the required column from drop-down in the third column against the required column name in where tab

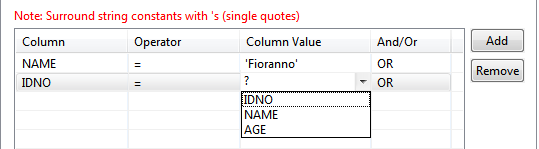
Figure 20: Specifying comparison between columns in condition for WHERE clause - Insert statement is automatically generated and shown in the text editor under SQL Statement in SQL tab. The generated SQL can be validated by pressing check syntax button.
Enable reconfiguration: If this option is checked then the query can be re-configured, if the option is unchecked then the Design tab (which is used to configure the query) will not be visible.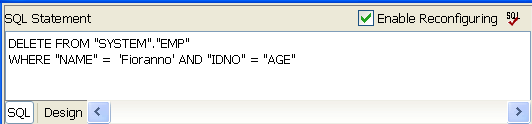
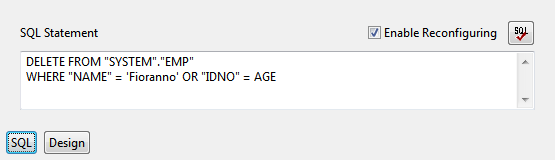
Figure 21: Generated Delete Query - Follow the steps from 7 and 8 as described in section Simple Insert Statement to complete the query configuration.
Update Statement Configuration
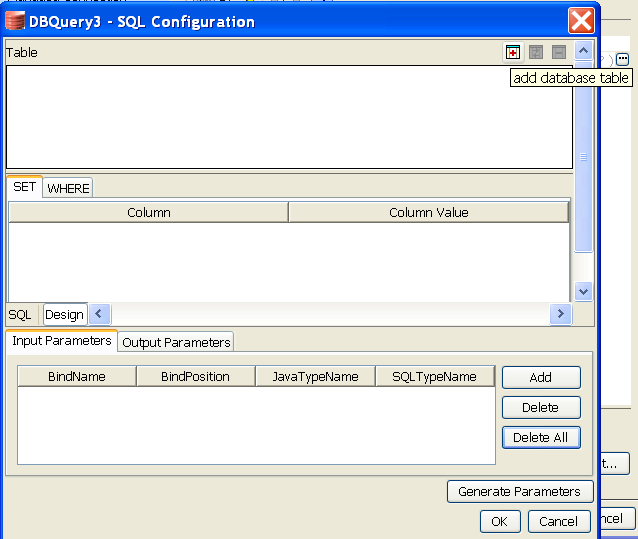
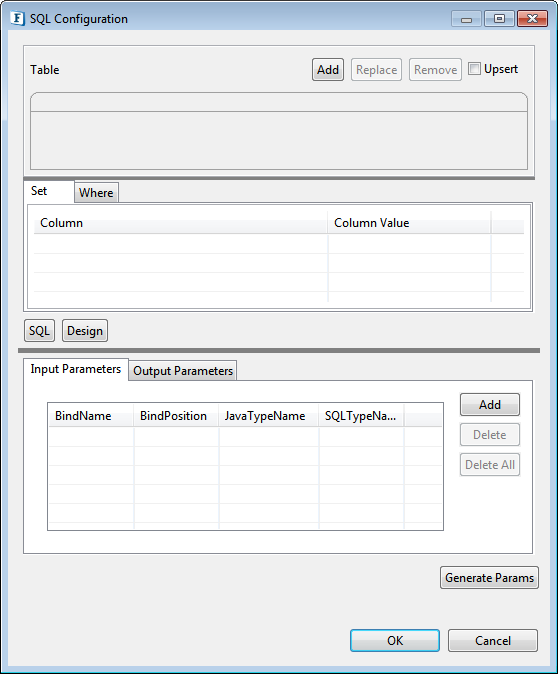
Figure 22: SQL Configuration Dialog for Update Query
Click ellipsis button ![]() next to SQL configuration property after selecting SQL Query Type as UPDATE will launch the SQL Configuration Wizard which will useful to configure update statement.
next to SQL configuration property after selecting SQL Query Type as UPDATE will launch the SQL Configuration Wizard which will useful to configure update statement.
Simple Update Statement
Update rows satisfying defined condition in configured table, with column values taken from input XML or with constant values. Condition values can also be taken from input XML or defined as constant values.
- Click add database table button to launch Table Selection Dialog dialog box.
- Select required table as explained in Table Selection Dialog section. Selected table is added to the easel under Table.
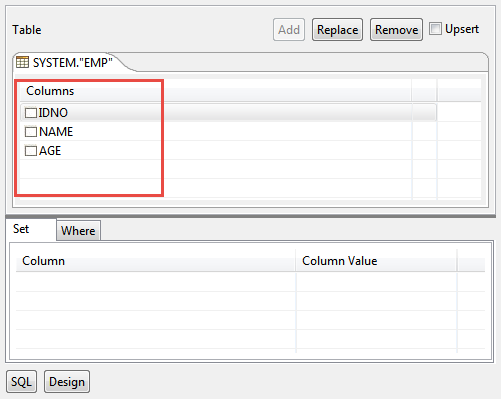
Figure 23: Selected table added to easel - Table can be changed by clicking replace selected table button and removed by clicking remove database table button.
- Select the columns whose values have to be set. Figure 24 shows that NAME and AGE are selected for update
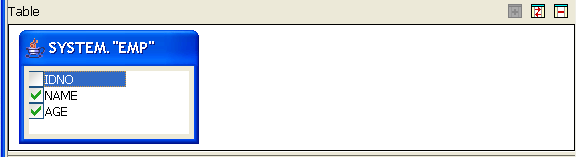
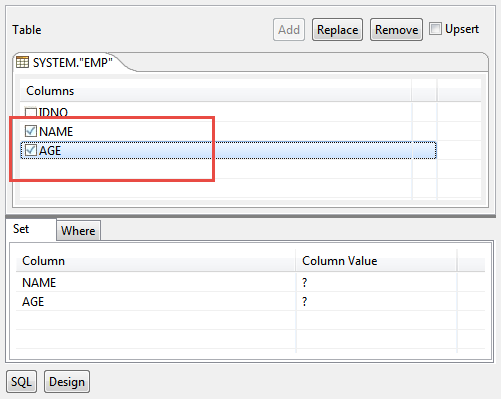
Figure 24: Selecting column for update - These selected columns will automatically add get added under the SET tab as shown in Figure 25.
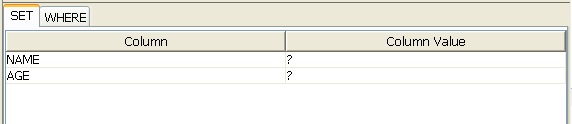
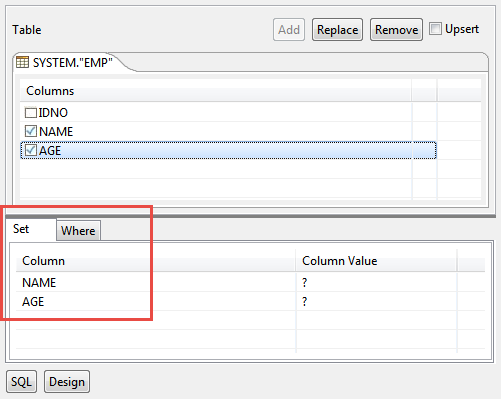
Figure 25: Columns added to SET clause - Click WHERE tab and select a column name on which where condition has to be applied.
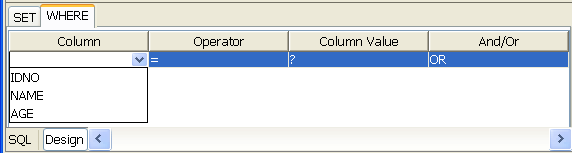
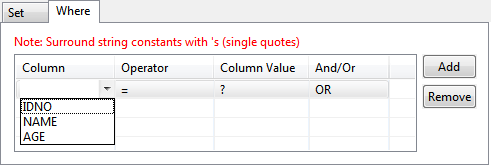
Figure 26: Adding condition on column to WHERE clause - When selecting multiple columns forfor where condition, conditions can be combined using AND or OR under And/Or column.
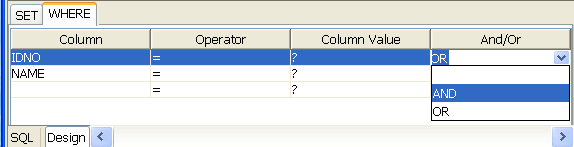
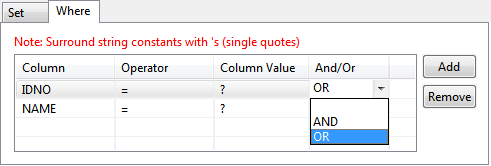
Figure 27: Combining multiple conditions under where clause - Operator of choice can be selected from the drop-down menu underOperator column.
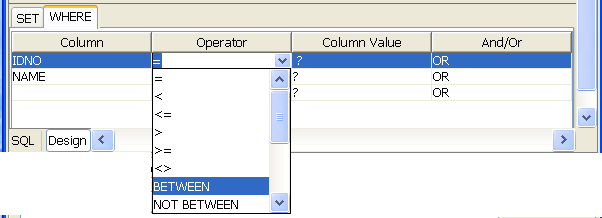
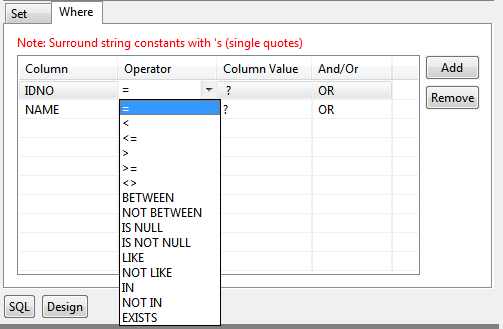
Figure 28: Selecting operator for a condition
...
| Note |
|---|
|
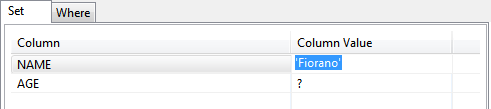
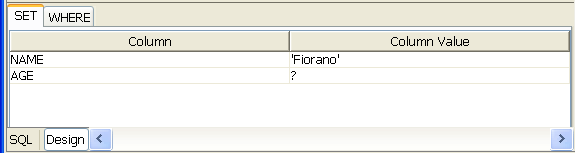
Figure 29: Specifying constant value for a column in SET clause
...
| Note |
|---|
If the value is a string value it should be wrapped in single quotes (' '). |
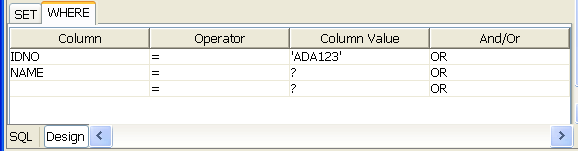
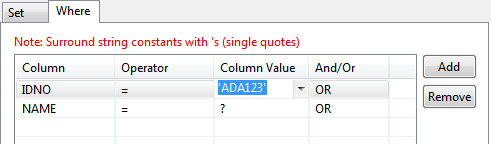
Figure 30: Specifying constant value for a column in condition for WHERE clause
...
- To specify where condition on a column whose value is equal to value defined in another column, select the required column from the drop-down menu in the Column Value column against the required column name in WHERE tab.
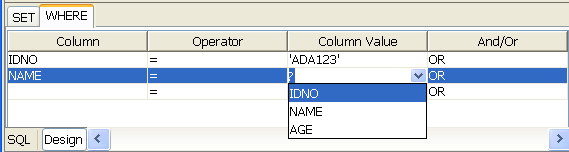
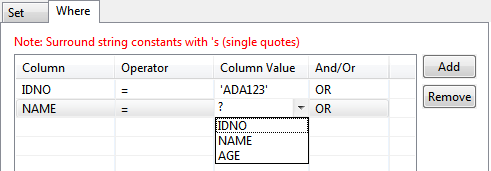
Figure 31: Specifying comparison between columns in condition for WHERE clause
| Note |
|---|
Enable reconfiguration: If the check box is selected the query can be re-configured, if the query is uncheck then the Design tab (which is used to configure the query) will not be visible. 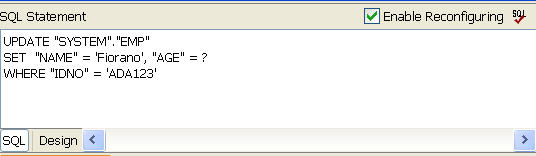
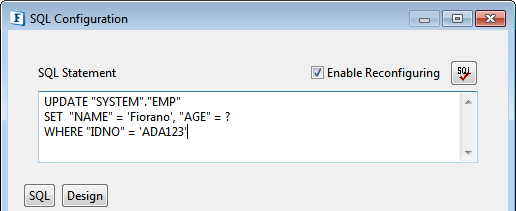
Figure 32: Generated update query
Follow the steps from 7 and 8 as described in section Simple Insert Statement to complete the query configuration.
| Anchor | ||||
|---|---|---|---|---|
|
...
Click ellipsis button ![]() next to SQL configuration property after selecting SQL Query Type as SELECT will launch the SQL Configuration Wizard which will useful to configure Insert statement.
next to SQL configuration property after selecting SQL Query Type as SELECT will launch the SQL Configuration Wizard which will useful to configure Insert statement.
| Anchor | ||||
|---|---|---|---|---|
|
Retrieves data from all columns or from selected columns in a configured database table.
- Click add database table the Add button to launch Table Selection Dialog dialog box.
- Select the required table as explained in the Table Selection Dialog section. Selected table is added to the easel under Table
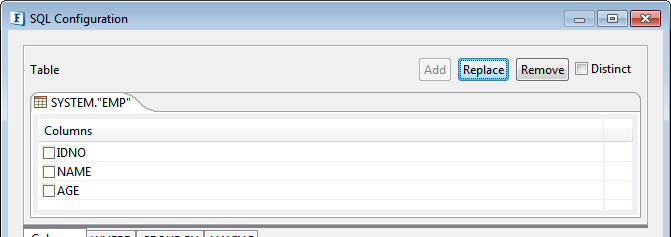
Figure 33: Selected table added to easel
- Table can be changed by clicking replace selected table button and removed by clicking remove database table button.
- To retrieve specific columns values from the table, check required columns to build a select query with specific columns. If no column is checked, then *SELECT ** is used. Select the columns in order in which they should appear they should appear in select clause.
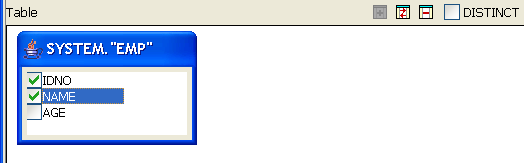
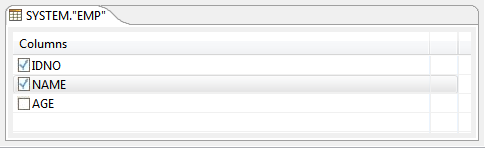
Figure 34: Selecting columns for selection
- Selected columns are shown under Columns tab. Check/Uncheck the check box in Output column against required column name to show/not show the corresponding column in the output XML.
For example, configuration in the following image generates IDNO in the output XML, but does not generate NAME in output XML, though values for both IDNO and NAME are retrieved from the table.
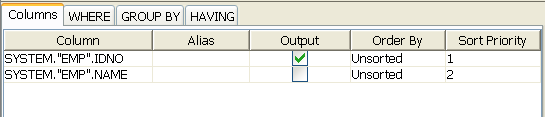
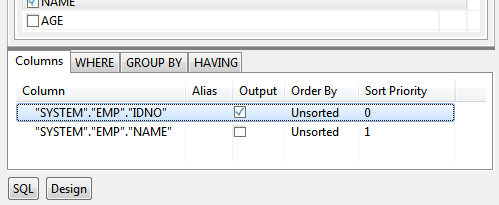
Figure 35: Selecting columns for output XML
- To define a column alias, provide the alias name under Alias column against required column name. Aliases are useful when the column name is not intuitive or too long. When an alias is specified output XML will contain an element with defined alias name instead of the column name.

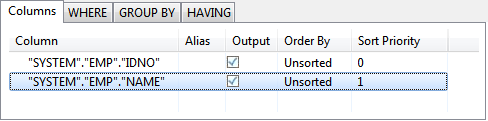
Figure 36: Defining Column Alias
- To return unique rows check DISTINCT.

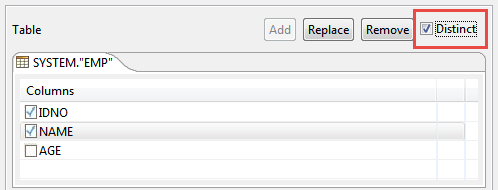
Figure 37: Distinct option to return unique values
| Note |
|---|
Enable reconfiguration:
Select the check box checkbox against this option to reconfigure the query, if this option is not checked then the Design tab (which is used to configure the query) will not be visible.
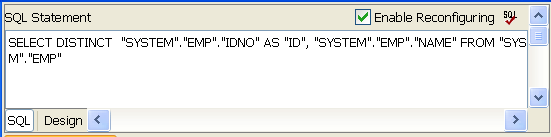
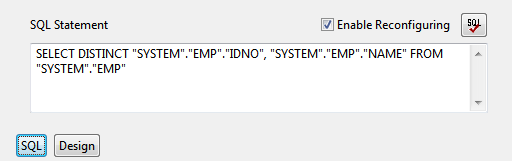
Figure 38: Generated Select Query
- Once this query is configured, generate the input and output parameters by clicking the Generate Parameters button. These generated parameters are used to define the input and output port schema.
- If the query contains any value which should be taken from input XML then the generated parameters are used to define the input and output port schemas.
- Add and Delete buttons are used to add and delete particular parameters from the list. Delete All button used to delete all the parameters from the list. The Output parameter list contains only those columns for which the Output column is checked under Columns tab.
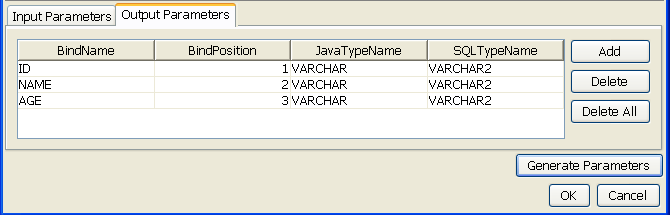
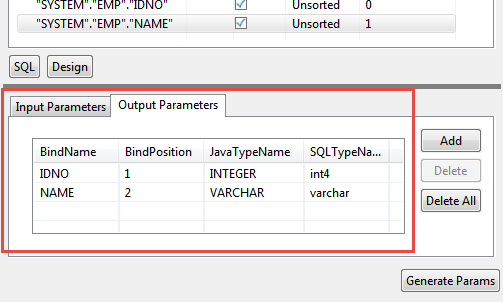
Figure 39: Generated Input/Output Parameters
...
Click Ok to close the dialog.
Select Statement with Filter:
Retrieves data from all columns or from selected columns in a configured database table after applying specified conditions. Condition values can be provided from input XML or as constant values.
- Follow the steps from 1 to 7 as described in the section Simple Select Statement.
- ClickWHERE tab and select a Column name on which WHERE condition has to be applied.

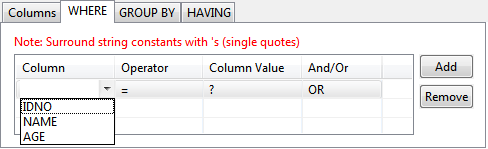
Figure 40: Adding condition on column to WHERE clause
- When selecting multiple columns for WHERE condition, conditions can be combined using AND or OR under And/Or column.

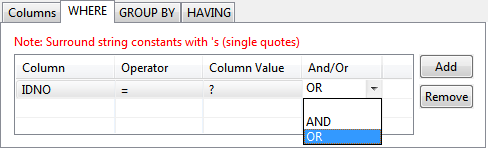
Figure 41: Adding condition on column to WHERE clause
- Operator of choice can be selected from the drop-down list under Operator column.
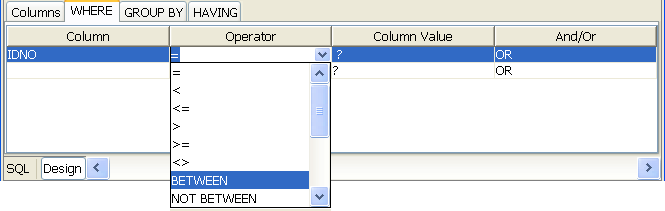
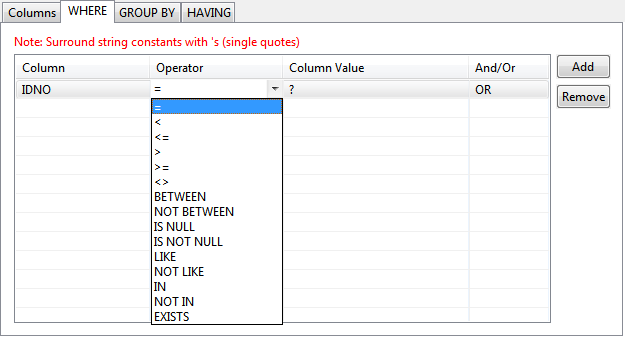
Figure 42: Selecting an operator for a condition
- Constant values can also be set for values in WHERE condition (under WHERE tab).
To specify a constant value for WHERE condition on a column, specify the required value in the Column Value column against the required column name in WHERE tab.
Note - If the value is a string value it should be wrapped in single quotes (' ').
- ? indicates value will be taken from input or from the output of another query where possible.

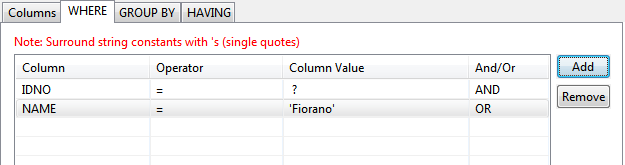
Figure 43: Specifying constant value for a column in SET clause
- To specify WHERE condition on a Column whose value is equal to value defined in another Column, select the required Column from drop-down list in the Column Value against the required column name in WHERE tab.
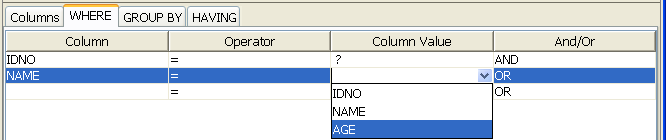
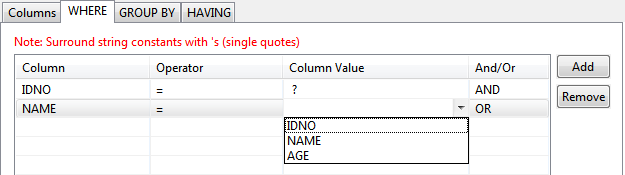
Figure 44: Specifying comparison between columns in condition for WHERE
- To specify WHERE condition on a Column whose value is equal to value defined in another Column, select the required Column from drop-down list in the Column Value against the required column name in WHERE tab.
- Follow the steps from 8 to 10 as described in the section Simple Select Statement.
Select Statement with Sorting:
Retrieves sorted data from all columns or from selected columns in a configured database table. Data is sorted in configured order on columns configured for sorting.
- Follow steps 1 to 7 in the section Simple Select Statement.
To specify columns which have to be sorted, select the appropriate sort order from drop-down list under Order By column in Columns tab. Order By for each columns has one of the following values:
Order By Value
Explanation
Unsorted
Data is not sorted on values in the column, that is, no order by clause
...
willaddedin the SQL statement.
Ascending
Data is sorted in ascending order on values in the column, that is, order by clause will be added in the SQL statement as ORDER BY <column name> ASC.
Descending
Data is sorted in descending order on values in the column, that is, order by clause will be added in the SQL statement as ORDER BY <column name> DESC.
Default
Data is sorted in default order for order by clause on values in the column, that is, order by clause will be added in the SQL statement as ORDER BY <column name>.
...
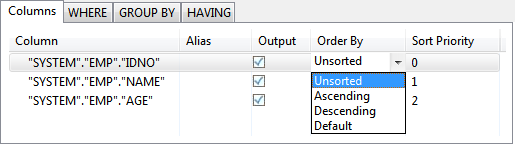
Figure 45: Selecting sorting order for columnWhen multiple columns have to be sorted, sorting priority for each column can be set under Sort Priority. Columns are sorted in order of increasing Sort Priority that is column with minimum value for Sort Priority is order first.
...

Figure 46: SQL Statement with different columns sorted in different orderTip When values of Sort Priority for multiple columns are same, columns are sorted in the order in which they appear in select clause.
- Follow the steps from 8 to 10 as described in the section Simple Select Statement.
Select Statement with Grouping:
Retrieves data, after applying grouping conditions, from all columns or from selected columns in a configured database table.
...
- Follow steps 1 to 7 in the section Simple Select Statement.
- Click GROUP BY tab and check under Select against the columns under Group By on which group by condition should be applied.
...
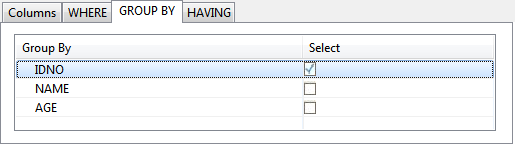
Figure 47: Selecting columns for grouping condition- To filter the results click HAVING tab and define required conditions. HAVING tab has functionality similar to WHERE tab (described in Select Statement with filter).
...
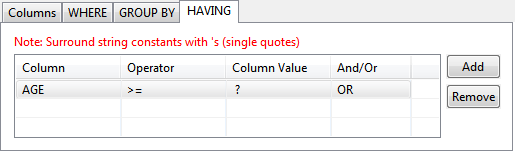
Figure 48: Adding condition to HAVING clause- Select required columns under Tables.
...
Figure 49: Selecting required columns- Now generate the input and output parameters as described in step 9 in section Simple Select Statement.
Edit the Select statement is which was shown in the text editor under SQL Statement in SQL tab.
Note Editing Select and HAVING clauses should be last action before closing the dialog.
...
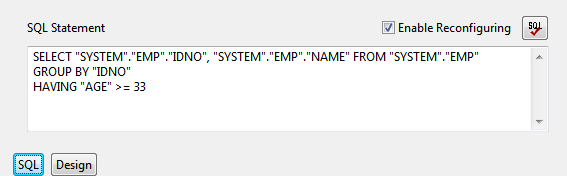
Figure 50: Generated SQL Select Query- Click the Ok button to close the dialog box.
Select Statement with Multiple Tables
Retrieves data from all columns or from selected columns from multiple configured database tables. Currently retrieving data from more than one table is not supported.
Date Time Format
Date time format to be used when any of the input parameters represent Date/Time-Stamp data types.
| Note |
|---|
If this value is empty, then mm/dd/yyyy will be used as the default format. |
Single Batch Mode
This option determines whether the component should send entire result send entire result of a query as a single message or as multiple messages.
...
Complete result of the query from input request is sent out as a single message. If the result set returned is huge then the component can run into memory problems and stop. When this value is selected, property property Batch Size is is hidden.
- no
Result of query from input is Result of query from input is split and sent out as multiple messages. Number of rows from result to from result to be included in each output message is determined by property property Batch Size. When this value is selected, property property Batch Size is is shown.
Example: If If a query returns 100 rows, and the batch size is set to 10 then 10 outputs will be generated each contains 10 rows.
Batch Size
This property is visible when the value of property property Single Batch Mode is set as yes is disabled. The property determines the number of units of result an output message contains.
Each row in a result set (typically result of a select query) or an update result (result of updateresult of update, delete, insert operations) is treated as unit of resultas unit of result.
Example:
Consider a stored procedure that returns a result of select query of select query followed by three update queries and another select query. Assume first select return 18 rows and second query returns 11 rows. If If Single Batch Mode is is set as no and and Batch Size is is set as 10 then there will be four output messages.
- first message: first ten rows from first query
- second message: remaining 8 rows from first query from the first query and two update query resultsquery results
- third message: third update query result and first nine rows of second select query
- fourth message: remaining two rows from second query.from the second query.
Validate Input
If this property is enabled, it validates the input request with the input port XSD.
Refer to the Validate Input section under the Common Configurations page.
Cleanup resources (excluding connection) after each document
This closes all the resources except for the connection used by the microservice after every request. If the less processing time is more important the less memory usage, then it is recommended to disable this property and vice versa.
For more details, refer to the respective section under in the Common Configurations page.
Target Namespace
Refer to the Target Namespace section under the Common Configurations page.
Monitoring Configuration
Please refer to the Monitoring Configuration section in Common Configurations page.
Elements to Decrypt
Select elements to decrypt in the Input Message.
Refer to the Encrypt Decrypt Configuration section in the Common Configurations page for details.
Elements to Encrypt
Select elements to encrypt in the Output Message.
Refer to the Encrypt Decrypt Configuration section in the Common Configurations page for details.
| Anchor | ||||
|---|---|---|---|---|
|
| Anchor | ||||
|---|---|---|---|---|
|
| Anchor | ||||
|---|---|---|---|---|
|
The input of the component varies with the kind of query configuration. If the query has input parameters which have to be provided dynamically, these parameters will be included in the input schema of the component if Generate Parameters button is clicked after configuring SQL.
| Anchor | ||||
|---|---|---|---|---|
|
| Anchor | ||||
|---|---|---|---|---|
|
| Anchor | ||||
|---|---|---|---|---|
|
In case of select query, the input parameters that have to be provided will be added as child elements to the SELECT element. When the query is as shown in Sample Query 1, the input schema will contain the parameters which have to be provided for the query as shown in the Figure 51.
![]()
Sample Query 1, Select with Where and Having clauses

Figure 51: Input schema – Sample Query 1
| Anchor | ||||
|---|---|---|---|---|
|
| Anchor | ||||
|---|---|---|---|---|
|
| Anchor | ||||
|---|---|---|---|---|
|
In case of insert query, the input parameters that have to be provided will be added as child elements to the INSERT element present in the input port schema of the component. The input schema corresponding to Sample Query 2 is as shown in the Figure 53.
![]()
Figure 52: Sample Query Simple Insert

Figure 53: Input Schema – Sample Query 2
| Anchor | ||||
|---|---|---|---|---|
|
| Anchor | ||||
|---|---|---|---|---|
|
| Anchor | ||||
|---|---|---|---|---|
|
In case of update query, the input parameters that have to be provided will be added as child elements to the UPDATE element present in the input port schema of the component. The input schema corresponding to Sample Query 3 is as shown in the Figure 55.
...
![]()
Figure 55: Input Schema – Sample Query 3
| Anchor | ||||
|---|---|---|---|---|
|
| Anchor | ||||
|---|---|---|---|---|
|
| Anchor | ||||
|---|---|---|---|---|
|
In case of update query, the input parameters that have to be provided will be added as child elements to the DELETE element present in the input port schema of the component. The input schema corresponding to Sample Query 4 is as shown in the Figure 57.
...
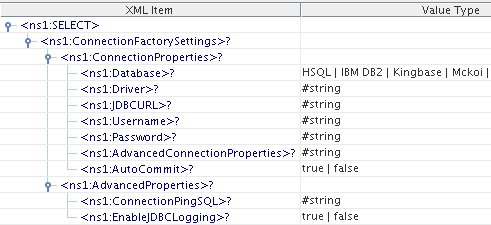
Figure 58: Input schema with ConnectionFactorySettings
| Anchor | ||||
|---|---|---|---|---|
|
| Anchor | ||||
|---|---|---|---|---|
|
| Anchor | ||||
|---|---|---|---|---|
|
The output schema is auto generated based on the configuration provided. An element Result will be used to represent the result of the query configured. In case of SELECT query, an element Row with zero-many cardinality will be added to this element. Each Row element represents a single entry in the result set obtained. If Generate Parameters button is clicked after configuring SQL different elements corresponding to columns in the result set will be added as child elements to the row elements. The sample output for the Sample Query 1 is as shown in Figure 58.

Figure 58: Output Schema – Sample Query 1
In case of UPDATE, DELETE, INSERT statements an element UpdateCount will be added as child to the Result element which holds the number of rows updated as a result of execution of the query. The output schema for queries 2, 3 and 4 is as shown in Figure 59.
![]()
Figure 59: Output Schema – Sample Queries 2,3,4
Date Time Format
Date time format to be used when any of the input parameters represent Date/Time-Stamp data types.
| Note |
|---|
If this value is empty, then mm/dd/yyyy will be used as the default format. |
Single Batch Mode
This option determines whether the component should send entire result of a query as a single message or as multiple messages.
- yes
Complete result of the query from input request is sent out as a single message. If the result set returned is huge then the component can run into memory problems and stop. When this value is selected, property Batch Size is hidden.
- no
Result of query from input is split and sent out as multiple messages. Number of rows from result to be included in each output message is determined by property Batch Size. When this value is selected, property Batch Size is shown.
Example: If a query returns 100 rows, and the batch size is set to 10 then 10 outputs will be generated each contains 10 rows.
Batch Size
This property is visible when the value of property Single Batch Mode is disabled. The property determines the number of units of result an output message contains.
Each row in a result set (typically result of a select query) or an update result (result of update, delete, insert operations) is treated as unit of result.
Example:
Consider a stored procedure that returns a result of select query followed by three update queries and another select query. Assume first select return 18 rows and second query returns 11 rows. If Single Batch Mode is set as no and Batch Size is set as 10 then there will be four output messages.
- first message: first ten rows from first query
- second message: remaining 8 rows from the first query and two update query results
- third message: third update query result and first nine rows of second select query
- fourth message: remaining two rows from the second query.
| Anchor | ||||
|---|---|---|---|---|
|
| Anchor | ||||
|---|---|---|---|---|
|
| Anchor | ||||
|---|---|---|---|---|
|
| Anchor | ||||
|---|---|---|---|---|
|
| Anchor | ||||
|---|---|---|---|---|
|
| Anchor | ||||
|---|---|---|---|---|
|
Execution of a select query
Start mckoiDB present at %FIORANO_HOME%\esb\samples\mckoiDB by executing CreateMckoiDB.bat and RunMckoi.bat. Configure the DBQuery component as shown in Figure 2 and configure a select statement as described in Simple Select Statement section. Use feeder and display components (shown in Figure 60) to create a flow to send sample input and check the response respectively. DBQuery component configures to a select query. As shown in sample input (Figure 61) DBQuery takes the CUSTOMER column value and returns that particular row. The selected row will be organized as XML and it will be returned to the output port as shown in sample output (Figure 62).
...