...
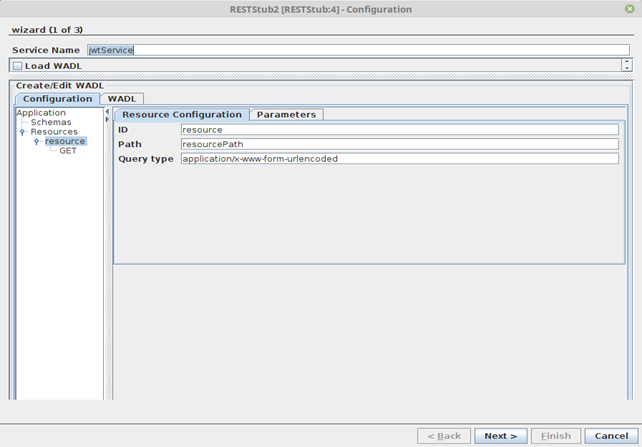
A resource logically represents an entity whose operations have to be exposed using the RESTful service. It may optionally be used to specify just a path segment for a child URL with no methods defined on the resource itself.

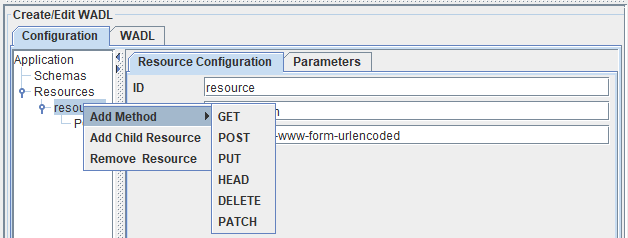
Figure 6: Adding child resources and methods
- Add Method: Operations such as GET, POST, PUT, HEAD, DELETE and DELETE PATCH can be added by selecting the option Add Method as shown in the figure above.
- Add child Resource: A resource can be added to a resource element by clicking the option Add Child Resource.
...
Password
Password to be used by the RESTStub component while deploying the Web Service. If this password is not present in Realm.properties file the component will not launch.Using Basic Authentication
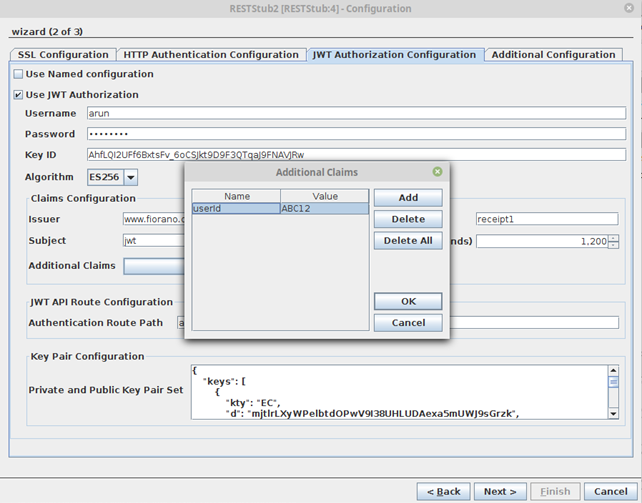
JWT Authorization Configuration
Enable the Use JWT Authorization option and provide the credentials, Key ID, etc.
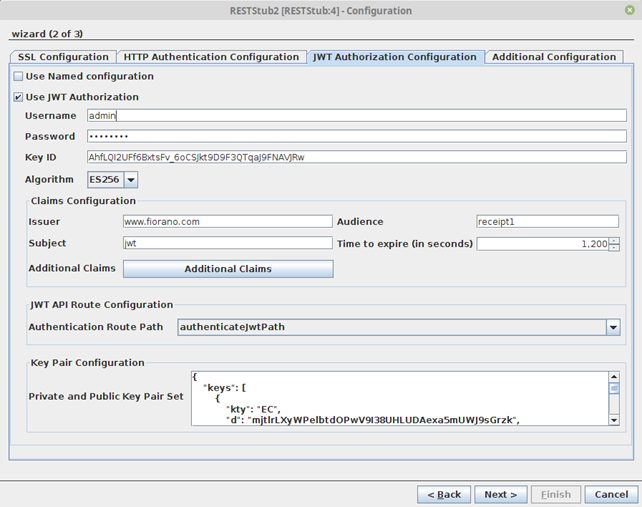
Figure 20: JWT Authorization Configuration properties
Use JWT Autherization
Enable JWT Authorization for all routes
- Username: Username to be used by the RESTStub component for verifying username in JWT token issue requests
- Password: Password to be used by the RESTStub component for verifying password in JWT token issue requests
- Key ID: The KID field as present in the public and private key pair set
Claims Confguration
The claims which will be present as key value pairs inside the JWT token
- Issuer: Refers to the servimauthority issuing the JWT token
- Audience: Refers to the audience intended for the JWT token
- Subject: Simple subject to be embedded in the JWT token
- Time to expire (in seconds): The time in seconds which would be taken for token expiry. Token issue time = time to expire = Token expiry time
- Additional Claims: Additional claims which can be customized for specific use cases as key-value pairs.
JWT API Route Configuration
The route configured in the Resource Configuraion panel which would be responsible for token authentication and token issue.
Key Pair Configuration
Private and Public Key Pair Set. Public and Private Key pairs in JWK format
| Tip |
|---|
Refer to the Configuring JWT Authentication in RESTStub section for the entire configuration steps for the JWT Authorization to work. |
| Anchor | ||||
|---|---|---|---|---|
|
This panel helps to enable usage of API keys.

Figure 20
Figure 21: Additional Configuration to enable API Keys usage
Use API Keys
Enable this property to support API keys authorization
...
Validates the parameter URL. This property is in the enabled state by default.
File Directory
This option is applicable only when the method is set to "POST", the media type is set to "multipart/form-data" and the request content is of File type. When the request content is of file type, the file specified in the request will be uploaded to the directory mentioned in the File Directory field.
Append TimeStamp
Enable append timestamp option to append a timestamp to the filename that is uploaded to the file directory.
TimeStamp format
Specify the timestamp format that is to be appended with the filename.
Enabling Basic Authentication
...
- Stop the FPS Server if it is running.
- Open FPS profile in Fiorano Studio and navigate to FPS > Fiorano > Esb > Jetty.
- Select the Jetty mbean.
In the Properties of Jetty window, enable the BasicAuthSupported property and give the fully qualified path of Realm.properties file as the RealmProperties property.
Tip More information on Realms and Realm.properties file content are discussed in the next section.
- Save the profile.

Figure 2122: Enabling Basic Authentication in FPS Jetty server
...
- admin: admin,admin
- user: password,user
- guest: guest,read-only
| Tip | |||||
|---|---|---|---|---|---|
| |||||
In a scenario where a few REST services such as service1, service2 and service3 are running on the same peer, if the services - service1 and service2 have to be protected, whereas service3 has to be non-protected, change the "url-pattern" as "services/service_name/*" in the web.xml file at %FIORANO_HOME%esb\server\jetty\fps\webapps\restgateway\WEB-INF.
|
Miscellaneous Configuration
| Anchor | ||||
|---|---|---|---|---|
|
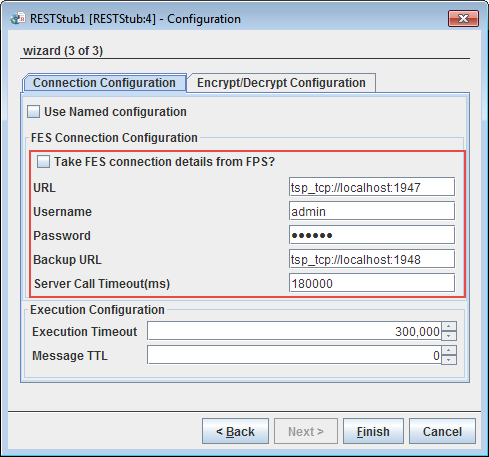
Figure 2223: FES Connection Configuration properties
...
Execution Configuration

Figure 2324: Execution Configuration
Execution Timeout
...
Enable the checkbox under the Encrypt/Decrypt Configuration tab to encrypt the messages received/sent at/to the selected port.
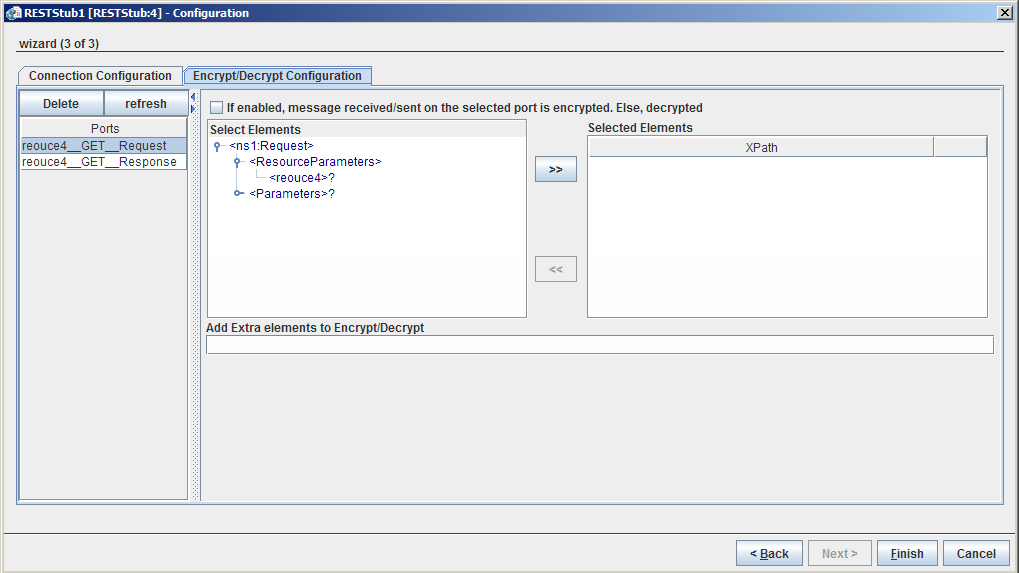
Figure 2425: Execution Configuration
Please refer Encrypt Decrypt Configuration section in Common Configurations page.
Port Generation
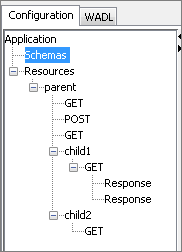
Figure 2526: Sample Configuration
A request port and response port are generated for each method configured in the component with suffixes __Request and __Response respectively. The prefix of the port name will be the complete ID of the resource computed (as described in the "Resource" section) followed by the method name.
If a resource has multiple methods with the same name (two GET methods) then the method ID has to be specified for at least one of those methods. The method ID will be appended to the port name prefix to differentiate between these methods. For the sample configuration defined in Figure 23, the ports will be generated as shown in the Figure 24.
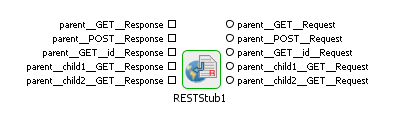
Figure 2627: Port Generation
Schema Generation
...
If there are any query parameters other than those specified in the configuration for the method, these parameters are added as part of the Parameters element.
For the sample configuration shown in Figure 23, the schema generated for port parent __POST_Request is as in Figure 25.
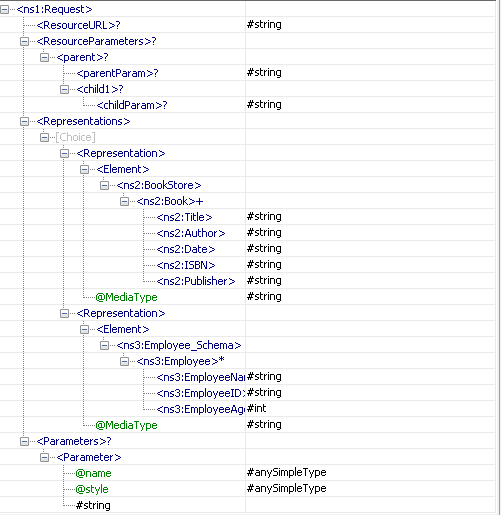
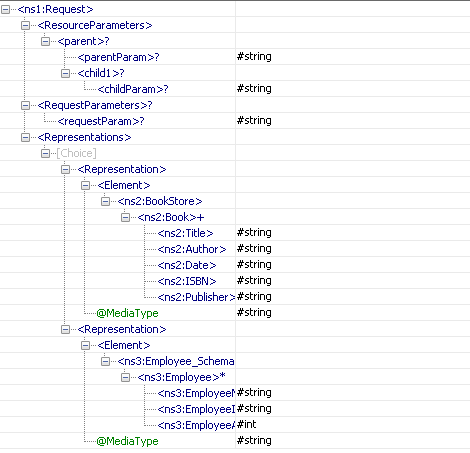
Figure 2728: Schema of port parent __POST_Request
...
For the sample configuration shown in Figure 23, the schema generated for port parent_child1_GET_Response is as in Figure 26.
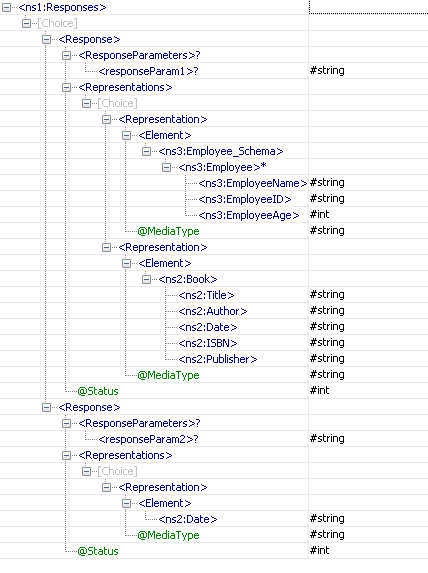
Figure 2829: Schema of port parent_child1_GET_Response
...
| Note |
|---|
These scenarios involve the RESTConsumer microservice as well, which works in conjunction with RESTStub. Refer to the RESTConsumer documentation to configure and run the event processes. |
Configuring JWT Authentication in RESTStub
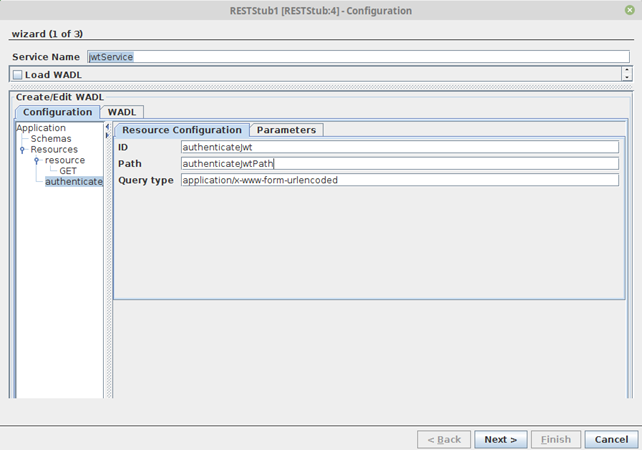
- Open RESTstub CPS and provide the component service name in the Service Name property.
For JWT Authentication in RestStub, there needs to be one mandatory route for authenticating credentials and issuing JWT token.
Add a new resource with resource ID “authenticateJwt” and resource Path “authenticateJwtPath” which will be the token authentication and the token issue route to imply that both the token authentication and issue are handled by the same route "authenticateJwtPath".
Note When the JWT option is enabled in the subsequent wizard panel, the other resources apart from the JWT Authentication resource will by default expect a JWT token in the header in the RFC6750 format “Bearer”.
Add POST request to the authenticateJwt resource and navigate to Method Configuration > Request Configuration. Add a new representation and select the Media Type ‘application/json’.
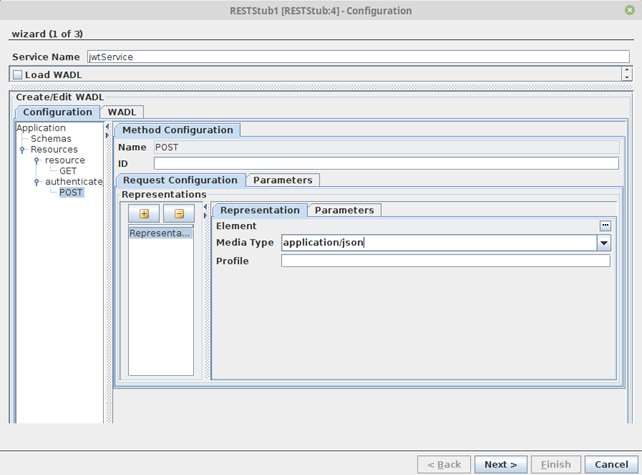
Note Currently, RestStub only supports JSON input as credentials payload for JWT authentication.
- Navigate to the JWT Authorization Configuration tab and enable the Use JWT Authorization option.
Key ID is to be entered as it is entered in the “Private and public key pair set” KID field.
Warning This is mandatory to ensure ‘KIDs’ match.

Note Public and private keys are expected as key pair set in JWK format.
Tip Sample JWK Key pair set for testing is available at: https://mkjwk.org/
- Additional Claims can be added to have custom key-value pairs in the JWT token apart from those in the Claims Configuration.
- Complete the CPS wizard upon configuration.
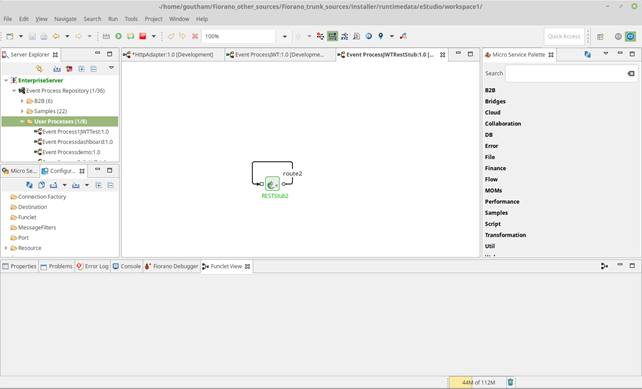
- Perform Route Transformations and run the event process after JWT configuration is complete.
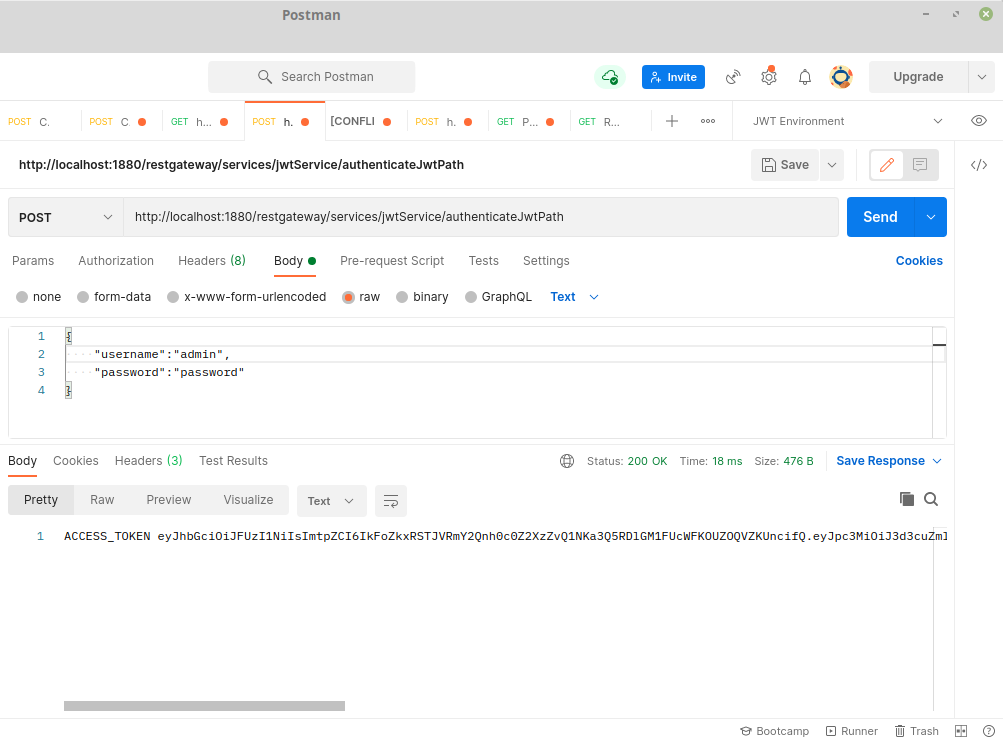
- Send a REST request by copying the JWT resource WADL URL of the RestStub and enter the authentication credentials in the Body payload (in the Postman app used for this example).
- Upon successful request, the response returns an “ACCESS_TOKEN” in the response body.
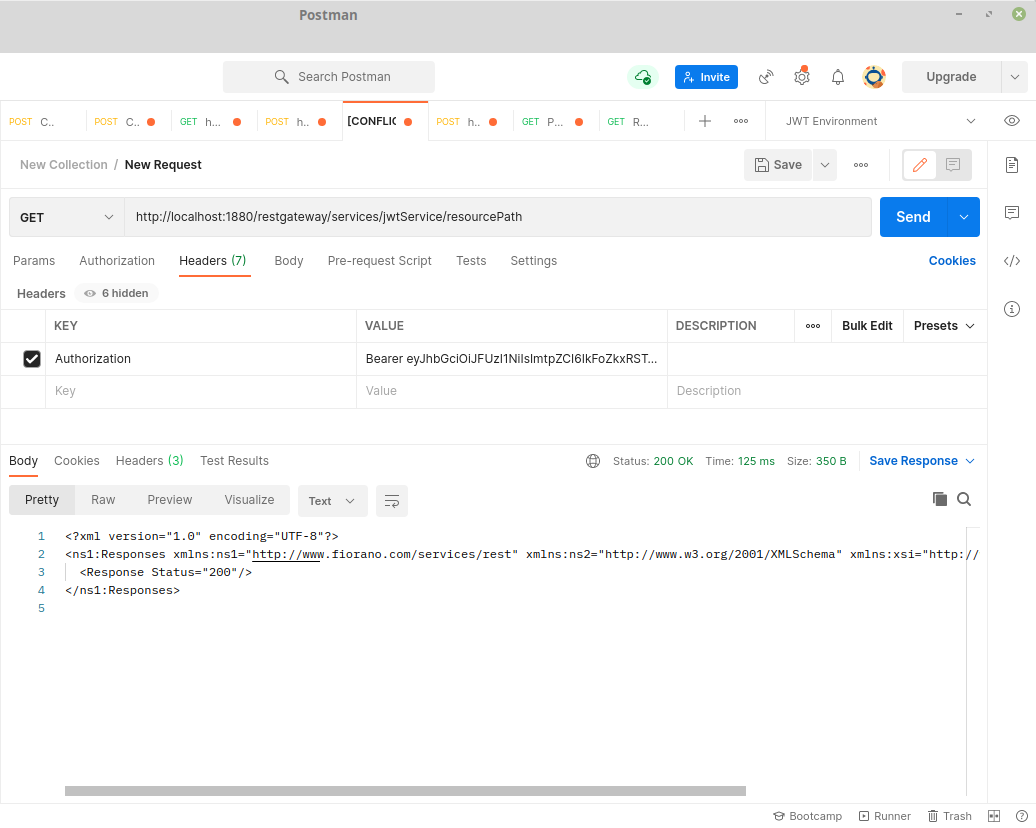
- Now the other routes will by default require an Authorization Header in RFC6750 format with Bearer token accessed in the step above. On successful request the response is returned.
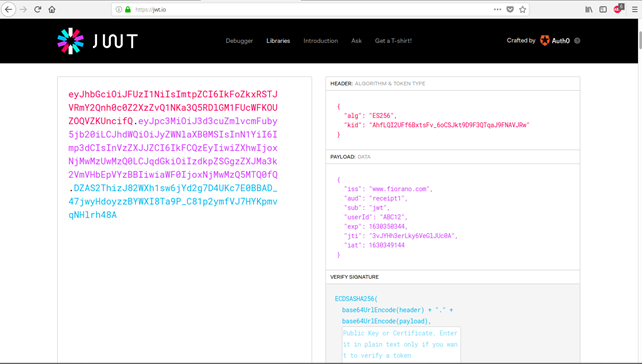
- The JWT token can be analyzed by decoding to observe the claims and additional claims as configured in the CPS.
Useful Tips
- For SSL to work properly the JDK version used should be greater than 1.5.0_08 and the jars present in JDK_HOME/jre/lib/ext should be copied to $FIORANO_HOME/esb/lib/ext.
- When RESTStub component is configured to launch on HA (High Availability) Peer Servers
- If both Primary and Secondary Servers are on the same machine:
Initially, if RESTStub is launched on the Primary Server, the generated WADL URL contains Primary Server's jetty port number. In case of Primary Server failover, the Secondary Server becomes Active and relaunches the component. WADL will be regenerated and if the Secondary Server uses a different jetty port then the WADL URL is changed. The clients have to be reconfigured to use new URL in this case.
To avoid this situation, it is recommended to use the same jetty ports for both Primary and Secondary Peer Servers.
Jetty service will be started only after the server is started successfully. In case of HA, only one server will be active at a given time and the Jetty Server will be running only in the active server and there will be no bind exceptions even if both the servers use the same port number for Jetty.
- If both Primary and Secondary Servers are on the same machine:
...
- The service name must be unique for RESTStub instances configured on the same peer server.
- Headers received by the component are sent out as JMS properties with http_ prefixed to their name.
- The component acts as a helper to expose an event process as a RESTful service. The developer of an event process will have to take care that the functionality is exposed as per the guidelines of REST architecture.
- When the content type of request is application/octet-stream the content is sent as bytes content in the message, this will be present as bytes property. This can be retrieved as Base 64 encoded string in mapper using the funclet Byte-Content in JMS Message funclets.
| Tip |
|---|
Refer to the REST HelloWorld section to go through a simple example using the RESTStub service. Another example named REST Attachments illustrates advanced functionalities. |