| Expandpanel | ||||||
|---|---|---|---|---|---|---|
| ||||||
|
Working with a Use Case Scenario
Demonstrate the usage of receiving messages over AS2 Protocol from Remote Partner.Working with a Use Case Scenario
To do this, below the following activities need to be performed:
...
Above steps are explained in detail in the following sections below.
| Note |
|---|
Fiorano B2B is completely dependent on Fiorano Suite. Prior knowledge of Configuring Event processes (which is done in the later sections of this document) and services is required for B2B tool usage. |
...
To add Host, perform the following actions:
- Click the Add
 button present on the Add Trading Parties tab in the Navigation Panel and click the Add button in the Trading parties page.
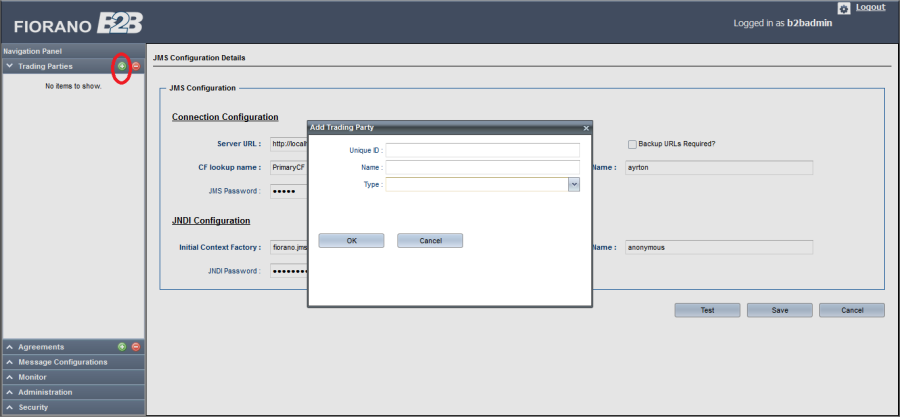
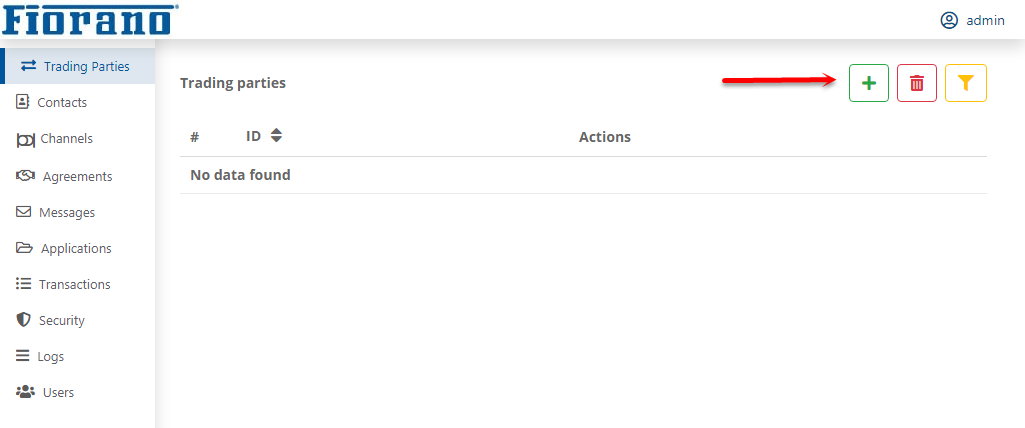
Figure 1: JMS Configuration Trading parties screen
- In the Add Trading Partytrading party dialog box, provide preferred data unique names in the fields: Unique Trading party ID and Name, and select 'Host' from the Type drop-down.
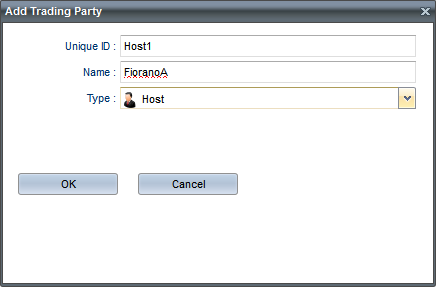
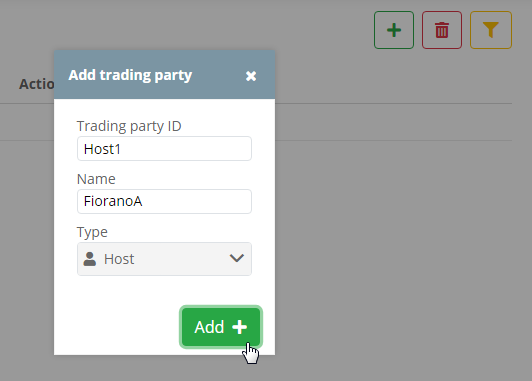
Figure 2: Entering Host Trading Party details
Click
OK to navigate to Contacts page.
...
In the Contacts page, the Name and Type fields will be auto-populated as entered while adding Host. Fill-in rest of the the contact details in General Info section under the Basic tab.
| Note |
|---|
To save additional contact information, if required, click the Add |
...
Add to add the Trading party entry to the Trading Parties list and add contact information, address, other contacts, and channels.
Note In order to add channels and contacts, these data need to be entered using the respective tabs (right below the Trading Parties tab) in the left navigation panel so that those details populate in the corresponding drop-downs in the Trading Parties page.
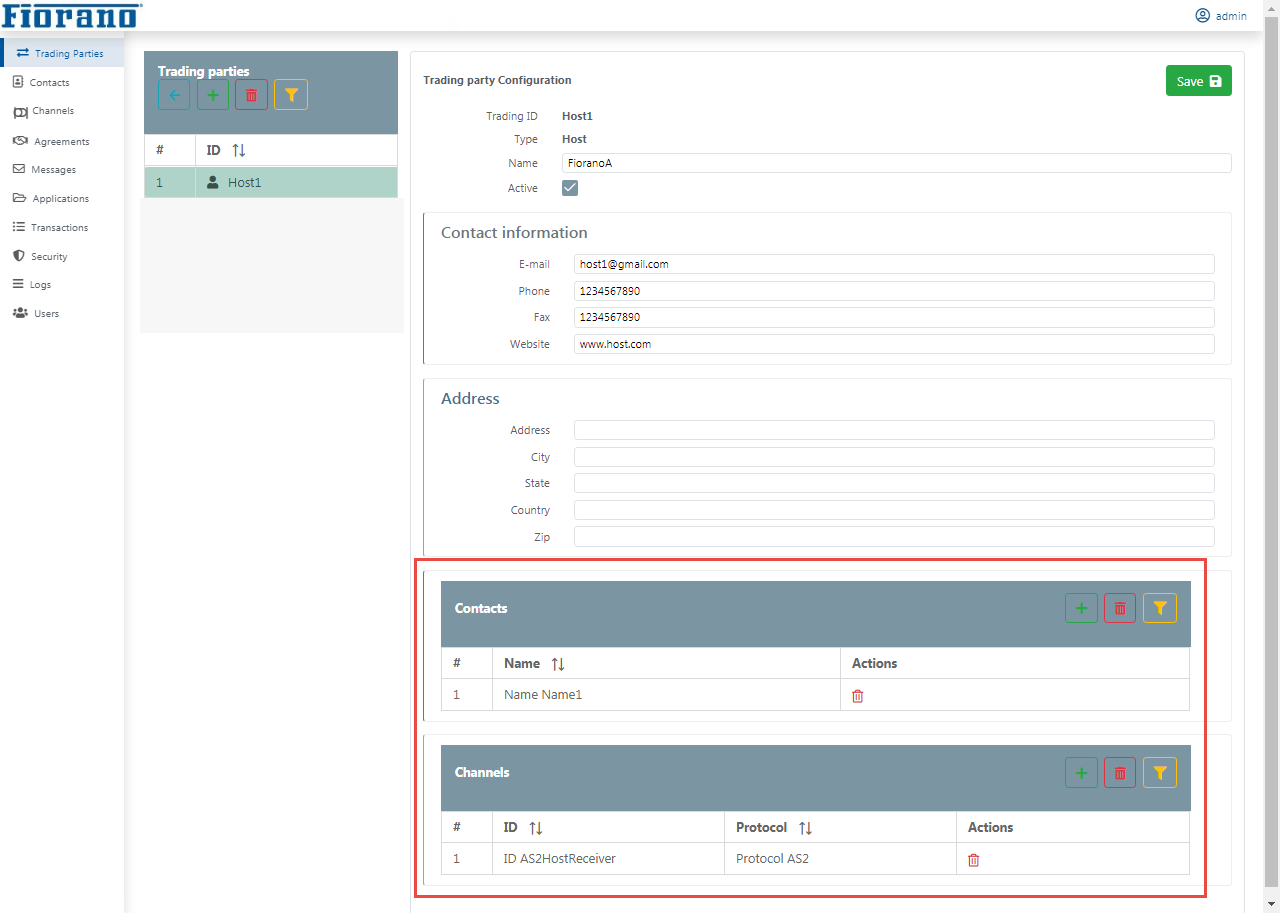
Figure 3: Host Trading Party details with contact details and channel details addedTip Refer to the sections below (Add Host Contact details and Add Host channel) to know how to add contact and channel details
- Click the Save button to save the Trading Party configuration; a notification appears as a confirmation of the Host trading party details added
...
...

Figure 4: Confirmation message saying that the Trading Party details are
...
- updated
| Anchor | ||||
|---|---|---|---|---|
|
- Click the Contacts tab and click the Add button in the Contacts page.
- Add contact details in the Add contact dialog box and click the Add button to add them to the Contacts list.
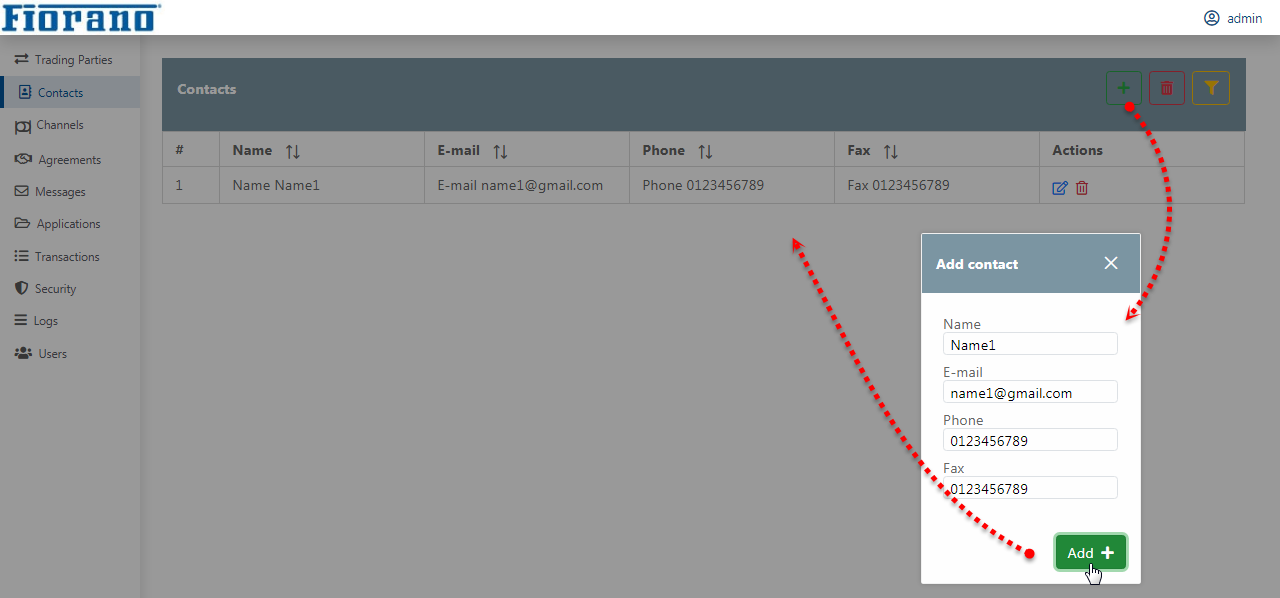
Figure 5: Contacts section
| Anchor | ||||
|---|---|---|---|---|
|
- Click the Channels tab and click the Add button Add button in the Channels section.
In the Add Channel Add channel dialog box, add a unique ID in the Channel ID field field and select select the desired protocol from the Protocol drop-down.
Info For illustration purpose, 'AS2' is being used here.
- Click OK to configure AS2 channel.
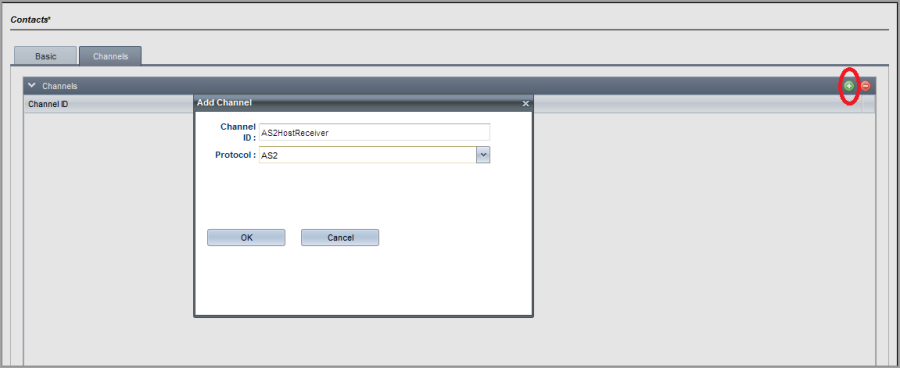
Figure 5: Adding host channel
(AS2 is used here) from the Protocol drop-down with Trading party type as "Host".

Figure 6: Entering Host Channel detailsClick Add in the dialog box to configure the AS2 channel.
| Anchor | ||||
|---|---|---|---|---|
|
...
Configure Host Protocol Channel
Fill-in the mandatory fields in the Protocol Parameters section, that is, under Connection Configuration.
- Provide the IP address of the host in the Host field and an available port which that is not in use in the Port field and a name in Context Namename.
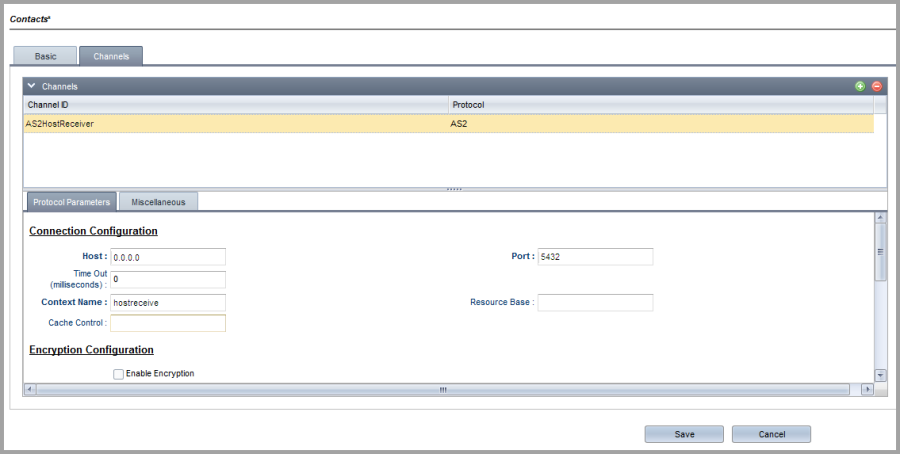
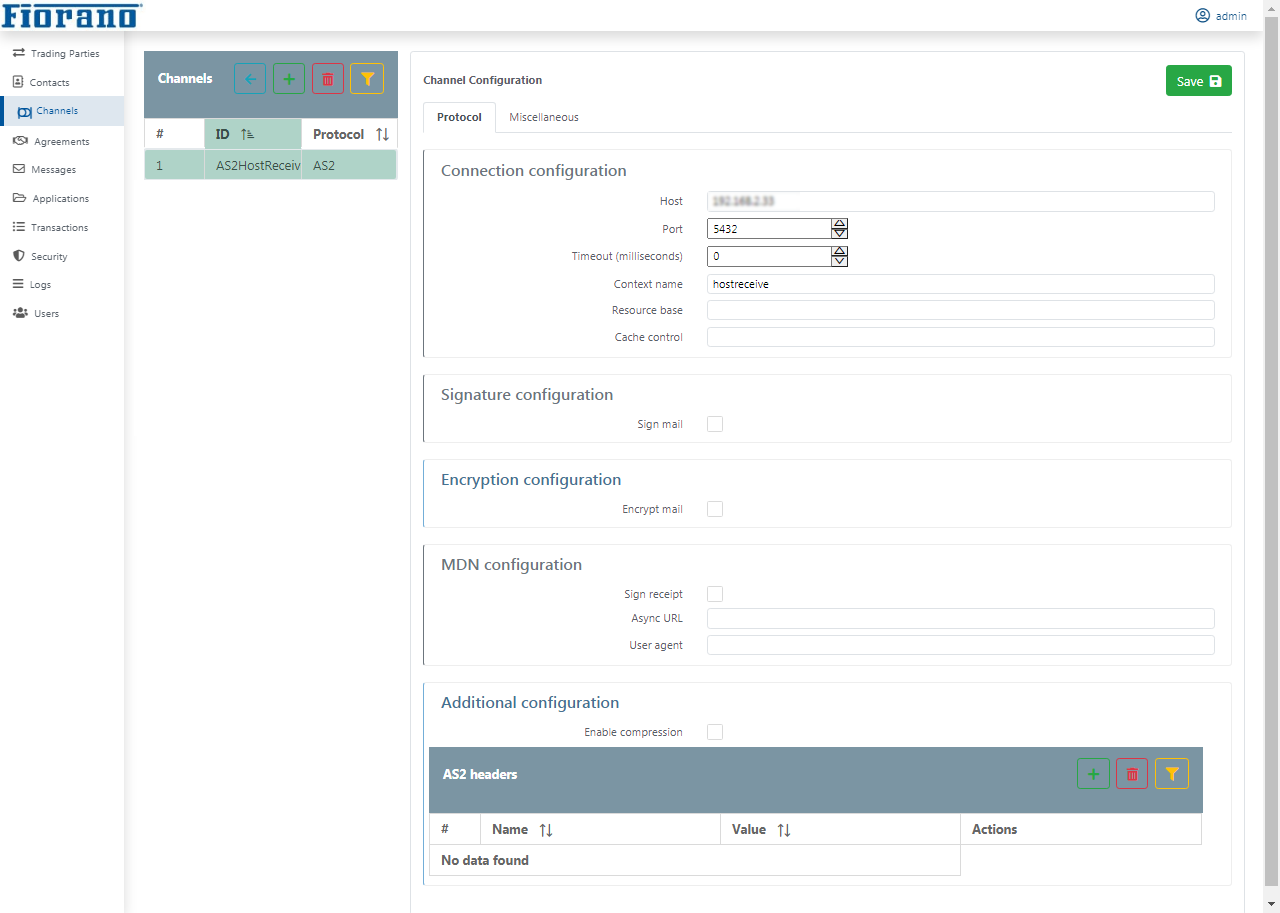
Figure 67: Configuring AS2 channel protocol
- Click the Save button in the Contacts page to save both the basic and channel protocol details in the database to save the channel protocol details.
| Anchor | ||||
|---|---|---|---|---|
|
...
Adding Receive Agreements for receiving documents
Business Agreements define the contract between the host and the remote trading party to send or receive documents using a specific channel (protocol). They can be used to monitor and manage the interactions with partners and also define a time period for the interaction after which the agreement will become inactive.
...
| Anchor | ||||
|---|---|---|---|---|
|
- Click the Add button Agreements tab in the Navigation Panel and click the Add button present on the Agreements tab in Navigation Panel.
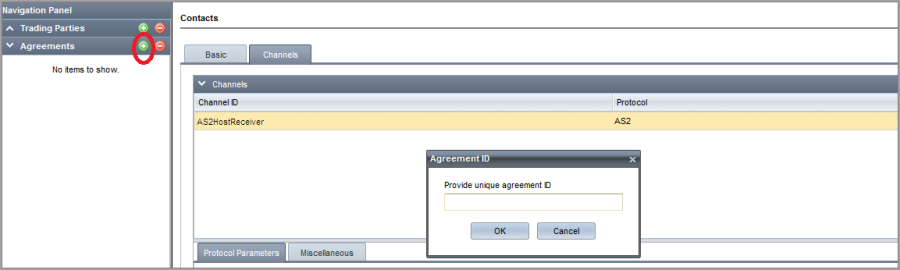
Figure 7: Adding Receive Agreement
In Agreement ID dialog the Agreements page. - In the Add Agreement dialog box, provide a unique ID and click OKclick Add.
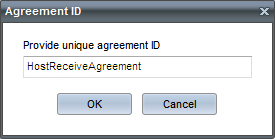
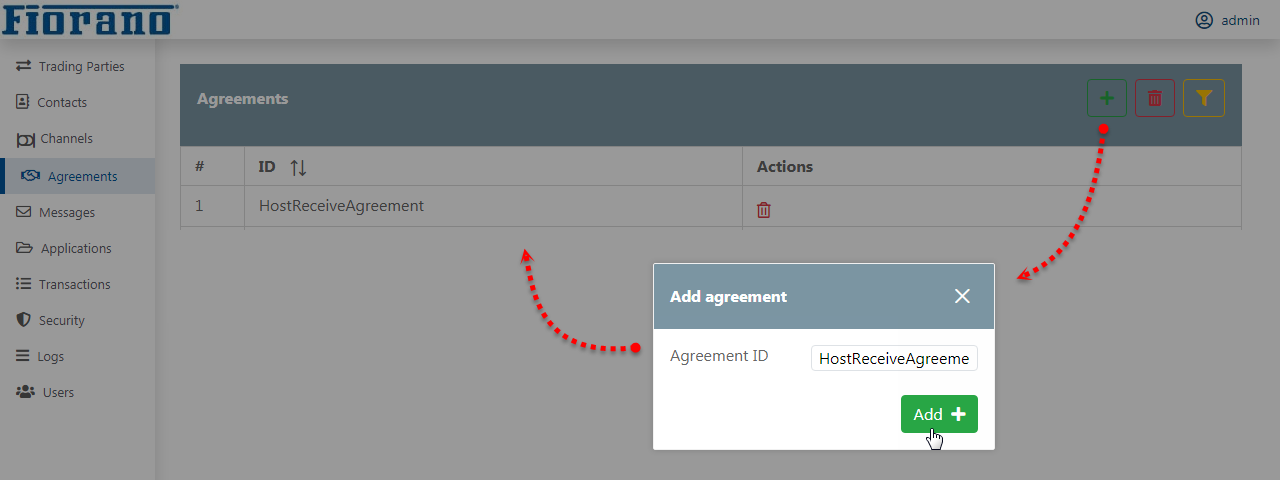
Figure 8: Providing Agreement Adding Receive Agreement providing a unique Agreement ID
| Anchor | ||||
|---|---|---|---|---|
|
Perform the following actions in on the Business Agreements page:
- Select host and host channel , which were added earlier, from the respective drop-downs where data will be pre-populated in the Host and Channel drop-downs respectivelywith the data added earlier.
- Provide Start Date and End Date of the agreement to create a timeline for the agreement.
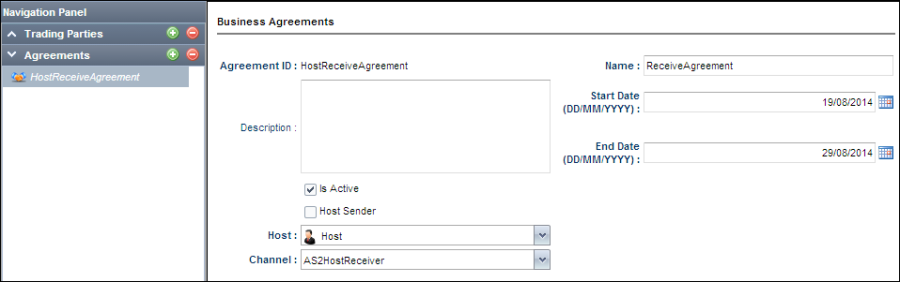
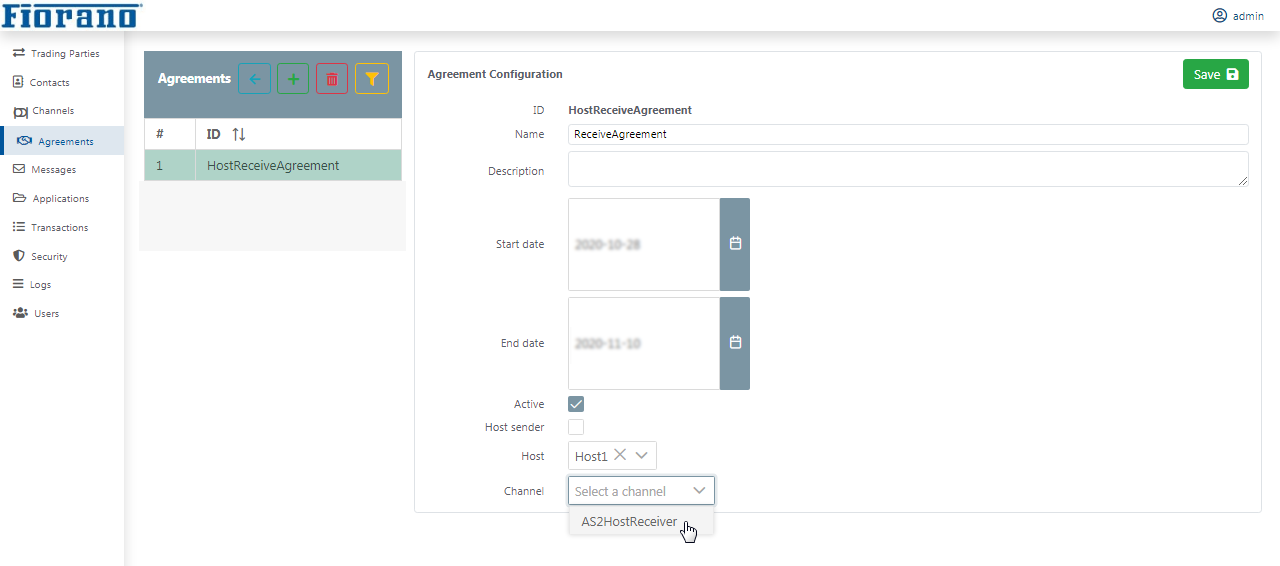
Figure 9: Configuring ReceiveAgreement
| Tip |
|---|
The Is Active check box can be used to activate/deactivate an agreement as per business requirements. |
| Anchor | ||||
|---|---|---|---|---|
|
| Anchor | ||||
|---|---|---|---|---|
|
...
Adding Message Type and Message Type Bindings
Message Configurations enable to configure different messages which are communicated by the organization.
...
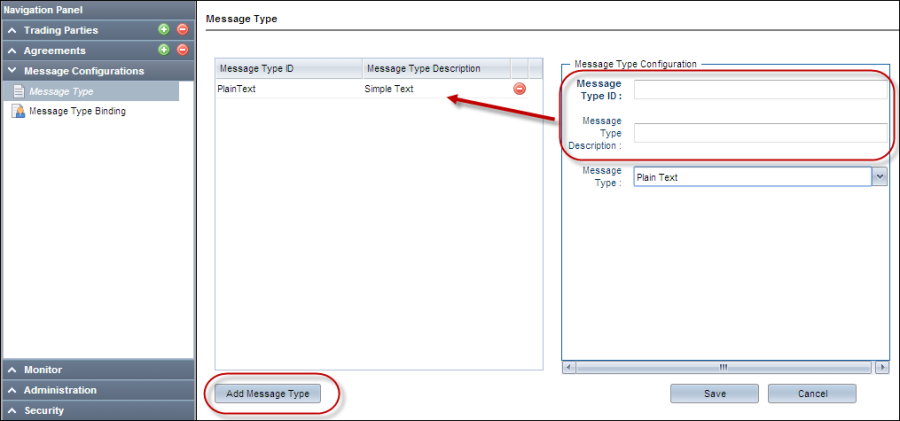
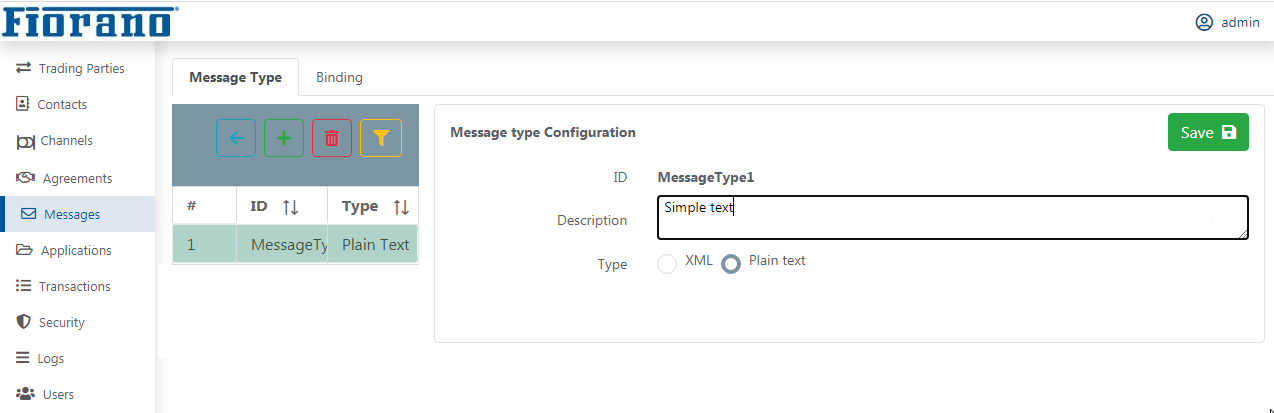
You need to specify the type of the message that is transmitted. 'XML' and 'Plain Text' messages are the Message Types that is presently supported by Fiorano B2B. To configure Message Type, perform the following actions:
- In the Navigation Panelleft navigation panel, click Message Configuration tabthe Messages tab, and then click the Message Type tab.
- Click Add In the Message Type button to add Message Type configuration and define the format of the message exchanged between the parties section, click the Add button.
- Provide a unique Message Type ID and Description and then choose the Message type ID in the Add message type dialogbox and click the Add button.
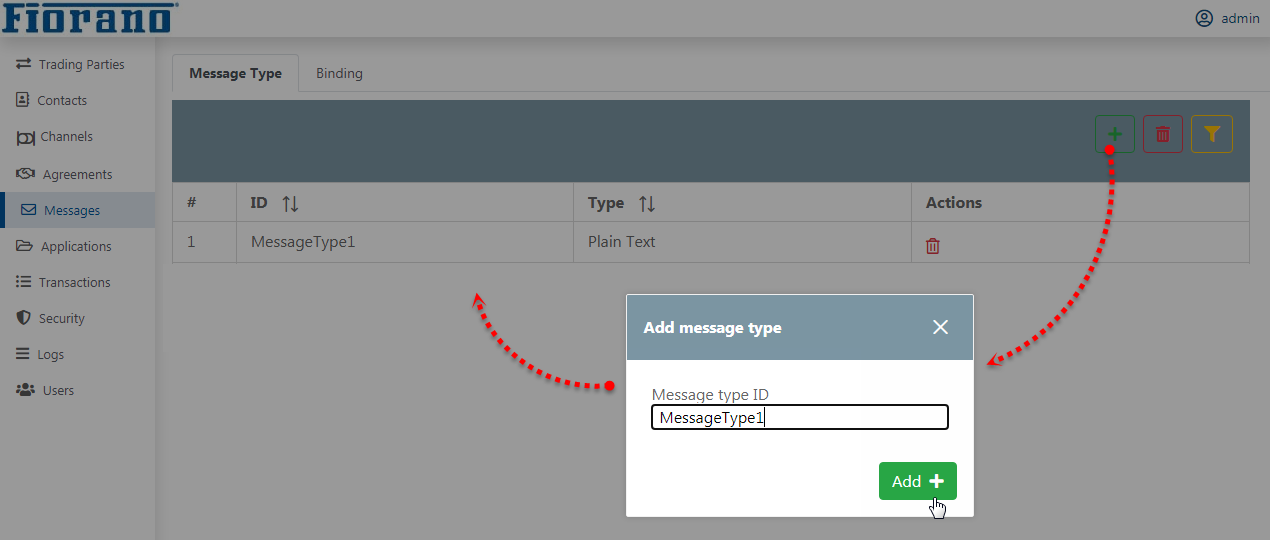
Figure 10: Adding Message type - Choose the Message type from the following options: Plain Text and XML to define the format of the message exchanged between the parties.
- Plain text
Figure
- 11: Configuring Message Type page
XML: If the message type is 'XML', then click the Load
- Plain text
...
from file button
...
and browse for the Schema file or paste the content in the
...
XML Schema text editor. Select the root element
...

Figure 11: Message Type Configuration
by clicking the
...
Select root Element button.
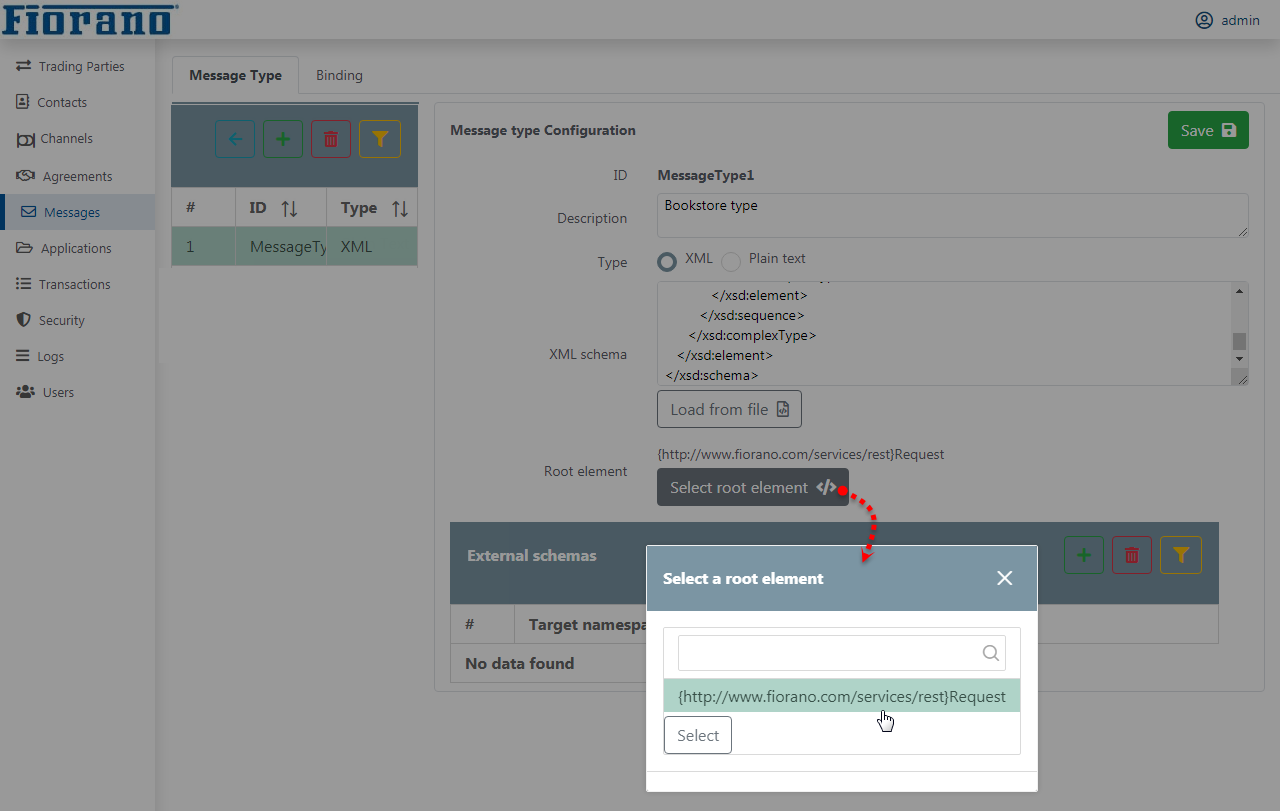
Figure 12: Message Type configuration for XML typeInfo External Schemas can be added, if necessary, by clicking on
...
the Add
...
Add button in the External schemas section.
- Click the Save button in the Message Type page to save the Message Type configuration
...
| Anchor | ||||
|---|---|---|---|---|
|
Message Type Bindings has have to be defined to associate a particular message type with a business agreement. To add Receive Message Type Binding, perform the following actions:
- Under Message Configurations Messages tab in the Navigation Panel, click Message Type Binding present below Message Typethe Binding tab.
- Click Add New Binding button in Message Type page. the Add button in the Binding section.

Figure 13: Message Type Binding ID screen - For a binding used by the host to receive messages, select choose the Agreement ID as 'HostReceiveAgreement' (this will be pre-populated as it was created previously).
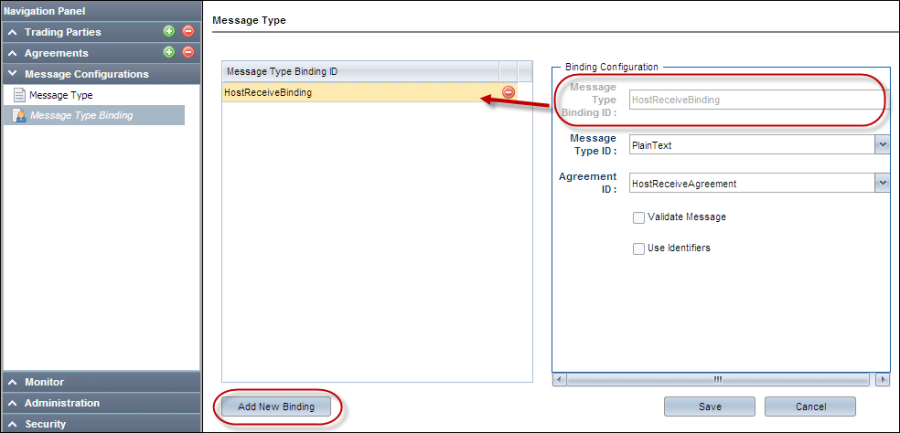
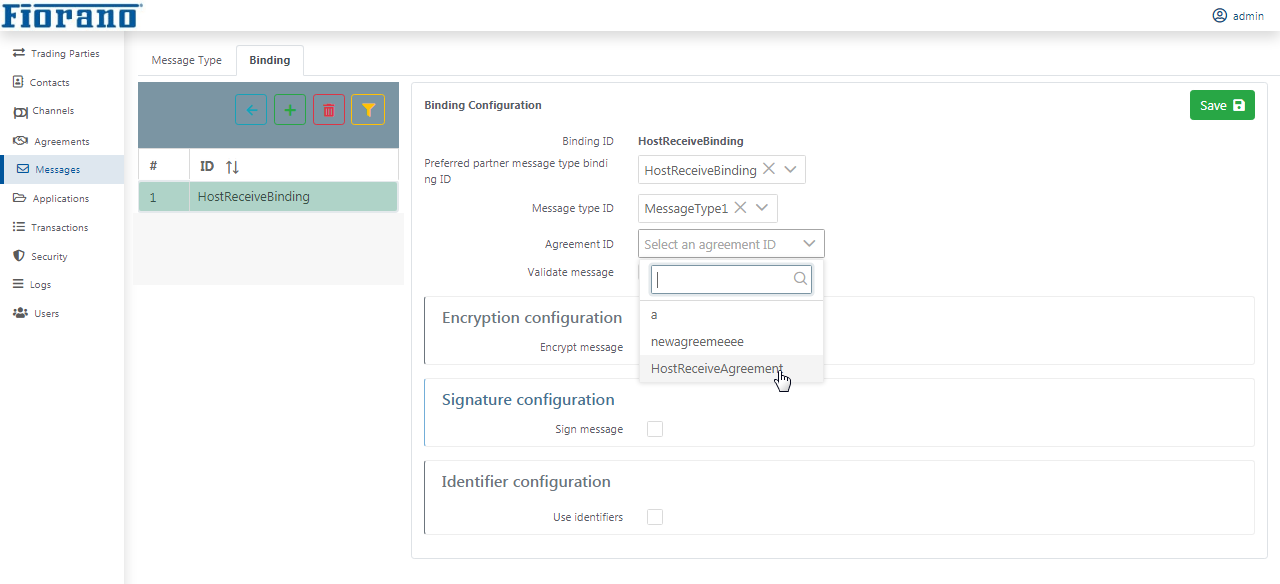
Figure 1214: Message Type Binding ID screenConfiguration